How To Make Clear Tail Lights
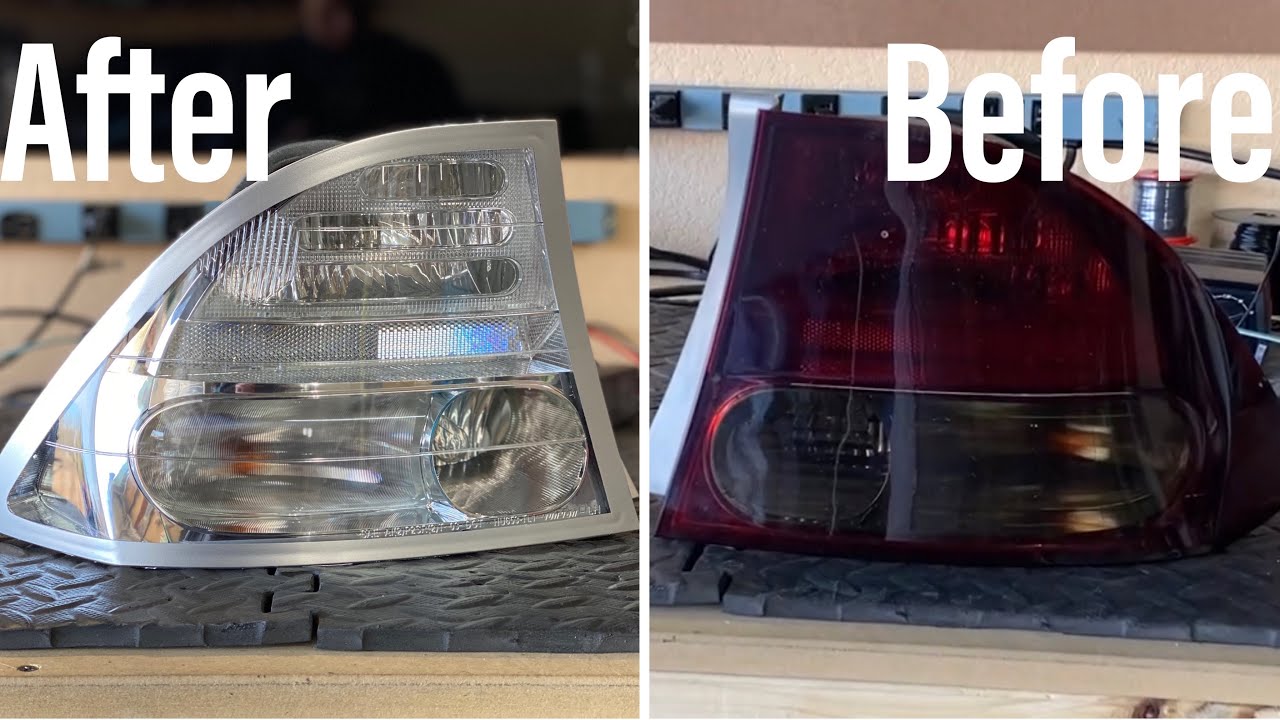
Clear tail lights have become a popular modification for car enthusiasts looking to give their vehicles a customized and modern appearance. Whether you're aiming for a sleek, tuner-inspired aesthetic or simply want to refresh the look of your ride, understanding the process of creating clear tail lights is essential. This article provides a detailed, technical guide on achieving this modification, covering everything from the underlying principles to practical execution and essential precautions.
Background: Tail Light Design and Functionality
Before diving into the process of creating clear tail lights, it's crucial to understand the original design and purpose of these components. Tail lights serve several critical functions:
- Visibility: Ensuring the vehicle is visible to other drivers, especially in low-light conditions.
- Communication: Signaling braking, turning, and reversing intentions.
- Compliance: Meeting legal standards for brightness and color, as dictated by local regulations (DOT, ECE, etc.).
Original tail lights typically use a combination of colored lenses (usually red for running lights and brake lights, amber for turn signals) and reflective surfaces to achieve these functions. The lenses are designed to filter the light emitted by the bulbs, producing the required colors. These lenses are often made from polycarbonate or acrylic, chosen for their durability and light transmission properties. Clear tail lights, on the other hand, involve removing or altering these colored lenses, requiring careful consideration of how the light will be filtered and projected.
Technical Breakdown: How to Make Clear Tail Lights
The process of creating clear tail lights involves several steps, each requiring precision and attention to detail. Here's a breakdown of the typical methods:
Method 1: Lens Replacement
This method involves completely removing the existing colored lens and replacing it with a clear acrylic or polycarbonate lens. This approach is often preferred for its clean and professional results, but requires a high degree of skill and access to specialized tools.
- Disassembly: The first step is to carefully disassemble the tail light assembly. This often involves heating the sealant that holds the lens to the housing. A heat gun (used cautiously!) or an oven (set to a low temperature, around 200°F) can be used to soften the adhesive. It is crucial to avoid overheating the plastic, as this can cause warping or melting.
- Lens Removal: Once the sealant is softened, gently pry the lens away from the housing. Use plastic trim tools to avoid scratching or damaging the plastic. Be patient and work slowly, reapplying heat as needed.
- Lens Fabrication: A new clear lens must be fabricated. This can be done by cutting a sheet of clear acrylic or polycarbonate to the exact shape and dimensions of the original lens. A CNC router is ideal for this, but a jigsaw with a fine-tooth blade can also be used with careful planning and execution. Precise measurements are critical for a proper fit.
- Light Source Modifications: With a clear lens, you must use the appropriate colored bulbs or LEDs to achieve the correct signal colors. Red bulbs for brake lights and running lights, amber bulbs for turn signals. Consider using LEDs for brighter and more efficient lighting.
- Sealing: Once the new lens and bulbs/LEDs are installed, the lens must be securely sealed to the housing. Use a high-quality automotive-grade sealant, such as butyl rubber sealant or silicone sealant. Ensure a watertight seal to prevent moisture from entering the assembly.
- Reassembly: Finally, reassemble the tail light and test all the lights to ensure they are functioning correctly.
Method 2: Tinting and Bulb Replacement
This method involves tinting the original lens with a clear coat mixed with a black or smoked tinting agent to achieve a darker or cleaner look. It's less invasive than lens replacement, but requires careful control of the tinting process to maintain adequate light output and color accuracy.
- Cleaning: Thoroughly clean the tail light lens with a degreasing cleaner and isopropyl alcohol to remove any dirt, grease, or wax. This ensures proper adhesion of the tint.
- Masking: Mask off any areas that you don't want tinted, such as the edges of the lens or any chrome trim. Use high-quality masking tape and ensure a clean, crisp line.
- Tinting: Apply the tint in thin, even coats using an aerosol spray can or a paint sprayer. Follow the manufacturer's instructions for the mixing ratio of clear coat and tinting agent. Allow each coat to dry completely before applying the next. Multiple light coats are always better than one heavy coat to avoid runs and uneven coverage.
- Light Source Modifications: Again, using correct colored bulbs or LED is critical. If a dark tint is applied it may be necessary to increase the bulb's intensity to remain compliant.
- Clear Coating (Optional): Apply a clear coat over the tint to protect it from scratches and UV damage. This will also enhance the gloss and improve the overall appearance.
- Reassembly and Testing: Reassemble the tail light and test all the lights to ensure they are functioning correctly.
Method 3: Using aftermarket Clear Tail Light Housings
This is the simplest, and often safest route, but comes with limitations of style choices. Aftermarket clear tail light housings that already contain the clear lens and properly engineered reflectors, light placement and seals are available from automotive parts distributors for certain models. In this case, the user will just need to replace the tail light assembly, and install the correct bulb and sockets.
Common Issues and Maintenance Concerns
Several common issues can arise during the process of creating clear tail lights:
- Moisture Intrusion: A poor seal between the lens and the housing can allow moisture to enter the tail light assembly, causing condensation and potentially damaging the bulbs or LEDs.
- Reduced Light Output: Tinting the lens can reduce the amount of light emitted, making the tail lights less visible. This is especially concerning for brake lights and turn signals.
- Color Inaccuracy: Incorrect bulb selection or improper tinting can result in colors that do not meet legal requirements. This can lead to fines or even rejection during vehicle inspections.
- UV Damage: Acrylic and polycarbonate can be susceptible to UV damage, causing them to yellow or become brittle over time. This can be mitigated by using UV-resistant materials and applying a UV-protective clear coat.
Maintenance concerns include regularly inspecting the tail lights for cracks, leaks, and discoloration. Replace any damaged bulbs or LEDs promptly. If condensation is present, address the source of the leak and reseal the lens.
Do's and Don'ts / Best Practices
To ensure a successful and safe modification, follow these do's and don'ts:
Do's:
- Do research local regulations regarding tail light colors and brightness requirements.
- Do use high-quality materials and sealants.
- Do test the lights thoroughly after modification to ensure they meet legal requirements.
- Do use appropriate safety equipment, such as gloves and eye protection, when working with chemicals and tools.
- Do take your time and work carefully. Rushing the process can lead to mistakes and substandard results.
- Do consider professional installation if you lack the necessary skills or experience.
- Do use correct colored bulbs or LED's
Don'ts:
- Don't use excessive heat when disassembling the tail light assembly.
- Don't apply tint too heavily. Multiple thin coats are better than one thick coat.
- Don't use household sealants. Only use automotive-grade sealants specifically designed for this purpose.
- Don't neglect to test the lights after modification.
- Don't ignore legal requirements. Ensure your modified tail lights comply with all applicable regulations.
- Don't directly look at the LED without eye protection, its strong light could damage eyes.
Conclusion
Creating clear tail lights can be a rewarding project for car enthusiasts, allowing for a customized and modern appearance. However, it's crucial to approach this modification with a thorough understanding of the technical aspects, legal requirements, and safety precautions involved. The lens replacement method provides the cleanest and most professional results, but requires significant skill and expertise. The tinting method offers a less invasive option, but requires careful control of the tinting process to maintain adequate light output and color accuracy. Purchasing aftermarket assemblies provides the easiest installation, with engineered optics. Regardless of the method chosen, always prioritize safety and compliance with local regulations. If you're unsure about any aspect of the process, seeking professional installation is highly recommended to ensure a safe and legal modification.