How To Make Lime Green Color
So, you want to mix up some eye-catching lime green? It's a color that screams energy and is a favorite for everything from brake calipers to custom trim work. But getting that *perfect* lime green isn't as simple as just throwing yellow and green paint together. It's about understanding color theory, pigment properties, and how to adjust your mix for the desired effect. This article will guide you through the technical aspects of creating lime green, giving you the knowledge to achieve professional-looking results.
Purpose: Achieving Color Perfection
Why dive into the specifics of color mixing? Because generic green just won't cut it! Understanding the nuances of color allows you to:
- Match Existing Colors: If you're touching up paint on a classic car or matching a specific shade for a body kit, you need to be able to replicate colors accurately.
- Customize Your Ride: Lime green comes in a wide variety of shades. Mastering the process allows you to create a truly unique color that reflects your personal style.
- Save Money: Mixing your own paint can be more cost-effective than buying pre-mixed colors, especially if you need a specific shade or a small quantity.
- Understand Paint Properties: Knowing how pigments interact affects the durability, UV resistance, and overall finish of your paint job.
Key Specs and Main Parts: The Color Wheel and Pigments
The foundation of color mixing lies in the color wheel. This wheel organizes colors based on their relationships to each other, and it’s essential for understanding how to achieve the color you want. Lime green, being a tertiary color, requires understanding how primary and secondary colors combine. We will focus primarily on creating lime green using yellow and green, which are key to getting that perfect shade. This sounds simple, but it involves careful selection and manipulation of pigment characteristics.
Understanding Pigments
Pigments are the finely ground particles that give paint its color. Here's what you need to know:
- Hue: The pure color – yellow, green, blue, etc. Choosing the right hue is the starting point. Different yellows and greens will yield different lime green results. A warmer yellow (leaning towards orange) will create a more muted lime green, while a cooler yellow (leaning towards green) will give you a brighter, more vibrant result.
- Value: The lightness or darkness of a color. Adding white to lime green will increase its value (make it lighter), while adding black will decrease its value (make it darker).
- Chroma (Saturation): The intensity or purity of a color. A highly saturated lime green is bright and vivid, while a desaturated lime green is duller and more muted. Adding a touch of gray or brown will decrease the chroma.
- Opacity: The ability of a paint to cover the surface underneath. Some pigments are more transparent than others. For example, some yellow pigments are notoriously transparent, requiring multiple coats for full coverage. This impacts your mixing strategy, potentially leading to unexpected color shifts.
For lime green, you'll typically start with a vibrant yellow and a true green. Look for pigments with good chroma and opacity. Consider using a cadmium yellow for its brightness or a phthalo green for its intense hue, but always check the pigment composition and properties on the paint's label or technical data sheet.
Tools of the Trade
Beyond the paints themselves, you'll need:
- Mixing Sticks: Clean, smooth sticks for stirring the paint thoroughly.
- Mixing Cups/Containers: Use containers with volume markings for accurate measurements.
- Palette Knife or Spatula: For transferring paint and cleaning up spills.
- Test Surface: A piece of scrap metal or cardboard to test the color as you mix.
- Good Lighting: Natural daylight is ideal, but consistent artificial light is also crucial for accurate color assessment.
How It Works: The Lime Green Mixing Process
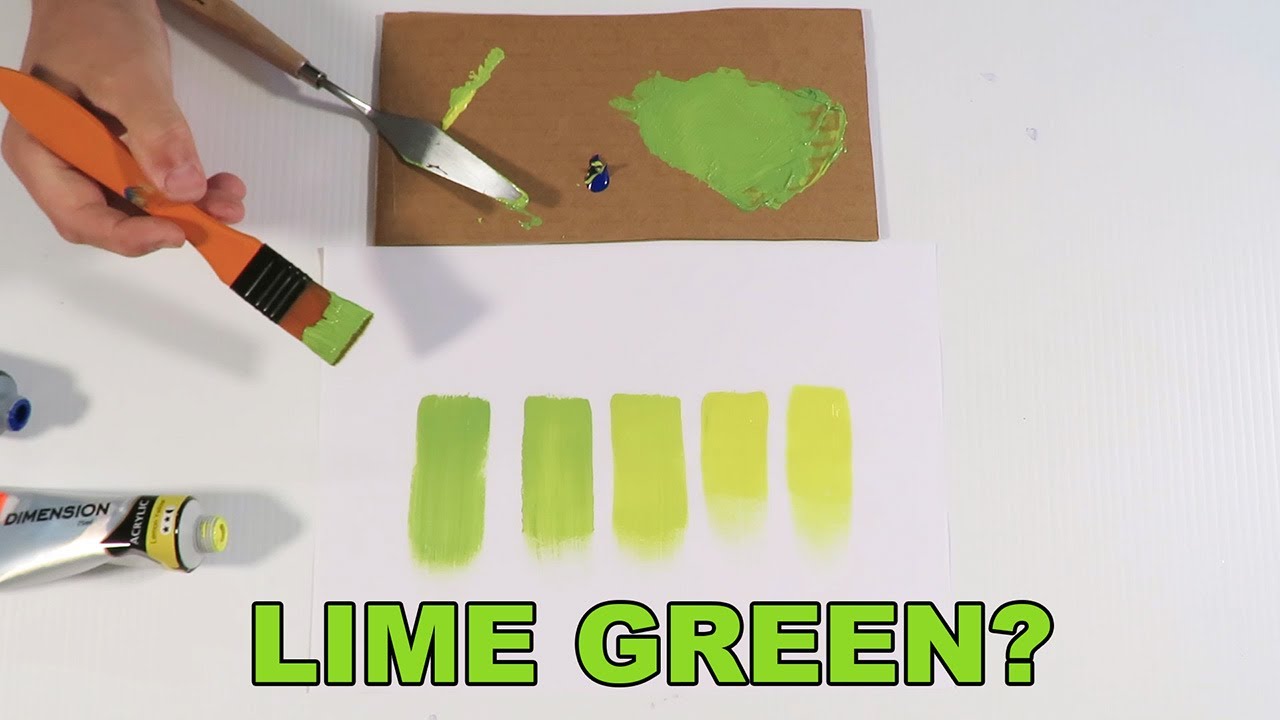
The process involves incrementally adding green to yellow until the desired shade is achieved. Remember, a little goes a long way!
- Start with Yellow: Place a small amount of your chosen yellow paint into your mixing container. This will be your base color.
- Add Green Gradually: Add tiny amounts of green paint, mixing thoroughly after each addition. It’s better to add too little than too much.
- Evaluate the Color: After each addition of green, use your mixing stick to apply a thin layer of the mixture onto your test surface. Let it dry slightly to see the true color.
- Adjust as Needed: If the green is too dominant, add more yellow. If the lime green is too pale, add a touch more green. If it's too bright, consider adding a tiny touch of black, blue, or a complementary color like red or orange to dull it down, but do so extremely sparingly.
- Consider Value: If you need a lighter lime green, add small amounts of white. If you need a darker shade, add small amounts of black. Be aware that adding white can also reduce the chroma, making the color less vibrant.
- Document Your Mix: Once you've achieved the desired color, record the ratios of yellow, green, and any other pigments you used. This will allow you to replicate the mix in the future.
Real-World Use: Troubleshooting Lime Green
Even with the best planning, things can sometimes go wrong. Here are a few common issues and how to address them:
- Lime Green is Too Dull: This usually means the green or yellow you're using isn't vibrant enough. Try using pigments with higher chroma or adding a tiny touch of a brighter color like cadmium yellow.
- Lime Green is Too Dark: This could be due to using a green that's too dark or accidentally adding too much black. Try adding more yellow or white to lighten the mixture.
- Lime Green Looks Muddy: This can happen if you've added too many colors or if the pigments are reacting poorly with each other. Start over with fresh paint and use a simpler mixing strategy. Some pigments, when mixed, will create a chemical reaction that ends up as "mud."
- Color Changes as it Dries: This is common, especially with acrylic paints. Always test the color on a scrap piece and let it dry completely before applying it to your project. The color can change dramatically as the paint dries and the solvents evaporate.
Safety: Handling Paint and Pigments
While mixing paint might seem harmless, it's crucial to take safety precautions:
- Wear Gloves: Protect your skin from direct contact with paint and pigments.
- Work in a Well-Ventilated Area: Many paints contain solvents that can be harmful if inhaled. Ensure proper ventilation to avoid respiratory irritation.
- Wear a Mask: Especially when working with powdered pigments, wear a respirator to avoid inhaling harmful particles.
- Dispose of Waste Properly: Never pour paint down the drain. Dispose of paint waste according to local regulations. Many communities have hazardous waste disposal events where you can safely discard unwanted paints and solvents.
- Read Safety Data Sheets (SDS): Always consult the SDS for each paint product you're using. The SDS provides detailed information on the chemical composition, hazards, and safe handling procedures. This is critical!
Remember, achieving the perfect lime green is a process of experimentation and refinement. Don't be afraid to try different pigments and mixing techniques until you find what works best for you.
We have a detailed color mixing chart and lime green shade guide that you can download for further reference. This guide includes suggested pigment combinations and mixing ratios for various shades of lime green. Download the diagram HERE!