How To Make The Color Beige
So, you're looking to conjure up the elusive color beige, huh? It's not as simple as just mixing a couple of primaries. Think of crafting beige like fine-tuning an engine – it's all about the right proportions, understanding the undertones, and knowing exactly what you're aiming for. This isn't just about slapping some paint together; it's about controlling the chromaticity and luminance to achieve the perfect shade.
Understanding Beige: A Color Formula Breakdown
Why dedicate an entire guide to beige? Because it's a chameleon! Beige forms the base for countless automotive finishes, interior trims, and even custom detailing. Mastering its creation opens doors to matching existing colors, creating custom blends, and even touching up those annoying scratches without a perfectly matched commercial paint. It’s also a fantastic exercise in color theory, allowing you to manipulate hue, saturation, and value with precision.
Key Specs and Main "Ingredients"
Think of this like our parts list. The key to creating beige lies in understanding the core elements and their interactions:
- White Base (TiO2 - Titanium Dioxide): The foundation. This is your base pigment, providing the lightness and opacity. The type of white can affect the final result; a warmer white will lean the beige towards yellow, while a cooler white will give a slightly grayer cast.
- Yellow (Iron Oxide Yellow or similar): The primary colorant. We’re not going for bright yellow, of course. This adds warmth and is the *dominant* colorant in achieving a basic beige.
- Brown (Burnt Umber, Raw Umber, or similar): The modulator. This introduces earthiness and depth. It controls the chroma, pushing the color towards a more muted and natural tone. Different browns have different undertones (red, green, yellow), so choose carefully.
- Black (Carbon Black): The fine-tuner. Used extremely sparingly, black can cool down the tone and reduce the intensity of the yellow. Overdoing it will result in a muddy or gray beige.
- Optional: Red (Iron Oxide Red or similar): For adding warmth and a slightly pinkish undertone. This is for specialized beiges; most require only the elements listed above.
- Medium (Acrylic, Oil, or Automotive Grade): The carrier. This is the vehicle for your pigments. The type of medium will depend on your application (craft projects vs. automotive touch-up). Choose the correct solvent for your medium (e.g., mineral spirits for oil-based paints).
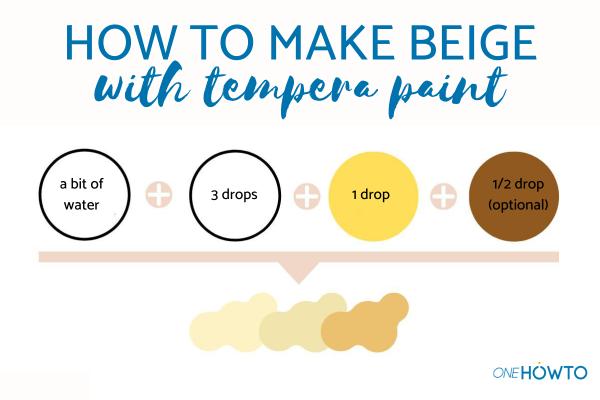
The "Recipe" (Ratios are Approximate – Adjust to Taste!)
This is where it gets interesting. Start with these ratios as a guide, then adjust based on your desired outcome. Think of this as an engine blueprint – it gives you the basic layout, but you'll need to tweak it for performance.
- 80% White Base
- 15% Yellow
- 5% Brown
- < 1% Black (Use with extreme caution!)
- Optional: Smallest dash of Red.
How It Works: The Color Theory Behind Beige
Beige, at its heart, is a desaturated (low chroma) tint of yellow or brown. We achieve this by mixing white with yellow and then "muddying" it with brown or black. The brown acts as a *neutralizer*, reducing the intensity of the yellow and creating a more subdued color. Black further cools the tone and lowers the value (brightness). Remember the color wheel: colors opposite each other (like yellow and violet) tend to neutralize each other.
Think of each pigment as having a spectral power distribution (SPD). The SPD describes the wavelengths of light a pigment reflects. Our goal is to manipulate the SPD to create a color that our eyes perceive as beige. The white provides broad reflection across the visible spectrum, while the yellow and brown selectively absorb certain wavelengths. The black absorbs almost all wavelengths, reducing overall brightness and intensity.
Real-World Use: Beige Troubleshooting & Customization
Okay, you've mixed your first batch of beige, but it's not quite right. Here's how to troubleshoot:
- Too Yellow: Add a tiny amount of brown or black. Start with the brown, as black can quickly overpower the color.
- Too Brown: Add more white. If it's still too brown, add a tiny touch of yellow.
- Too Gray/Cool: Add a touch of yellow or a very small amount of red. A warmer white base can also help.
- Not Light Enough: Add more white.
- Looks Muddy/Dull: You've probably added too much black or brown. There is not much you can do, other than starting over. You might save it by adding a lot of white and then start the color adjustment from a much lighter tone.
Matching Existing Colors: This is where the artistry comes in. Take a small sample of the target color (e.g., the interior trim you're trying to match). Mix your beige in small batches, comparing it to the sample under *consistent lighting*. Natural daylight is best, but avoid direct sunlight. Use a palette knife or similar tool to apply a small amount of your mixed color next to the sample. Let it dry completely before making your final judgment, as colors often shift slightly as they dry.
Safety Considerations: Pigments and Media
Just like working on your car, safety is paramount:
- Pigment Dust: Some pigments, especially those used in older paints, can be toxic if inhaled. Always wear a respirator when working with powdered pigments, even in small quantities.
- Solvents: Many paint media contain volatile organic compounds (VOCs) that can be harmful if inhaled. Work in a well-ventilated area and wear a respirator if necessary. Avoid prolonged skin contact with solvents.
- Eye Protection: Wear safety glasses to protect your eyes from splashes and splatters.
- Material Data Safety Sheets (MSDS): Always consult the MSDS for each pigment and medium you are using. These sheets provide detailed information on potential hazards and safety precautions.
Important Notes
Consistency is Key: Mix your paint thoroughly to ensure the pigments are evenly dispersed. A paint mixer can be a valuable tool for larger batches.
Record Your Ratios: Keep track of the ratios you use for each batch of beige. This will make it easier to reproduce the color in the future.
Experiment: Don't be afraid to experiment with different pigments and ratios to create unique shades of beige. The possibilities are endless!
Mastering the art of creating beige is a valuable skill for any DIYer or automotive enthusiast. It allows you to customize your projects, match existing colors, and save money on expensive commercial paints. So, grab your pigments, get mixing, and unlock the versatility of this subtle but essential color.
Remember, we have a comprehensive digital diagram detailing various beige color formulas and mixing techniques available for download. Contact us for access to this valuable resource.