How To Paint Your Own Car
So, you're thinking about painting your car yourself? Awesome! It's a big project, but totally achievable with the right prep work, understanding, and a healthy dose of patience. This guide isn't about rattle-can touch-ups; we're talking about a proper, professional-looking respray. We'll break down the process step-by-step, covering everything from surface prep to applying that final clear coat. Let's get started!
Purpose: Why DIY Car Painting Matters
Why bother painting your car yourself? Several reasons. First, cost savings. A professional paint job can set you back thousands. Doing it yourself significantly reduces that, especially if you already have some tools. Second, customization. Want a unique color or a specific finish? You're in control. Third, skill development. Learning to paint a car is a valuable skill for any car enthusiast or DIY mechanic. It opens doors to restoring classic vehicles, customizing your ride, and generally understanding automotive finishes. Finally, satisfaction. There's nothing quite like seeing the results of your hard work, transforming a tired-looking car into a head-turner.
Key Specs and Main Parts
Before we dive into the "how," let's look at the essential components and materials. Think of it like an exploded view of the painting process:
- Surface Preparation: This is the single most crucial step. You need a perfectly smooth, clean, and properly prepared surface for the paint to adhere correctly. This includes:
- Cleaning: Removing dirt, grease, wax, and contaminants.
- Sanding: Leveling imperfections, removing rust, and creating a "key" for the primer. Different grit sandpaper is required for different stages.
- Body Filler (Bondo): Addressing dents and imperfections that sanding can't fix.
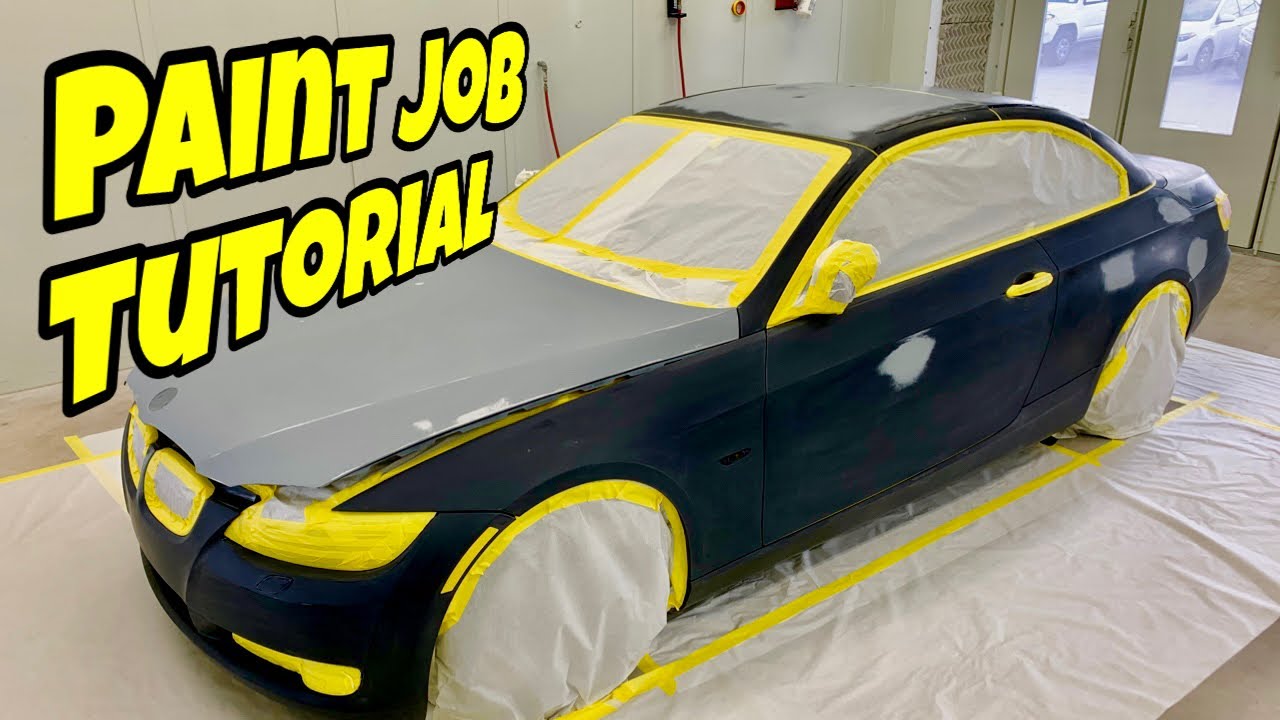
- Masking: Protecting areas you don't want to paint (windows, trim, etc.).
- Primer: The foundation of your paint job. It provides a uniform surface for the color coat to adhere to, fills minor imperfections, and helps prevent corrosion. Types include:
- Etch Primer: Used on bare metal to promote adhesion.
- Filler Primer: Used to fill minor imperfections after body work.
- Sealer: Applied before the color coat to ensure proper adhesion and color consistency.
- Base Coat (Color Coat): This is the actual color of your car. Modern paints are typically base coat/clear coat systems.
- Single-Stage Paints: Older paints (like enamels and lacquers) that contain both color and clear in one application. Not commonly used for modern cars.
- Two-Stage Paints: A separate base coat for color and a clear coat for protection and gloss. This is the standard for modern vehicles.
- Clear Coat: A protective layer that adds gloss, depth, and UV protection to the base coat. This is essential for modern automotive finishes.
- Paint Gun (Spray Gun): The tool used to apply the paint. Types include:
- HVLP (High Volume Low Pressure): Most common for DIYers. Transfers more paint to the surface with less overspray.
- LVLP (Low Volume Low Pressure): Similar to HVLP, but uses even less air pressure.
- Airless: Not recommended for automotive painting due to high pressure and potential for uneven application.
- Air Compressor: Provides the compressed air needed to power the paint gun. Needs to have sufficient CFM (cubic feet per minute) to operate your spray gun.
- Respirator: Absolutely essential for protecting your lungs from harmful paint fumes and isocyanates.
- Paint Thinner/Reducer: Used to thin the paint to the correct viscosity for spraying.
- Mixing Cups and Sticks: For accurately mixing paint, reducer, and hardener.
- Tack Cloth: Used to remove dust and debris from the surface before painting.
How It Works: The Painting Process
Here's a simplified breakdown of the painting process:
- Preparation is King: Remove all trim, lights, and anything else that isn't getting painted. Thoroughly clean the car with soap and water, then degrease it. Sand the existing paint surface. If there are dents or rust, address them with body filler and sanding. Feather the edges of the repaired areas to blend smoothly with the surrounding paint. Mask off areas you don't want to paint.
- Primer Application: Apply 2-3 coats of primer, allowing each coat to dry according to the manufacturer's instructions. Sand the primer smooth with fine-grit sandpaper (e.g., 400-grit, then 600-grit) to remove any imperfections.
- Base Coat Application: Apply 2-3 coats of base coat, allowing each coat to dry according to the manufacturer's instructions. Ensure even coverage and avoid runs or drips.
- Clear Coat Application: Apply 2-3 coats of clear coat, allowing each coat to dry according to the manufacturer's instructions. This is where you'll achieve that glossy, professional look. Practice your technique to avoid orange peel (a textured surface) or runs.
- Wet Sanding and Polishing (Optional): If you have any imperfections in the clear coat (orange peel, dust nibs), you can wet sand with very fine-grit sandpaper (e.g., 2000-grit, 3000-grit) and then polish the surface to a mirror finish.
- Reassembly: Once the paint is fully cured (check the paint manufacturer's instructions), carefully remove the masking and reassemble the trim, lights, and other components.
Real-World Use: Basic Troubleshooting Tips
Things don't always go according to plan. Here are some common issues and how to address them:
- Runs and Sags: Too much paint applied in one area. Let it dry completely, sand it down, and repaint. Apply thinner coats.
- Orange Peel: A textured surface due to improper spraying technique or paint viscosity. Wet sand and polish. Adjust your spray gun settings and practice your technique.
- Fish Eyes: Small craters in the paint caused by contaminants on the surface. Thoroughly clean and degrease the surface before painting. Use a wax and grease remover.
- Poor Adhesion: Paint peeling or flaking off. Insufficient surface preparation. Ensure the surface is properly sanded and primed. Use the correct primer for the substrate (e.g., etch primer for bare metal).
- Color Mismatch: The new paint doesn't match the existing paint. This can be due to incorrect paint mixing, fading of the original paint, or variations in paint batches. Have the paint custom-matched to your car's paint code and blend the new paint into the surrounding areas.
Safety: Highlighting Risky Components
Painting cars involves hazardous materials and equipment. Here's what to watch out for:
- Paint Fumes and Isocyanates: Extremely dangerous. Always wear a NIOSH-approved respirator with organic vapor cartridges. Ensure adequate ventilation in your work area.
- Flammable Materials: Paint, thinner, and other solvents are highly flammable. Keep them away from open flames and sparks. Store them in properly labeled containers.
- Compressed Air: Compressed air can be dangerous if not handled properly. Ensure your air compressor is in good working order and that all connections are secure. Wear eye protection when working with compressed air.
- Electrical Hazards: If you're using power tools, ensure they are properly grounded and that you're not working in a wet environment.
- Sharp Objects: Sandpaper and body filler tools can be sharp. Wear gloves to protect your hands.
This guide provides a comprehensive overview of how to paint your car yourself. Remember that practice makes perfect. Start with smaller projects to hone your skills before tackling the entire car. Invest in good quality tools and materials, and always prioritize safety. With careful planning, diligent preparation, and a steady hand, you can achieve a professional-looking paint job that you'll be proud of.
We have a detailed diagram available for download. It outlines the entire painting process visually, including specific sandpaper grits, paint mixing ratios, and spray gun settings. Download the diagram here.