How To Pull Relay From Fuse Box
Removing relays from your vehicle's fuse box is a seemingly simple task, but understanding the right techniques and potential pitfalls can save you time, frustration, and even prevent damage to your electrical system. This article provides a detailed guide on how to safely and effectively remove relays, covering the essential background knowledge, step-by-step instructions, and best practices for intermediate car owners and DIY mechanics.
Understanding Relays and Their Role
What is a Relay?
A relay is essentially an electrically operated switch. It allows a low-current circuit to control a high-current circuit. Think of it as a gatekeeper: a small electrical signal activates the relay, which then closes (or opens, depending on the type of relay) a separate, more powerful circuit. This is crucial in automotive applications because many components require significant power, while the control signals from the car's computer (ECU) or switches are relatively weak.
Why Are Relays Used in Cars?
Relays serve several vital functions in a vehicle's electrical system:
- Isolation: They isolate sensitive electronic components from high-voltage or high-current circuits, protecting them from damage.
- Amplification: As mentioned earlier, they allow low-current signals to control high-current devices. For example, the signal from your headlight switch activates a relay that then supplies power to the headlights.
- Switching: They provide a convenient way to switch circuits on and off, often controlled by the vehicle's ECU or other control modules.
- Safety: Relays can be used in safety circuits to cut off power in the event of a fault or emergency.
Typical Applications
You'll find relays controlling a wide range of systems in your car, including:
- Headlights and taillights
- Fuel pump
- Starter motor
- Air conditioning compressor
- Horn
- Windshield wipers
- Power windows and door locks
- Cooling fan
Technical Breakdown: How Relays Work
A typical automotive relay consists of several key components:
- Coil: A coil of wire that creates an electromagnetic field when current flows through it.
- Armature: A movable metal part that is attracted to the electromagnetic field generated by the coil.
- Contacts: Electrical contacts that open or close when the armature moves. There are typically two types of contacts:
- Normally Open (NO): The circuit is open (disconnected) when the relay is not energized. When the coil is energized, the contacts close, completing the circuit.
- Normally Closed (NC): The circuit is closed (connected) when the relay is not energized. When the coil is energized, the contacts open, breaking the circuit.
- Common Terminal (COM): A terminal that is connected to either the NO or NC contact, depending on whether the relay is energized.
When a small current is applied to the coil, the electromagnetic field pulls the armature, which in turn moves the contacts. This either closes the circuit (for NO relays) or opens the circuit (for NC relays), allowing the high-current device to operate.
Relay Pinout Conventions
Understanding the standard relay pinout is crucial for troubleshooting and testing. While specific pin numbers may vary slightly between manufacturers, the general convention is as follows:
- 85: Coil negative (-) terminal
- 86: Coil positive (+) terminal
- 30: Common terminal (COM)
- 87: Normally Open (NO) terminal
- 87a: Normally Closed (NC) terminal (not always present)
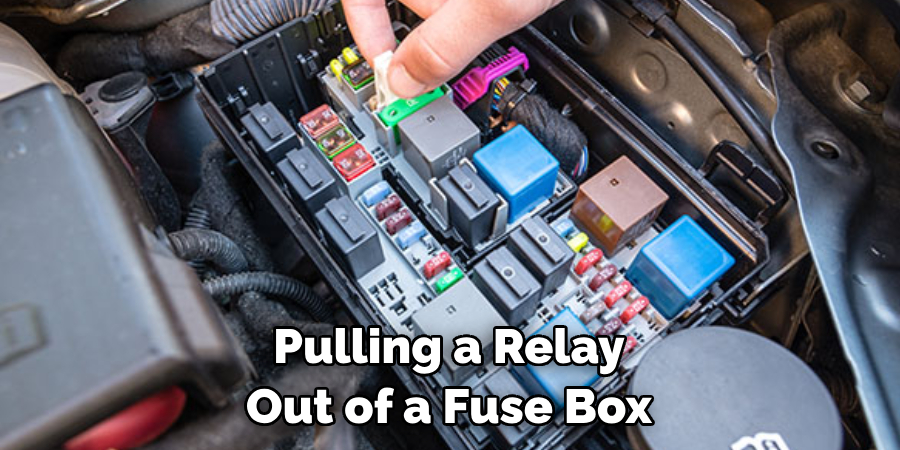
Removing a Relay: Step-by-Step Guide
Now let's get to the practical part. Here's a step-by-step guide on how to safely remove a relay from your fuse box:
- Safety First: Always disconnect the negative terminal of your car battery before working on any electrical components. This will prevent accidental shorts and potential damage to your vehicle's electrical system.
- Locate the Fuse Box: Refer to your vehicle's owner's manual to find the location of the fuse box. Most cars have at least one fuse box under the hood and another inside the cabin.
- Identify the Relay: Consult your owner's manual or a wiring diagram to identify the specific relay you need to remove. The fuse box cover usually has a diagram showing the location and function of each relay and fuse.
- Use a Relay Puller (Recommended): A relay puller is a specialized tool designed to grip the relay firmly and pull it straight out. This is the safest and most efficient way to remove a relay. If you don't have a relay puller, you can often find them at auto parts stores for a reasonable price.
- Alternative Method (If No Puller): If you don't have a relay puller, you can try using a pair of needle-nose pliers or a small flathead screwdriver. Be extremely careful not to damage the relay or the fuse box.
- Needle-Nose Pliers: Grip the sides of the relay firmly with the pliers and gently rock it back and forth while pulling upwards.
- Flathead Screwdriver: Carefully insert the screwdriver blade under the edge of the relay and gently pry it upwards. Work your way around the relay, prying it up a little at a time. Do not force it!
- Pull Straight Up: It's crucial to pull the relay straight up out of the socket. Twisting or rocking the relay excessively can damage the terminals or the socket.
- Inspect the Relay and Socket: Once the relay is removed, inspect the terminals for corrosion or damage. Also, check the socket for any signs of damage or debris. Clean the terminals with electrical contact cleaner if necessary.
- Reinstallation (If Applicable): If you are reinstalling the same relay, make sure it is oriented correctly and push it firmly into the socket until it is fully seated.
- Reconnect the Battery: Once you have finished working on the electrical system, reconnect the negative terminal of your car battery.
Common Issues and Maintenance Concerns
- Corrosion: Corrosion on the relay terminals or in the socket can cause poor connections and intermittent failures. Regularly inspect the relays and sockets for corrosion, especially in vehicles that are exposed to harsh weather conditions. Clean any corrosion with electrical contact cleaner and a small brush.
- Loose Connections: Vibrations and temperature changes can cause relay terminals to loosen over time. Ensure the relays are firmly seated in their sockets. If you suspect a loose connection, you can try gently bending the relay terminals to improve contact.
- Overheating: Overloading a relay can cause it to overheat and fail. Make sure you are using the correct relay for the application. Using a relay with a lower current rating than required can lead to premature failure and potentially damage the circuit.
- Relay Failure: Relays can fail due to various reasons, including wear and tear, corrosion, and overheating. If you suspect a relay is faulty, you can test it using a multimeter. You can also try swapping it with a known good relay to see if the problem is resolved.
Do's and Don'ts / Best Practices
Do's:
- Do disconnect the battery before working on any electrical components.
- Do use a relay puller whenever possible.
- Do pull the relay straight up.
- Do inspect the relay and socket for corrosion or damage.
- Do use the correct relay for the application.
- Do refer to your vehicle's owner's manual or a wiring diagram for accurate information.
Don'ts:
- Don't force the relay out of the socket.
- Don't twist or rock the relay excessively.
- Don't use a screwdriver to pry the relay out if you can avoid it. (Risk of damage is high).
- Don't use a relay with a lower current rating than required.
- Don't ignore signs of corrosion or damage.
- Don't work on electrical systems if you are not comfortable or experienced.
Conclusion
Safely removing relays from your fuse box requires a basic understanding of relay function, careful technique, and the right tools. While a simple task, neglecting proper procedures can lead to costly repairs. Investing in a relay puller and following the steps outlined in this article will ensure a smooth and safe relay removal process. If you're unsure about any aspect of the procedure, it's always best to consult a qualified mechanic. By adopting these best practices, you can confidently maintain your vehicle's electrical system and address relay-related issues effectively. Always prioritize safety and double-check your work before reconnecting the battery.