How To Put Freon In A Nissan Altima
Many experienced DIYers find themselves tackling AC recharge projects, especially during the hot summer months. Recharging the AC in a Nissan Altima, specifically, is a task within reach for those with some mechanical experience and the right tools. While it's tempting to view this as a simple "plug and play" procedure, understanding the AC system's intricacies, safety precautions, and potential problems is crucial for a successful and long-lasting repair. This article will guide you through the process, providing the technical knowledge and practical advice you need.
Background of the Altima AC System
The AC system in your Nissan Altima, like most modern automotive AC systems, is a closed-loop refrigerant cycle designed to cool the cabin air. It operates on the principles of thermodynamics, specifically heat transfer and phase change. Understanding the main components is key to troubleshooting and maintaining the system:
- Compressor: The heart of the system, the compressor pressurizes the refrigerant (typically R-134a or the newer R-1234yf, though Altima model years will primarily use R-134a) into a high-pressure, high-temperature gas. It's driven by a belt connected to the engine crankshaft.
- Condenser: Located in front of the radiator, the condenser cools the high-pressure refrigerant, causing it to condense into a high-pressure liquid. Airflow from the engine fan and vehicle movement aids this process.
- Receiver/Drier (or Accumulator): This component acts as a filter, removing moisture and debris from the refrigerant. It also stores liquid refrigerant. In some systems, you'll find an accumulator on the low-pressure side instead.
- Expansion Valve (or Orifice Tube): This metering device reduces the pressure of the liquid refrigerant before it enters the evaporator. This pressure drop causes the refrigerant to rapidly expand and vaporize.
- Evaporator: Located inside the cabin, usually behind the dashboard, the evaporator is where the refrigerant absorbs heat from the cabin air, cooling the air before it's blown through the vents. As the refrigerant absorbs heat, it turns back into a low-pressure gas.
The refrigerant, constantly cycling through these components, is the lifeblood of the system. Leaks, blockages, or component failures can disrupt this cycle, leading to reduced cooling performance or complete system failure.
Technical Breakdown: How Recharging Works
Recharging the AC essentially means replenishing the refrigerant that has leaked out of the system. However, it's crucial to identify why the refrigerant leaked in the first place. Simply adding more refrigerant to a system with a significant leak is a temporary fix and can potentially damage components or release harmful refrigerant into the atmosphere.
Here's a step-by-step guide to recharging your Altima's AC system:
- Safety First: Wear safety glasses and gloves. Refrigerant can cause frostbite if it comes into contact with skin or eyes. Work in a well-ventilated area.
- Gather Your Supplies:
- Refrigerant: Use the correct type and amount specified in your owner's manual or on a sticker under the hood. Typically, older Altimas use R-134a. Never mix refrigerants.
- Recharge Kit: This usually includes a pressure gauge, hose, and refrigerant can tap.
- Manifold Gauge Set (Optional but Recommended): For more accurate pressure readings and diagnosis.
- Leak Detector (Optional but Recommended): A UV dye and light, or an electronic leak detector, can help pinpoint leaks.
- Vacuum Pump (Optional but Highly Recommended): To evacuate moisture and air from the system.
- Wrench Set: For accessing service ports.
- Locate the Service Ports: The Altima has two service ports: a high-pressure port (smaller) and a low-pressure port (larger). They are usually located near the compressor and/or accumulator. Consult your service manual for the exact location on your specific model year.
- Check System Pressure (Initial Reading): Connect the recharge kit's gauge to the low-pressure service port. Do not force the connection. The gauge will indicate the current pressure in the system. A reading below the recommended range indicates a low refrigerant level. Refer to a pressure-temperature chart for R-134a (easily found online) to interpret the pressure based on the ambient temperature.
- Vacuum the System (If Possible): If you have a vacuum pump, connect it to both the high- and low-pressure service ports using a manifold gauge set. Evacuate the system for at least 30-60 minutes. This removes moisture and air, improving cooling performance and preventing corrosion. This step is critical if the system has been opened for repairs. After evacuating, close the valves and monitor the vacuum gauge for 30 minutes. If the vacuum holds, the system is likely sealed. If the vacuum drops, you have a leak.
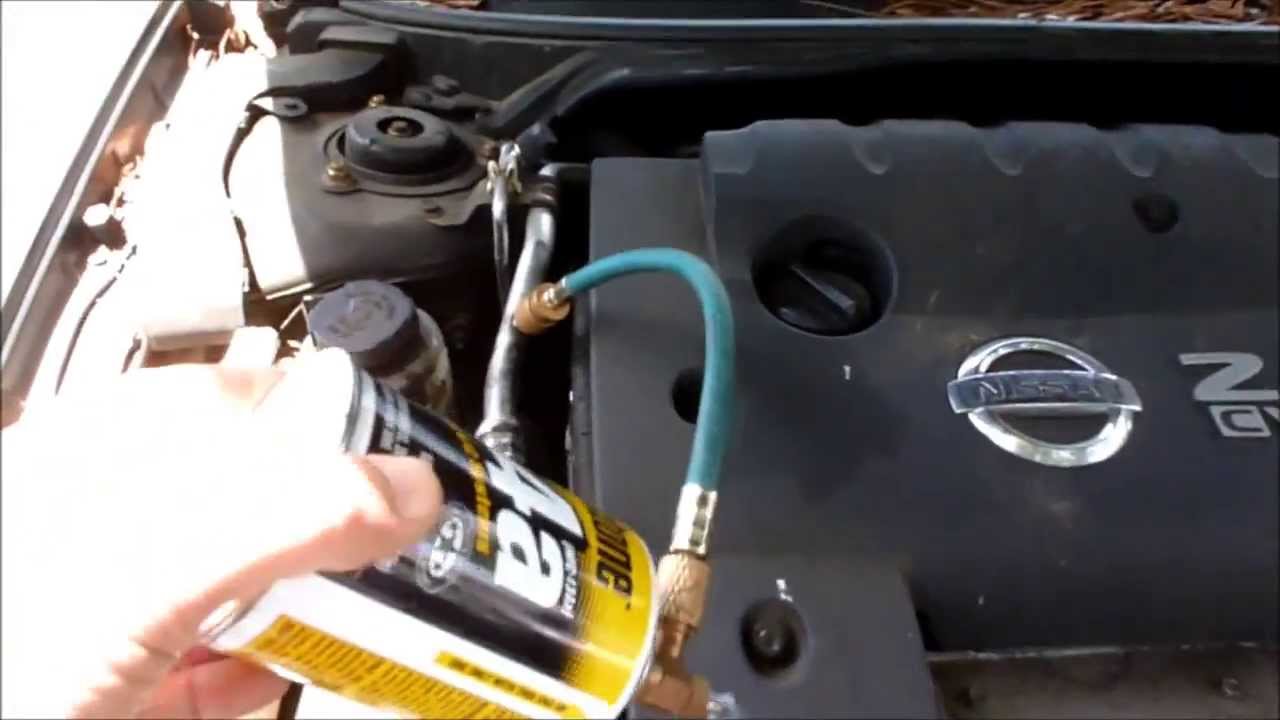
- Recharge the System:
- Attach the refrigerant can to the recharge kit.
- Purge the air from the recharge hose by briefly pressing the can tap.
- With the engine running and the AC on max, connect the recharge hose to the low-pressure service port.
- Slowly add refrigerant to the system, monitoring the pressure gauge. Do not overcharge the system. Refer to the pressure-temperature chart and your vehicle's specifications for the correct pressure range.
- Shake the refrigerant can periodically to ensure liquid refrigerant enters the system.
- If using a manifold gauge set, monitor both the high- and low-side pressures.
- Monitor Cooling Performance: After recharging, check the air temperature at the vents. It should be significantly cooler than the ambient temperature.
- Check for Leaks: Use a leak detector (UV dye and light or electronic detector) to check for leaks around the compressor, condenser, evaporator, and all connections.
Common Issues and Maintenance Concerns
- Refrigerant Leaks: The most common issue. They can occur at O-rings, seals, hoses, or component housings. Using a leak detector is essential for finding them.
- Compressor Failure: Compressors can fail due to age, lack of lubrication (caused by low refrigerant), or internal damage.
- Condenser Blockage: Debris and corrosion can block the condenser, reducing its efficiency.
- Expansion Valve/Orifice Tube Blockage: These metering devices can become clogged, restricting refrigerant flow.
- Electrical Problems: Issues with the compressor clutch, fan motors, or pressure switches can prevent the AC system from operating.
- Moisture Contamination: Moisture in the system can react with the refrigerant and oil, forming acids that corrode components. This is why vacuuming the system is crucial.
Regular AC maintenance includes:
- Visually inspecting the system for leaks or damage.
- Checking the compressor belt for wear and tension.
- Cleaning the condenser fins to ensure proper airflow.
- Periodically running the AC, even in winter, to circulate the refrigerant and oil.
Do's and Don'ts / Best Practices
Do's:
- Use the Correct Refrigerant: Refer to your owner's manual or the sticker under the hood for the correct type.
- Wear Safety Gear: Protect your eyes and skin.
- Work in a Well-Ventilated Area: Refrigerant fumes can be harmful.
- Vacuum the System: This is crucial for removing moisture and air.
- Monitor Pressure Gauges: Avoid overcharging the system.
- Check for Leaks: After recharging, use a leak detector to identify any leaks.
- Consult a Professional: If you're unsure about any step, seek professional help.
Don'ts:
- Overcharge the System: This can damage the compressor and reduce cooling performance.
- Mix Refrigerants: This can create a dangerous and corrosive mixture.
- Release Refrigerant into the Atmosphere: This is illegal and environmentally harmful.
- Force Connections: Use the correct fittings and avoid damaging the service ports.
- Ignore Leaks: Find and repair leaks before recharging the system.
- Attempt Repairs Without Proper Knowledge: AC systems contain high-pressure components and potentially hazardous chemicals.
Conclusion
Recharging your Nissan Altima's AC system is a manageable task for experienced DIYers. By understanding the system's operation, following the proper procedures, and prioritizing safety, you can potentially save money and enjoy a cooler ride. However, it's important to remember that this is not a simple "top-up" procedure. If you suspect a significant leak or if the system has been opened for repairs, vacuuming the system is essential. Furthermore, if you are uncomfortable with any aspect of the process, or if you are unable to locate and repair leaks, it is always best to consult a qualified automotive AC technician. Attempting repairs without the proper knowledge and equipment can be dangerous and may result in further damage to your vehicle.