How To Recharge A/c In Car
Okay, let's talk about recharging your car's air conditioning system. This isn't a "just point and spray" kind of task, especially if you want it done right and avoid causing damage. This guide is geared towards those of you with some mechanical experience who are looking to maintain or repair your AC system yourself. We’ll cover the core concepts, necessary components, and best practices to ensure a successful recharge. We also have a detailed system diagram available for download to assist you.
Purpose of Understanding AC Recharge
Why bother understanding the AC recharge process in detail? Simply put, it's crucial for several reasons:
- Cost Savings: Diagnosing and performing a recharge yourself can save you a significant amount compared to professional service fees.
- Prevent Further Damage: Understanding the system helps you identify and address underlying issues, preventing costly repairs down the line. Low refrigerant is often a symptom of a leak, and simply refilling without fixing the leak will lead to the same problem again.
- Proper Maintenance: Regular checks and maintenance, including refrigerant levels, will ensure your AC system operates efficiently and prolong its lifespan.
- Informed Decision-Making: When dealing with professional mechanics, you'll be better equipped to understand their recommendations and assess the validity of their diagnoses.
Having a solid grasp of your car's AC system empowers you to make informed decisions, troubleshoot problems effectively, and potentially save money. Plus, it's just plain satisfying to fix something yourself!
Key Specs and Main Parts of an Automotive AC System
Before diving into the recharge process, let's familiarize ourselves with the main components and their functions:
- Compressor: The heart of the system. It compresses the refrigerant gas, increasing its pressure and temperature. It is driven by the engine via a belt. A failing compressor is a major repair.
- Condenser: Located at the front of the vehicle, often near the radiator. The condenser dissipates heat from the high-pressure, high-temperature refrigerant gas, turning it into a high-pressure liquid.
- Receiver/Drier (or Accumulator): This component filters debris and removes moisture from the refrigerant. Moisture in the system can cause corrosion and freeze up the expansion valve. Replacing this is highly recommended whenever the system is opened.
- Expansion Valve (or Orifice Tube): This regulates the flow of refrigerant into the evaporator. It causes a pressure drop, which allows the refrigerant to expand and cool rapidly.
- Evaporator: Located inside the vehicle, usually behind the dashboard. The cold, low-pressure refrigerant absorbs heat from the air passing over the evaporator coils, cooling the cabin.
- Refrigerant: The working fluid that cycles through the system, absorbing and releasing heat. Common types include R-134a (more common in older vehicles) and R-1234yf (more common in newer vehicles). Mixing refrigerants is extremely dangerous and illegal.
- Pressure Switches: These switches monitor the pressure within the system. They can shut off the compressor if the pressure is too high or too low, protecting the system from damage.
- Service Ports (High and Low Side): These are access points for connecting gauges and charging equipment to the system. They are typically capped to prevent leaks.
Key Specifications you should be aware of are:
- Refrigerant Type and Quantity: This information is usually found on a sticker under the hood or in the owner's manual. Using the wrong refrigerant or overcharging/undercharging the system can lead to performance issues or damage.
- Operating Pressures (High and Low Side): These pressures vary depending on ambient temperature and engine speed. Understanding these ranges is crucial for diagnosing problems.
Understanding AC System Diagram Symbols
A typical AC system diagram uses standardized symbols to represent different components and connections. Here's a breakdown of common symbols:
- Lines:
- Solid Lines: Indicate refrigerant lines.
- Dashed Lines: May represent electrical wiring or control lines.
- Arrows: Show the direction of refrigerant flow.
- Components:
- Compressor: Often depicted as a stylized pump or cylinder.
- Condenser: Usually shown as a series of wavy lines representing the cooling fins.
- Receiver/Drier or Accumulator: Represented as a cylinder with a filter symbol inside.
- Expansion Valve: Depicted as a valve with a variable opening.
- Evaporator: Similar to the condenser, but smaller and located inside the vehicle.
- Colors: While not always standardized, colors can sometimes indicate pressure levels or fluid types. Refer to the specific diagram's legend for clarification.
How an Automotive AC System Works
The AC system operates on the principle of heat transfer through refrigerant phase changes. Here's a simplified breakdown of the cycle:
- Compression: The compressor compresses the low-pressure, low-temperature refrigerant gas into a high-pressure, high-temperature gas.
- Condensation: The high-pressure, high-temperature gas flows to the condenser, where it releases heat to the outside air and condenses into a high-pressure, warm liquid.
- Metering: The high-pressure, warm liquid flows through the receiver/drier, where moisture and contaminants are removed. Then it passes through the expansion valve (or orifice tube), which reduces the pressure and regulates the flow of refrigerant into the evaporator. This pressure drop causes the refrigerant to cool dramatically.
- Evaporation: The low-pressure, cold refrigerant enters the evaporator, where it absorbs heat from the air flowing through the car's vents. This cools the air and turns the refrigerant back into a low-pressure, low-temperature gas.
- Cycle Repeat: The low-pressure, low-temperature gas returns to the compressor, and the cycle begins again.
The cooling process relies heavily on the refrigerant's ability to absorb and release heat as it changes between liquid and gas states. Any disruption to this cycle, such as low refrigerant levels or a malfunctioning component, can reduce the system's efficiency or cause it to fail altogether.
Real-World Use: Basic Troubleshooting and Recharge Tips
Before recharging your AC, it's crucial to diagnose the underlying problem. Common issues include:
- Low Refrigerant: The most common cause. Use gauges to verify the pressure.
- Leaks: Use a leak detector or UV dye to find leaks. Common leak points include hose connections, the compressor shaft seal, and the condenser.
- Compressor Failure: A failing compressor may not engage, produce weak pressures, or make unusual noises.
- Blocked Expansion Valve or Orifice Tube: This can cause low cooling performance and high head pressure.
- Condenser or Evaporator Issues: Damage or blockage can reduce heat transfer.
Recharge Procedure (Simplified):
- Safety First: Wear eye protection and gloves. Refrigerant can cause frostbite.
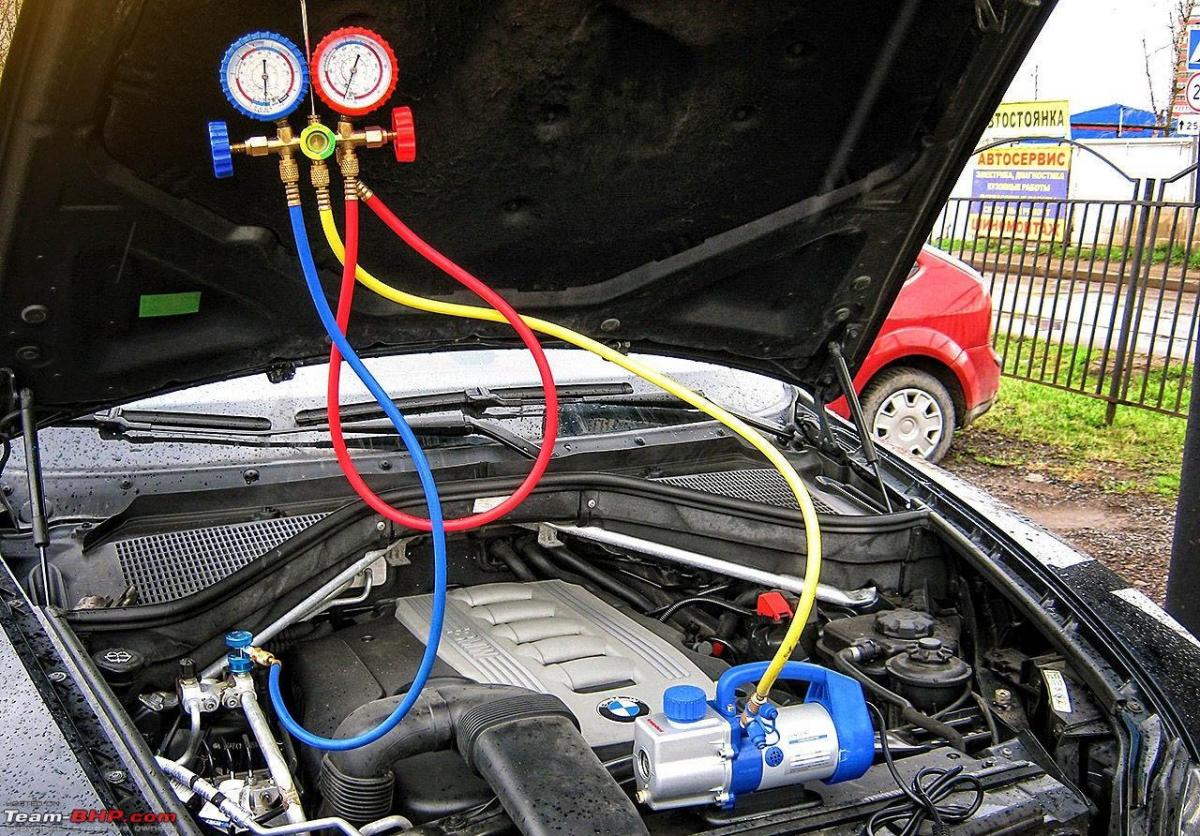
- Connect Gauges: Attach the high-side and low-side hoses to the appropriate service ports.
- Check Pressures: Observe the pressures on the gauges to diagnose the system.
- Evacuate (Recommended): Use a vacuum pump to remove air and moisture from the system. This is critical for optimal performance and longevity.
- Recharge: Slowly add refrigerant to the system, monitoring the pressures. Refer to the vehicle's specifications for the correct amount. It's essential to add refrigerant slowly and carefully. Overcharging can damage the compressor.
- Monitor Performance: After recharging, monitor the system's performance and check for leaks.
Troubleshooting Tips:
- No Cooling: Check refrigerant levels, compressor clutch engagement, and fuses.
- Weak Cooling: Check refrigerant levels, condenser fan operation, and cabin air filter condition.
- Unusual Noises: Investigate the compressor, belt tensioner, and other components.
Safety Precautions
Working with AC systems involves potential hazards. Take these precautions seriously:
- Refrigerant Exposure: Refrigerant can cause frostbite and asphyxiation. Wear gloves and eye protection, and work in a well-ventilated area.
- High Pressure: The system contains high-pressure refrigerant. Never disconnect hoses or fittings while the system is pressurized.
- Electrical Hazards: Be aware of electrical components, such as the compressor clutch and pressure switches. Disconnect the battery before working on electrical components.
- Refrigerant Compatibility: Ensure you are using the correct refrigerant for your vehicle. Mixing refrigerants can damage the system and pose environmental hazards.
Always consult your vehicle's service manual for specific instructions and safety precautions.
By following these guidelines and exercising caution, you can successfully recharge your car's AC system and enjoy cool, comfortable driving.
We have a detailed AC system diagram that complements this article, providing a visual aid for understanding the components and their connections. The file is available for download. Having this diagram in hand will be invaluable as you troubleshoot and work on your AC system.