How To Refill Car Ac Freon
Alright, let's talk about refilling your car's AC system with refrigerant, often called "Freon" – though technically, most systems now use R-134a or the newer R-1234yf. This article is aimed at those of you who are already comfortable working on your cars and understand basic automotive principles. We'll cover the process, the tools needed, safety precautions, and some troubleshooting tips. Remember, dealing with AC systems can be tricky and potentially dangerous, so proceed with caution and always prioritize safety.
Purpose of Understanding AC Systems
Understanding the AC system and being able to refill it, if necessary, serves several purposes. First, it allows you to maintain a comfortable cabin temperature, especially during hot weather. Second, it can save you money on expensive shop visits. More importantly, understanding the system can help you diagnose problems early, potentially preventing more significant and costly repairs down the line. If you are a modder, this is even more important, in case you make changes to your car or need to move/modify AC components during a project.
Key Specs and Main Parts of a Car AC System
Before we dive into refilling the refrigerant, let's identify the key components of your car's AC system. Knowing what each part does will help you understand the process and troubleshoot issues effectively.
- Compressor: This is the heart of the system. Driven by the engine (usually via a belt), it compresses the refrigerant gas, increasing its pressure and temperature.
- Condenser: Located in front of the radiator, the condenser cools the high-pressure, high-temperature refrigerant gas, turning it into a high-pressure liquid. Think of it like a small radiator specifically for the AC system.
- Receiver/Drier (or Accumulator): This component acts as a filter, removing moisture and debris from the refrigerant. It also stores refrigerant and ensures that only liquid refrigerant reaches the next component. In some systems, you'll find an accumulator instead of a receiver/drier, usually located on the low-pressure side of the system.
- Expansion Valve (or Orifice Tube): This component controls the flow of refrigerant into the evaporator. It causes a pressure drop, allowing the liquid refrigerant to expand and turn into a cold gas. The orifice tube is a simpler, fixed-size restrictor, while the expansion valve is more sophisticated and can adjust the refrigerant flow based on temperature.
- Evaporator: Located inside the dashboard, the evaporator is where the refrigerant absorbs heat from the cabin air. As the refrigerant evaporates, it cools the surrounding air, which is then blown into the cabin by the blower motor.
- Refrigerant Lines: These are the hoses and pipes that connect all the components and carry the refrigerant. They are typically made of rubber or metal and are designed to withstand the high pressures involved.
- Pressure Switches: These switches monitor the pressure in the system. They can shut off the compressor if the pressure is too high or too low, protecting the system from damage.
Key Specs: Knowing the type of refrigerant your car uses (R-134a or R-1234yf) is crucial. This information is usually found on a sticker under the hood or in the owner's manual. You'll also need to know the correct refrigerant charge amount, typically measured in ounces or grams. This information is also usually on a sticker under the hood. Using the wrong refrigerant or the wrong amount can damage your system.
How It Works: The Refrigeration Cycle
The AC system works on a simple principle of heat transfer. Here's a breakdown of the refrigeration cycle:
- The compressor compresses the refrigerant gas, increasing its pressure and temperature.
- The hot, high-pressure gas flows to the condenser, where it releases heat to the outside air and turns into a high-pressure liquid.
- The high-pressure liquid flows to the receiver/drier (or accumulator), where it is filtered and stored.
- The high-pressure liquid flows to the expansion valve (or orifice tube), where it expands and turns into a cold, low-pressure gas.
- The cold, low-pressure gas flows to the evaporator, where it absorbs heat from the cabin air, cooling the air.
- The now warm, low-pressure gas returns to the compressor, and the cycle repeats.
Refilling Your Car's AC System: A Step-by-Step Guide
Disclaimer: This process requires caution and knowledge of automotive systems. If you are not comfortable working on your car, it is best to take it to a qualified mechanic.
- Gather Your Supplies: You'll need:
- Refrigerant (R-134a or R-1234yf, depending on your car's specifications)
- AC manifold gauge set (with appropriate adapters for your refrigerant type)
- Refrigerant charging hose
- Safety glasses and gloves
- Wrench (for connecting hoses)
- Leak detector (optional, but highly recommended)
- Locate the Low-Pressure Service Port: This port is usually located on the larger diameter refrigerant line, typically near the evaporator or accumulator/receiver-drier. It will have a cap labeled "L" or "Low." Never attempt to connect to the high-pressure port. They are different sizes to prevent accidental connection.
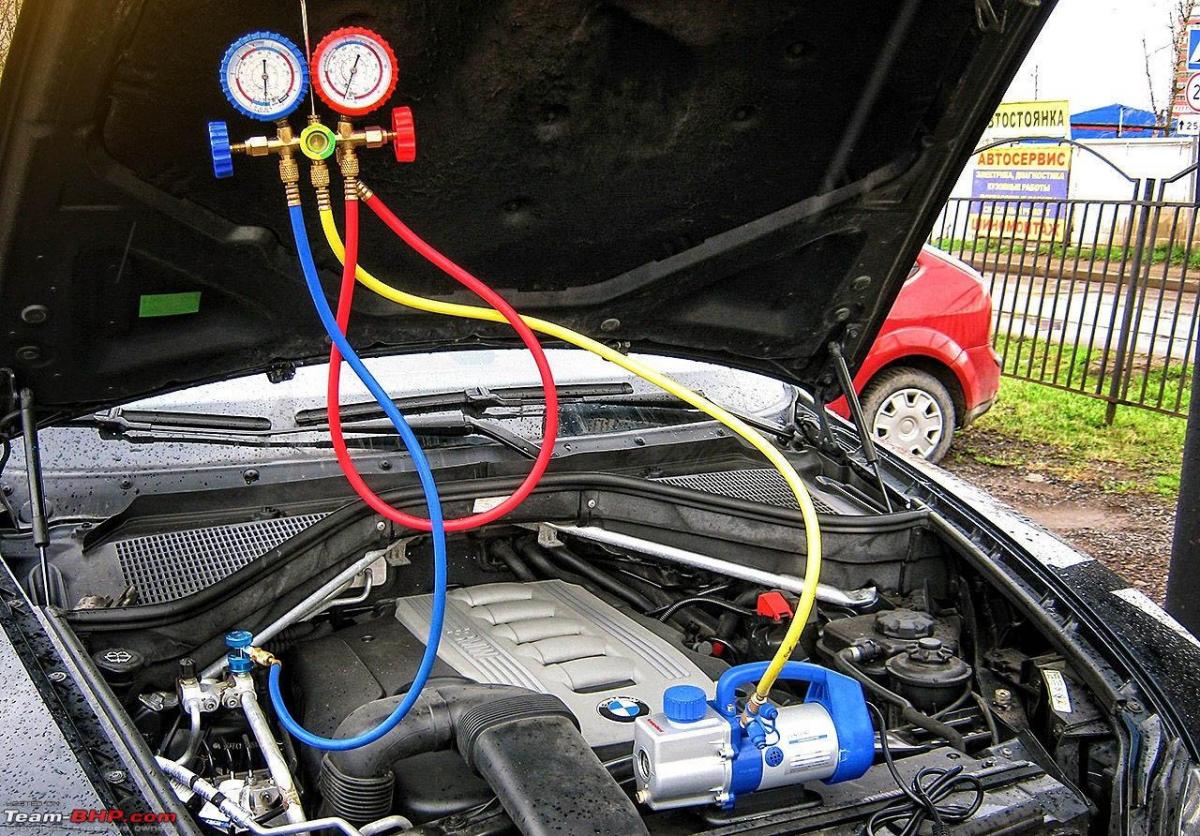
- Connect the Manifold Gauge Set:
- Connect the blue hose (low-pressure) to the low-pressure service port.
- Connect the red hose (high-pressure) to the high-pressure service port (for monitoring only; do not charge through the high-pressure side).
- Connect the yellow hose to the refrigerant can or charging station.
- Purge the Hoses: Before opening the refrigerant can, slightly loosen the yellow hose connection at the manifold gauge to release any air that may be in the hose. This prevents air from entering the AC system.
- Start the Engine and Turn on the AC: Set the AC to maximum cooling and the blower fan to the highest setting.
- Check the Pressure Readings: Observe the pressure readings on the manifold gauge. The low-pressure side should typically be between 25-45 psi, depending on the ambient temperature and humidity. Refer to your car's service manual for specific pressure ranges.
- Begin Charging the System:
- Open the valve on the refrigerant can or charging station.
- Slowly open the low-pressure valve on the manifold gauge to allow refrigerant to flow into the system.
- Monitor the pressure readings carefully. Do not overcharge the system.
- Charge in short bursts, allowing the system to stabilize between each burst.
- Monitor System Performance: As you add refrigerant, observe the temperature of the air coming from the vents. It should gradually decrease. Also, listen for the compressor to cycle on and off smoothly.
- Stop Charging When the Pressure is Correct: Refer to your car's service manual for the correct pressure readings. Once the pressure is within the specified range, close the low-pressure valve on the manifold gauge and the valve on the refrigerant can or charging station.
- Disconnect the Manifold Gauge Set: Carefully disconnect the hoses from the service ports. Some refrigerant may escape, so be prepared. Replace the service port caps.
- Check for Leaks: Use a leak detector to check for leaks around the service ports and other AC components. If you find a leak, address it immediately.
Real-World Use: Basic Troubleshooting Tips
Here are some common issues you might encounter and how to troubleshoot them:
- AC Not Cold Enough: This could be due to low refrigerant, a faulty compressor, a clogged condenser, or a malfunctioning expansion valve.
- Compressor Not Engaging: This could be due to a blown fuse, a faulty pressure switch, or a bad compressor clutch.
- Strange Noises: This could be due to a failing compressor, a loose belt, or debris in the system.
- Leaking Refrigerant: This is a serious issue that needs to be addressed immediately. Use a leak detector to find the source of the leak and repair it.
Safety: Risky Components
The AC system contains high-pressure refrigerant, which can be dangerous if handled improperly. Always wear safety glasses and gloves when working on the system. Never disconnect any hoses or components while the system is pressurized. Never expose refrigerant to open flame or high heat, as it can produce toxic fumes. If you suspect a major leak, evacuate the area immediately and ventilate the space. Refrigerant can cause frostbite if it comes into contact with skin.
Disclaimer
Working on automotive AC systems requires specialized knowledge and tools. This article is for informational purposes only and should not be considered a substitute for professional advice. If you are not comfortable working on your car, it is best to take it to a qualified mechanic.