How To Remove A Manual Window Crank
The humble manual window crank, a testament to simpler automotive times, remains a fixture in many vehicles, particularly older models and budget-conscious newer ones. While power windows offer push-button convenience, understanding the mechanics behind a manual crank – and knowing how to remove it – is a valuable skill for any car enthusiast or DIY mechanic. This guide delves into the process of removing a manual window crank, explaining the underlying mechanisms and offering insights for a successful and damage-free operation.
The Problem: A Stuck or Damaged Crank
Imagine this: you’re trying to roll down your window on a sunny day, but the crank is stuck, spinning freely, or feels unusually stiff. Perhaps you’re upgrading your door panels, replacing a broken crank, or simply need to access the inner workings of the door. Whatever the reason, removing the crank is often the first step. A common issue is the crank becoming detached from the regulator. This can happen if the retaining clip breaks or becomes dislodged, which means the crank spins without actually moving the window.
Analogy: The Bicycle Gear System
Think of a bicycle’s gear system. The crank (pedals) connects to the chainring (window regulator gear) via a chain (the regulator mechanism). When you pedal (turn the crank), the chain transfers that force to the rear wheel, making the bicycle move. Similarly, turning the window crank engages a series of gears that ultimately raise or lower the window pane. Just as a slipped chain on a bicycle prevents movement, a disengaged or broken component in the window regulator system prevents the window from moving.
How the Manual Window System Works
Let's break down the components involved:
The Crank Handle:
This is the interface between you and the window mechanism. It's typically made of plastic or metal and designed for comfortable gripping and leverage. Its purpose is to transmit rotational force to the regulator mechanism.
The Retaining Clip (or Spring Clip):
This small but crucial component secures the crank handle to the regulator shaft. It usually sits in a groove on the shaft, preventing the crank from simply pulling off. There are various types, but the most common are C-clips, Omega clips, or hairpin clips. Locating and releasing this clip is usually the trickiest part of the removal process.
The Regulator Shaft:
This is the central spindle that the crank handle attaches to. It's connected directly to the window regulator mechanism. Turning the shaft causes the regulator to move.
The Window Regulator:
This is the heart of the system. The regulator is a mechanical assembly, usually consisting of a scissor-like arm or a cable-driven system. When the crank is turned, the regulator translates the rotational motion into linear motion, raising or lowering the window pane. Common designs include:
- Scissor Regulator: Employs a pair of pivoting arms that extend or retract, raising and lowering the window. These are robust but can be bulkier.
- Cable Regulator: Uses a cable wound around a spool, driven by the crank. This design is lighter and more compact but potentially less durable.
Step-by-Step Removal Guide
Here's a general guide on how to remove a manual window crank. Always consult your vehicle's repair manual for specific instructions, as variations exist across different makes and models.
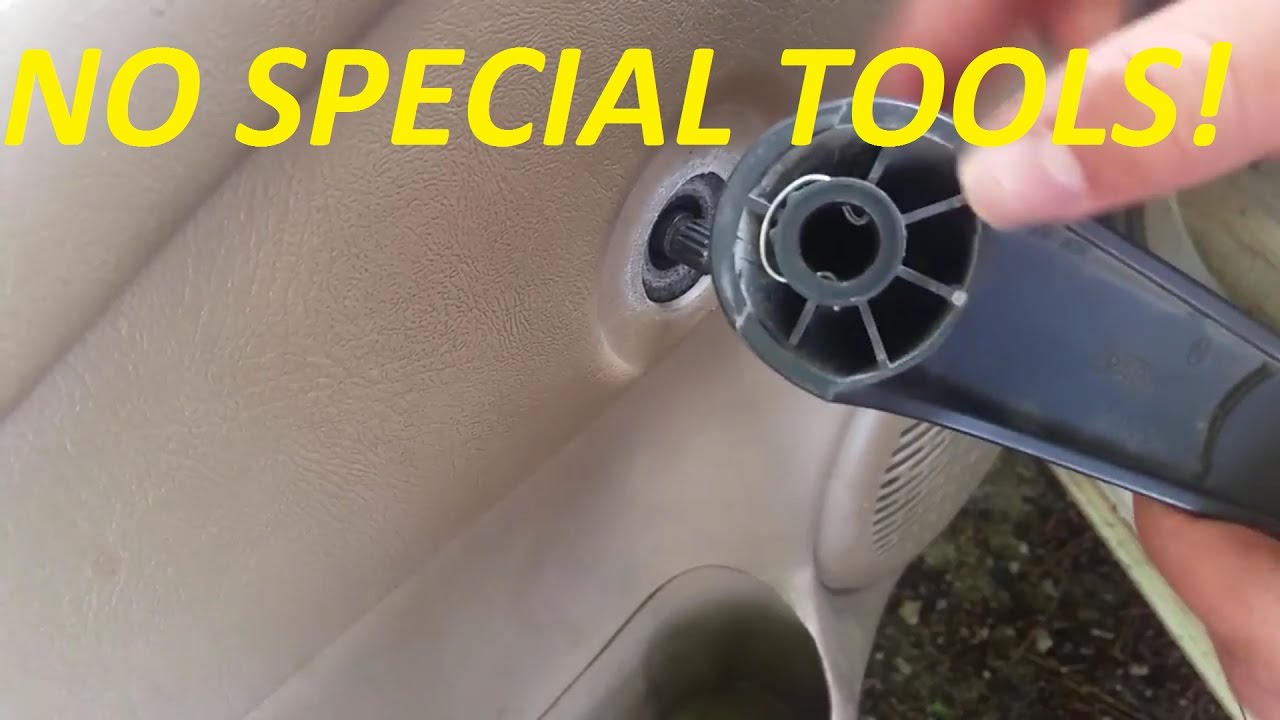
- Gather your tools: You'll typically need a specialized window crank removal tool (often a forked tool designed to slide behind the crank) or a thin, sturdy tool like a small flathead screwdriver or a shop rag. Good lighting is also essential.
- Inspect the Crank: Examine the base of the crank where it meets the door panel. Look for the retaining clip. Sometimes, it’s partially visible.
- Locate the Clip: This is the key. The clip is usually a C-shaped spring clip or a hairpin clip. It sits in a groove on the regulator shaft.
- Release the Clip:
- Using the Removal Tool: If you have the correct tool, carefully slide it behind the crank handle, pushing it towards the door panel. The forked ends of the tool should engage the retaining clip and push it off the shaft. This may require some wiggling and persistence.
- Using a Screwdriver or Rag: If you don't have the specialized tool, wrap a thin shop rag around the screwdriver to protect the door panel from scratches. Carefully slide the screwdriver behind the crank and try to gently push the clip off the shaft. This method requires patience and finesse. You might need to rotate the crank slightly to find the optimal position for access.
- Remove the Crank: Once the clip is disengaged, the crank should pull straight off the regulator shaft. Be careful not to lose the clip!
Pros and Cons of Manual Windows
Pros:
- Simplicity and Reliability: Fewer components mean less to go wrong. Manual systems are generally more reliable than power windows, which rely on complex wiring, motors, and switches.
- Cost-Effective: Manual windows are significantly cheaper to install and repair.
- Ease of Repair: Repairs are typically straightforward and can often be done by a DIYer with basic tools.
- Weight Savings: Manual window systems are lighter than power window systems, which can slightly improve fuel economy.
Cons:
- Inconvenience: Requires manual effort to operate, which can be inconvenient, especially for rear windows.
- Safety Concerns: Can be distracting to operate while driving.
- Resale Value: Cars with manual windows may have slightly lower resale value.
Use Cases
- Older Vehicles: Many classic and older vehicles were originally equipped with manual windows.
- Budget-Conscious Vehicles: Some newer entry-level vehicles still offer manual windows as a standard feature to reduce costs.
- Off-Road Vehicles: Some off-road enthusiasts prefer manual windows because they are less likely to fail in harsh conditions and are easier to repair in the field.
- Fleet Vehicles: Companies that operate large fleets of vehicles may opt for manual windows to minimize maintenance costs.
Manufacturer Examples
Many manufacturers have historically used manual windows across a wide range of models. Examples include:
- Toyota: Base model Corollas and Tacomas often came with manual windows.
- Honda: Civic DX models were frequently equipped with manual windows.
- Ford: Earlier generations of the Ford Ranger often featured manual windows.
- Chevrolet: Many Chevrolet trucks and economy cars offered manual windows as a standard or optional feature.
Real-World Insights and Recommendations
From personal experience, I've found that patience is key when removing a manual window crank. Rushing the process can lead to damaged door panels or a lost retaining clip. Always work in a well-lit area and use a shop rag to protect the surrounding surfaces. If you're struggling to remove the clip with a screwdriver, consider investing in a dedicated window crank removal tool. They are relatively inexpensive and can save you a lot of frustration. Another tip is to try rotating the crank slightly while attempting to release the clip. This can help align the clip and make it easier to dislodge. Also, be prepared to replace the retaining clip if it's damaged or lost. They are readily available at most auto parts stores. After successfully removing the crank, inspect the regulator mechanism for any signs of wear or damage. If the window was operating erratically, there may be an underlying issue with the regulator that needs to be addressed. Applying a small amount of grease to the regulator shaft before reinstalling the crank can help ensure smooth operation. And finally, remember to reattach the retaining clip securely to prevent the crank from coming loose in the future. Ensuring the retaining clip "clicks" back in position is important. This ensures it will not slide off with use.