How To Remove A Relay From Fuse Box
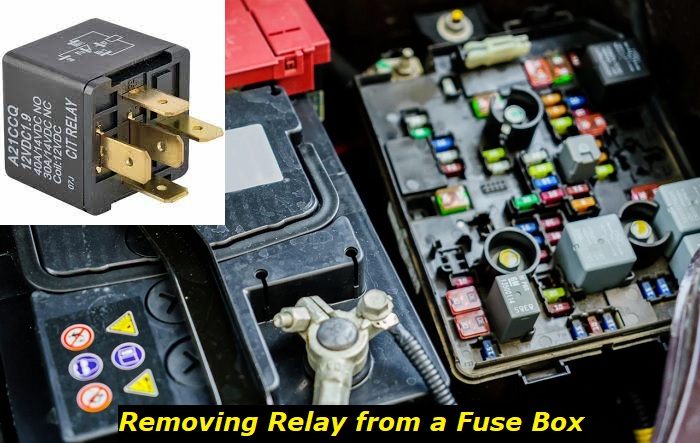
Removing a relay from a fuse box is a task that many car owners encounter at some point. Relays are essential components in your vehicle's electrical system, acting as switches that control various functions, such as the headlights, fuel pump, and air conditioning. Knowing how to safely and correctly remove a relay is crucial for troubleshooting electrical problems, performing maintenance, or replacing a faulty component. This guide will provide you with a step-by-step approach to removing a relay from your fuse box, ensuring you do it safely and without damaging any components.
Why Removing a Relay Matters
Understanding the importance of relays and their proper removal is vital for several reasons:
- Troubleshooting Electrical Issues: When experiencing electrical problems in your vehicle, a faulty relay is a common suspect. Removing and testing the relay is a crucial step in diagnosing the issue.
- Maintenance and Replacement: Relays can wear out or fail over time. Knowing how to remove them allows you to replace them with new ones, restoring the functionality of the affected system.
- Preventing Further Damage: Attempting to force a relay out of its socket can damage the relay itself, the fuse box, or the surrounding wiring. Proper removal techniques minimize the risk of such damage.
- Safety: Working with electrical components always carries a risk. Knowing the correct procedures helps to minimize the chance of electrical shock or short circuits.
How to Remove a Relay from a Fuse Box: A Step-by-Step Guide
Before you begin, gather the necessary tools and ensure your vehicle is turned off and the keys are removed from the ignition. This is crucial for safety.
Step 1: Locate the Fuse Box
The fuse box is typically located in one of three places:
- Under the Hood: Often near the engine compartment. Look for a black plastic box with a diagram on the cover.
- Inside the Cabin: Commonly under the dashboard on the driver's side or passenger side.
- In the Trunk: Some vehicles have a fuse box in the trunk, usually near the battery.
Consult your vehicle's owner's manual to pinpoint the exact location of the fuse box and to identify the specific relay you need to remove. This is very important to avoid accidentally removing the wrong relay.
Step 2: Identify the Relay
Once you've located the fuse box, you need to identify the correct relay. The fuse box cover usually has a diagram that labels each fuse and relay. Match the diagram to the relay you need to remove based on the function it controls (e.g., headlights, fuel pump, etc.). If the diagram is unclear, refer to your vehicle's owner's manual for a more detailed explanation. If the diagram is missing, you might find a replacement diagram online based on your car's make, model, and year.
Step 3: Prepare for Removal
Before physically removing the relay, take a moment to inspect its surroundings. Look for any signs of corrosion or damage to the relay or the fuse box. Note the orientation of the relay so you can reinstall it correctly later. If possible, take a picture with your phone as a reference.
Step 4: Use the Proper Tool (Recommended)
The best way to remove a relay is by using a relay puller. This tool is specifically designed to grip the relay securely and pull it straight out without damaging it or the fuse box. Relay pullers are inexpensive and can be purchased at most auto parts stores. Using a relay puller will ensure a clean and safe removal.
Step 5: Removing the Relay (Without a Relay Puller - Proceed with Caution)
If you don't have a relay puller, you can try removing the relay manually. However, be extremely careful to avoid damaging the relay or the fuse box. Here's how:
- Gently Wiggle the Relay: Using your fingers (or a small pair of needle-nose pliers, being very careful not to squeeze too hard), gently wiggle the relay from side to side. This helps to loosen it from its socket.
- Apply Even Pressure: While wiggling, try to pull the relay straight up out of the socket. Avoid twisting or bending the relay, as this can damage the pins.
- Don't Force It: If the relay is stuck, don't force it. Instead, try wiggling it more or use a small flathead screwdriver to gently pry it up. Insert the screwdriver under the edge of the relay and apply slight pressure. Be extremely careful not to damage the fuse box or the relay pins.
- Repeat as Needed: Continue wiggling and gently prying until the relay comes loose.
Important Note: Never use excessive force when removing a relay. If it's too difficult to remove manually, it's best to purchase a relay puller or consult a professional mechanic.
Step 6: Inspect the Relay and Socket
After removing the relay, inspect it for any signs of damage, such as cracks, burns, or corrosion. Also, inspect the relay socket in the fuse box for any signs of damage or corrosion. Clean the socket with a contact cleaner if necessary.
How to Choose the Right Replacement Relay
If you're replacing a faulty relay, it's crucial to choose the correct replacement. Here's what to consider:
- Amperage Rating: The replacement relay must have the same amperage rating as the original relay. The amperage rating is usually printed on the side of the relay.
- Voltage: Ensure the voltage rating of the replacement relay matches your vehicle's electrical system (typically 12V).
- Pin Configuration: The pin configuration of the replacement relay must match the original relay. The pin configuration refers to the number and arrangement of the pins on the relay.
- Part Number: If possible, use the part number from the original relay to find an exact replacement. This will ensure compatibility.
- Compatibility: Always check your vehicle's owner's manual or consult with an auto parts store to ensure that the replacement relay is compatible with your vehicle's make, model, and year.
Real-World Owner Experiences
Many car owners have shared their experiences with removing and replacing relays. Here are a few common themes:
- The Importance of Patience: Rushing the removal process can lead to damage. Taking your time and using the correct tools is essential.
- The Value of a Relay Puller: Owners who used a relay puller reported a much easier and safer removal process.
- Proper Identification is Key: Misidentifying the relay can lead to replacing the wrong component, wasting time and money.
- Cleaning the Socket: Cleaning the relay socket with contact cleaner after removing a faulty relay can improve the connection and prevent future problems.
- Seeking Professional Help: Some owners found the process too difficult or were concerned about damaging their vehicle's electrical system. In these cases, consulting a professional mechanic was the best option.
Frequently Asked Questions (FAQs)
Q: Can I use a fuse puller to remove a relay?
A: While a fuse puller can sometimes work, it's not the ideal tool for removing relays. Fuse pullers are designed for smaller components and may not provide enough grip to safely remove a relay without damaging it or the fuse box. A relay puller is the recommended tool.
Q: What happens if I install the wrong relay?
A: Installing the wrong relay can cause various problems, depending on the function it controls. It could prevent the system from working correctly, cause damage to the system, or even create a fire hazard. Always ensure that the replacement relay is the correct one for your vehicle.
Q: How do I test a relay to see if it's bad?
A: You can test a relay using a multimeter. There are several tests you can perform, including a continuity test to check the coil and a voltage test to ensure the relay is switching correctly. There are many online resources and videos that demonstrate how to test a relay with a multimeter.
Q: Can I drive my car with a faulty relay?
A: It depends on which system the faulty relay controls. If it's a relay for a non-essential system, such as the power windows, you can likely drive your car. However, if it's a relay for a critical system, such as the fuel pump or headlights, it's not safe to drive your car until the relay is replaced.
Q: Where can I buy a replacement relay?
A: Replacement relays can be purchased at most auto parts stores, both online and in person. You can also find them at some general retailers that sell automotive supplies. Be sure to check the part number and compatibility before purchasing.
By following these steps and taking the necessary precautions, you can safely and effectively remove a relay from your fuse box, allowing you to troubleshoot electrical problems, perform maintenance, and replace faulty components. Remember to prioritize safety and consult a professional if you're unsure about any part of the process.