How To Remove A Valve Spring
Valve springs are the unsung heroes of your engine, tirelessly controlling the opening and closing of the valves that allow air and fuel to enter the combustion chamber and exhaust gases to exit. Over time, however, these springs can weaken, break, or require replacement due to performance upgrades. Removing a valve spring might seem like a daunting task, but with the right tools and understanding, it's a manageable project for the home mechanic. This guide will walk you through the process, exploring the mechanics involved, different tool options, and crucial considerations for a successful valve spring removal.
The Problem: Valve Spring Fatigue and Replacement
Imagine a pogo stick. When it's new, it bounces with ease. But after years of use, the spring becomes weaker, and the bounce loses its enthusiasm. Valve springs face a similar fate. Repeated compression and expansion under immense pressure and heat eventually lead to fatigue. This fatigue manifests as a loss of spring pressure, affecting valve timing and engine performance. Symptoms of worn valve springs can include:
- Reduced engine power, especially at higher RPMs.
- Engine misfires.
- Increased valve train noise (ticking or tapping).
- Difficulty starting the engine.
Beyond simple wear and tear, valve springs are also frequently replaced when upgrading engine components. High-performance camshafts, for example, often require stiffer valve springs to properly control the valve at higher engine speeds, preventing valve float (where the valve doesn't close fully before the piston comes back up) and potential engine damage.
Understanding the Mechanical System: A Deep Dive
At its core, a valve spring's job is simple: to keep the valve securely seated against the valve seat when the camshaft isn't actively pushing it open. Here's a breakdown of the key components and their roles:
- Valve: The poppet valve controls the flow of air/fuel mixture into and exhaust gases out of the cylinder.
- Valve Spring: Provides the closing force for the valve, ensuring it seals properly.
- Valve Spring Retainer: A metal cap that sits on top of the valve spring and holds the valve locks (or keepers).
- Valve Locks (Keepers): Small, usually split, conical pieces that lock the valve spring retainer onto the valve stem.
- Valve Stem: The long, cylindrical part of the valve that slides through the valve guide.
- Valve Seat: The precisely machined surface in the cylinder head that the valve seals against.
The camshaft lobe pushes on the rocker arm (or directly on the valve in some designs), which, in turn, pushes down on the valve stem. This compresses the valve spring, opening the valve. As the camshaft rotates, the lobe moves away, and the valve spring's stored energy pushes the valve closed. The valve locks are crucial; they prevent the retainer from slipping off the valve stem under the immense pressure exerted by the valve spring.
Removing a valve spring involves compressing the spring enough to relieve the pressure on the valve locks, allowing them to be removed. Once the locks are out, the spring retainer and spring can be lifted off the valve.
Tools of the Trade: Valve Spring Compressors
The key to successful valve spring removal is using the right tool: a valve spring compressor. There are several types available, each with its own advantages and disadvantages:
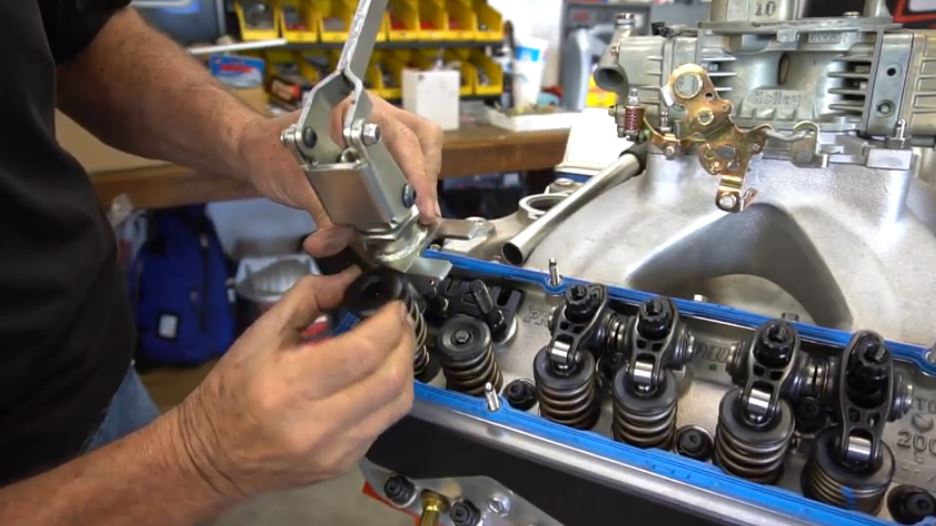
Overhead Valve Spring Compressors:
These compressors are designed to be used with the cylinder head still on the engine. They typically have a lever or screw mechanism that presses down on the valve spring retainer, compressing the spring. Here's a breakdown of different types:
- Lever-Type: These are relatively inexpensive and easy to use. They use a lever arm to compress the spring. However, they may not be suitable for all engine types and can sometimes be bulky.
- Screw-Type: These compressors use a threaded rod to compress the spring. They offer more precise control over the compression process but can be slower to operate.
- Universal Overhead Compressors: These are designed to work with a wide range of engine types and cylinder head configurations. They often have adjustable jaws or adapters to accommodate different valve spring retainer sizes.
Pros: Can be used with the cylinder head on the engine, saving time and effort. Relatively inexpensive.
Cons: Can be difficult to use in tight spaces. May not be suitable for all engine types. Potential for damaging the cylinder head if not used carefully.
Example: Lisle 36200 Valve Spring Compressor – a popular and affordable lever-type compressor.
Bench-Type Valve Spring Compressors:
These compressors are designed to be used with the cylinder head removed from the engine. They typically consist of a base plate, a compression arm, and various adapters to accommodate different cylinder head designs. These are typically the best choice for higher performance or racing engines that require higher spring pressures.
Pros: More precise and controlled compression. Easier to access and work with the valve springs. Less risk of damaging the cylinder head.
Cons: Requires removing the cylinder head, which is a more involved process. More expensive than overhead compressors.
Example: Kent-Moore J-8062 Valve Spring Compressor - a popular bench-type compressor used by many professional mechanics.
Pneumatic Valve Spring Compressors:
These use compressed air to hold the valve in place while you remove the valve spring. You can adapt a spark plug hole with a fitting and hose to an air compressor. Note that you must use caution when using compressed air with an engine and ensure there is no oil or fuel in the cylinder, which would then be discharged.
Pros: No need to remove the cylinder head. Relatively fast.
Cons: Requires an air compressor and specialized fittings. Can be noisy. Potential for dropping the valve into the cylinder if not used correctly.
Step-by-Step Guide: Removing a Valve Spring (Using an Overhead Compressor)
This guide assumes you are using an overhead valve spring compressor. Always refer to your engine's service manual for specific instructions and torque specifications.
- Safety First: Wear safety glasses and gloves. Disconnect the battery to prevent accidental starting.
- Prepare the Engine: Ensure the piston for the cylinder you're working on is at Top Dead Center (TDC). This will prevent the valve from falling into the cylinder if it slips past the valve seat. You can use a piston stop tool or carefully rotate the crankshaft by hand.
- Secure the Valve: If you're not removing the head, ensure the valve cannot fall into the cylinder. A common method is using compressed air fed through the spark plug hole with an adapter to hold the valve closed. Special tools exist to install under the valve to prevent it from falling in.
- Position the Compressor: Carefully position the valve spring compressor over the valve spring retainer. Ensure the jaws of the compressor are securely engaged with the retainer.
- Compress the Spring: Slowly and steadily compress the valve spring using the compressor's lever or screw mechanism. Compress it just enough to relieve the pressure on the valve locks.
- Remove the Valve Locks: Use a magnetic pick-up tool or small needle-nose pliers to carefully remove the valve locks. Be careful not to drop them into the engine! They are small and can be difficult to retrieve.
- Release the Compressor: Slowly release the valve spring compressor, allowing the spring to decompress.
- Remove the Retainer and Spring: Lift the valve spring retainer and valve spring off the valve stem.
Important Considerations and Best Practices
- Valve Stem Seals: When removing valve springs, inspect the valve stem seals for wear or damage. It's often a good idea to replace them when replacing valve springs.
- Valve Guides: Check the valve guides for excessive wear. Worn valve guides can lead to oil consumption and reduced engine performance.
- Spring Height: After installing new valve springs, measure the installed height (distance between the spring seat and the underside of the retainer) to ensure it meets the manufacturer's specifications. Incorrect installed height can affect spring pressure and valve timing.
- Valve Rotation: Some engines use valve rotators, which are designed to rotate the valve slightly with each cycle. Inspect these for proper function.
- Cleanliness: Keep everything clean! Dirt and debris can damage engine components.
Real-World Insights and Recommendations
Based on experience, investing in a quality valve spring compressor is well worth the money. A cheap compressor can be difficult to use, prone to slippage, and even damage the cylinder head. Screw-type compressors offer more precise control, which is particularly important when working with high-performance engines and stiffer valve springs. Always double-check that the valve locks are properly seated in the retainer before releasing the compressor. A slightly off-center lock can lead to valve float and potentially catastrophic engine failure. Furthermore, having a magnetic pickup tool is essential to ensure you retrieve any valve locks that drop. Dropping one and not finding it could lead to future issues. Consider using a shop towel or rag to stuff the oil drain holes to prevent dropping locks into the engine.
Valve spring removal, while seemingly complex, is a task that can be tackled with patience, the right tools, and a solid understanding of the mechanics involved. By following this guide and taking your time, you can successfully replace your valve springs and keep your engine running smoothly.