How To Remove Stabilizer Bar Link
So, you're tackling a suspension refresh, diagnosing a clunking noise, or maybe just wrestling with a stubborn bolt. Chances are, you've found yourself staring at the stabilizer bar link – that little connecting piece that seems to defy logic at times. Removing it can be surprisingly frustrating, but understanding its function and the forces at play is half the battle. This guide will walk you through the process, the mechanics behind it, and offer some real-world insights to make your life easier.
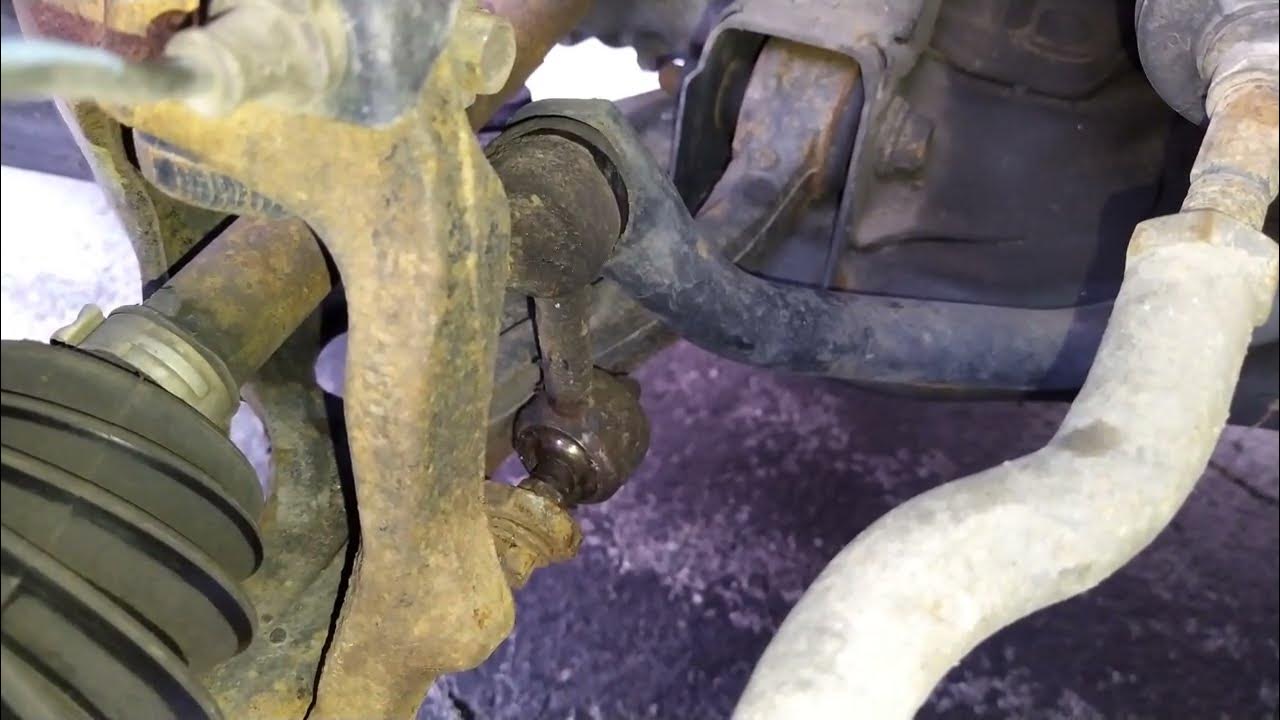
The Stabilizer Bar Link Dilemma
Imagine a seesaw. If one side goes up, the other goes down. Now, picture your car going around a corner. The outside wheel is compressed, the inside wheel is extended. Without a stabilizer bar, each wheel would act independently, leading to significant body roll. This feels unstable and reduces the tire's contact patch with the road, hurting handling. The stabilizer bar link is the crucial connector in a system designed to fight this lean.
These links often seize due to corrosion, rust, and constant stress. The typical scenario involves a spinning ball joint stud while you desperately try to loosen the nut. The frustration is amplified when you realize there's often limited access for tools. Let's break down why this happens and how to overcome it.
How the Stabilizer Bar System Works
The stabilizer bar, also known as an anti-roll bar or sway bar, is a torsion spring that connects the left and right suspensions. When the vehicle leans during a turn, the outside suspension compresses and the inside suspension extends. This difference in suspension height creates torsion (twisting force) in the stabilizer bar. The bar then resists this twisting motion, transferring some of the force from the compressed outside suspension to the extended inside suspension. This reduces the amount of body roll and helps keep the car more level.
The stabilizer bar links are the connecting pieces between the ends of the stabilizer bar and the suspension components (typically the strut or control arm). They transmit the force from the stabilizer bar to the suspension, and vice-versa. These links are almost always equipped with ball joints or bushings at each end to allow for movement and articulation as the suspension travels. Because they are in constant motion and exposed to the elements, they are prone to wear and tear.
Mechanical Breakdown
- Torsion Bar: The main component. It's a spring steel bar designed to resist twisting. Its thickness and length dictate its stiffness and therefore how much roll it resists.
- Stabilizer Bar Bushings: Mount the bar to the vehicle's chassis. They allow the bar to twist freely. Wear here can cause clunking noises.
- Stabilizer Bar Links: These connect the bar to the suspension. Typically, they use ball joints for articulation.
When one wheel moves up relative to the other, the link on that side pulls (or pushes) on the stabilizer bar. The bar resists this twisting force, transferring some of it to the opposite side through the other link. The effectiveness of the system depends on the stiffness of the bar and the integrity of the links and bushings.
The Removal Process: A Step-by-Step Guide
Before you start, gather the necessary tools:
- Penetrating oil (PB Blaster, Kroil)
- Socket set and wrenches (metric or SAE, depending on your vehicle)
- Vice grips or locking pliers
- Allen wrench or Torx bit (for holding the ball joint stud)
- Hammer
- Jack and jack stands
- Safety glasses
- Gloves
Steps:
- Safety First: Jack up the vehicle and securely support it with jack stands. Never work under a vehicle supported only by a jack.
- Penetrating Oil: Generously apply penetrating oil to the stabilizer bar link bolts or nuts, especially at the ball joint studs. Let it soak for at least 15-30 minutes (longer is better). This is critical for loosening corroded fasteners.
- Access and Stabilization: Locate the stabilizer bar link. Identify how the ball joint studs are held in place. Many have a hex key or Torx socket molded into the end of the stud.
- The Challenge: This is where things often get tricky. The goal is to loosen the nut while preventing the ball joint stud from spinning.
- Using the Allen Wrench/Torx Bit: Insert the appropriate Allen wrench or Torx bit into the end of the stud and hold it firmly. Simultaneously, use a wrench to loosen the nut. If the stud still spins, proceed to the next step.
- Vice Grips to the Rescue: If the Allen wrench/Torx bit method fails, use vice grips or locking pliers to clamp onto the ball joint stud *below* the nut. Be careful not to damage the threads excessively, but a firm grip is essential. You may need to apply significant force. The goal is to prevent the stud from rotating while you loosen the nut.
- The Hammer Technique (Use with Caution): If the above methods fail and you're prepared to replace the link (because this might damage it), you can try tapping the side of the link near the ball joint with a hammer. The vibrations can help break the corrosion bond and allow you to loosen the nut.
- Removing the Link: Once you've loosened the nut, remove it completely. You may need to tap the link with a hammer to dislodge it from the mounting point. Repeat the process for the other end of the link.
- Inspection: Once the link is removed, inspect the mounting points on the stabilizer bar and suspension components for any damage or excessive wear.
Pros and Cons of Stabilizer Bars and Links
Pros:
- Improved Handling: Reduces body roll, leading to more predictable and stable handling.
- Increased Tire Contact: Keeps more of the tire in contact with the road during cornering, improving grip.
- Enhanced Safety: Contributes to a safer driving experience by reducing the risk of rollovers.
Cons:
- Increased Complexity: Adds complexity to the suspension system, potentially increasing maintenance requirements.
- Potential for Noise: Worn bushings or links can cause clunking or rattling noises.
- Ride Quality Trade-off: Stiffer stabilizer bars can sometimes negatively impact ride comfort on uneven surfaces.
Use Cases and Manufacturer Examples
High-Performance Vehicles: Sports cars and performance sedans often use thicker stabilizer bars to minimize body roll and maximize handling. Examples include BMW M cars, Porsche 911s, and Chevrolet Corvettes.
SUVs and Trucks: Vehicles with a higher center of gravity, like SUVs and trucks, benefit greatly from stabilizer bars to improve stability and reduce the risk of rollovers. Many manufacturers offer heavy-duty stabilizer bar upgrades for off-road use.
Everyday Cars: Most modern passenger cars are equipped with stabilizer bars to improve handling and safety. The size and stiffness of the bar are typically tailored to the vehicle's intended use.
For example, Honda often uses relatively thin stabilizer bars in their economy cars for a balance of comfort and handling. Mercedes-Benz, on the other hand, utilizes more advanced stabilizer bar systems, sometimes even electronically controlled ones, to provide superior handling and ride comfort.
Real-World Insights and Recommendations
Prevention is Key: Regular inspection of your stabilizer bar links and bushings can help prevent problems. Look for signs of wear, such as cracked or deteriorated bushings, loose ball joints, or corrosion.
Corrosion is the Enemy: Applying anti-seize compound to the threads of the stabilizer bar link bolts during installation can make future removal much easier. This is especially important in areas with harsh winters where road salt is used.
Don't Over-Tighten: When installing new stabilizer bar links, be sure to tighten the bolts to the manufacturer's specified torque. Over-tightening can damage the ball joints or bushings.
Aftermarket Upgrades: Consider upgrading to heavier-duty stabilizer bar links and bushings if you frequently drive aggressively or tow heavy loads. This can improve handling and increase the lifespan of the components.
Noise Diagnosis: A clunking noise from the suspension is often a sign of worn stabilizer bar links or bushings. To diagnose the problem, try grabbing the link and shaking it vigorously. If there's excessive play or a clunking sound, the link likely needs to be replaced.
In conclusion, removing a stabilizer bar link can be a straightforward task with the right tools and techniques. Understanding the mechanics of the system and addressing corrosion are key to success. Remember to prioritize safety and take your time. A little patience and persistence will go a long way in getting the job done right.