How To Remove Stuck Wheel Hub Assembly
Is your car making a groaning noise, especially when turning? Are you feeling vibrations in the steering wheel that weren’t there before? You might be dealing with a stuck wheel hub assembly. Removing a stuck hub can be a real headache, turning what should be a simple repair into a frustrating battle. The good news is, with the right tools and techniques, you can usually tackle this yourself and save a considerable amount of money. Getting that hub assembly off is critical for replacing worn-out bearings, diagnosing brake issues, or performing other essential maintenance, so it’s important to address it properly.
Identifying a Stuck Wheel Hub Assembly
Before you go tearing into your suspension, it's important to correctly identify if you're truly dealing with a stuck wheel hub assembly. Here's a list of common symptoms to watch out for:
- Excessive Noise: This is often the first sign. Listen for a grinding, rumbling, or whining noise coming from one or more of your wheels, especially when turning or at higher speeds. The noise may change in intensity depending on your speed and whether you’re turning left or right.
- Vibrations: You might feel a vibration in the steering wheel, floorboard, or even the seat. The vibration could be subtle at first, gradually worsening as the wheel bearing deteriorates further.
- Wheel Play: With the vehicle safely lifted, try to wiggle the wheel back and forth (at the 12 o'clock and 6 o'clock positions). Excessive play indicates a loose or failing wheel bearing, which is often a sign of a hub assembly issue. Be sure to compare the play to the other side of the vehicle to get a good comparison.
- Uneven Tire Wear: A damaged wheel bearing can cause the tire to wobble slightly, leading to uneven or accelerated tire wear on one side of the tire.
- ABS Problems: Some hub assemblies contain an ABS (Anti-lock Braking System) sensor. A failing hub can damage this sensor or disrupt its signal, triggering the ABS warning light on your dashboard.
- Difficulty Removing the Wheel: While not always indicative of a *stuck* hub in the literal sense, a severely corroded hub face can make removing the wheel extremely difficult, often mistaken for a hub assembly issue.
- Brake Drag or Reduced Braking Performance: In more severe cases, a failing hub assembly can put stress on the braking system, leading to brake drag, reduced braking performance, or even premature brake pad wear.
The Root Cause: Rust, Corrosion, and Time
The primary culprit behind a stuck wheel hub assembly is, unsurprisingly, rust and corrosion. Hub assemblies are constantly exposed to the elements: water, road salt, dirt, and extreme temperatures. Over time, this relentless exposure causes rust to form between the hub assembly and the wheel bearing, and also between the hub assembly and the vehicle's knuckle or spindle. This corrosion acts like a powerful adhesive, essentially welding the hub assembly in place.
Another contributing factor is time itself. Even in areas with minimal road salt, the constant pressure and friction between the components can cause them to seize together over many years and miles. The wheel bearing itself can also seize, adding to the difficulty of removing the hub assembly. Vehicles in northern states or near coastal areas are significantly more prone to stuck hub assemblies due to the increased salt and moisture in the air.
Finally, improper installation or maintenance can contribute to the problem. For example, failing to apply anti-seize compound to the hub face during wheel installation can exacerbate corrosion and make future wheel removal extremely difficult. Over-torquing the wheel bolts can also put undue stress on the hub assembly and potentially damage the wheel bearing.
Consequences of Ignoring a Stuck Wheel Hub Assembly
Ignoring a stuck or failing wheel hub assembly can lead to a range of potentially dangerous consequences. The most immediate is reduced vehicle safety. A severely damaged wheel bearing can cause the wheel to wobble uncontrollably, leading to loss of control, especially at higher speeds. The resulting damage to other suspension components can rapidly increase repair costs.
A failing ABS sensor within the hub assembly will disable the ABS system, reducing your car's ability to stop safely in emergency braking situations. This is especially critical in wet or icy conditions.
Additionally, a worn wheel bearing can cause increased stress on other components, such as the CV joint, ball joints, and even the transmission. This can lead to premature failure of these parts and significantly increase the overall cost of repairs.
Finally, the increased friction and resistance caused by a failing wheel bearing can also reduce your fuel economy and put unnecessary strain on the engine.
Recommended Fixes for a Stuck Wheel Hub Assembly
Removing a stuck wheel hub assembly requires a combination of patience, the right tools, and a systematic approach. Here's a step-by-step guide:
- Preparation is Key: Gather your tools: a good quality penetrating oil (like PB Blaster or Kroil), a hammer (preferably a slide hammer with a hub puller attachment), sockets and wrenches, a breaker bar, safety glasses, gloves, and possibly a torch. Also, have a new hub assembly on hand for replacement.
- Apply Penetrating Oil: Generously spray penetrating oil around the perimeter of the hub assembly where it meets the knuckle or spindle. Also, spray it around the wheel studs. Let the oil soak in for at least 30 minutes, preferably longer. Reapply the oil periodically. The more time the oil has to penetrate, the easier the removal will be.
- Loosen the Axle Nut: If applicable (typically for front-wheel drive vehicles), loosen the axle nut while the vehicle is still on the ground. This nut can be extremely tight, so you might need a breaker bar and a cheater pipe for extra leverage. Do not completely remove the nut at this point.
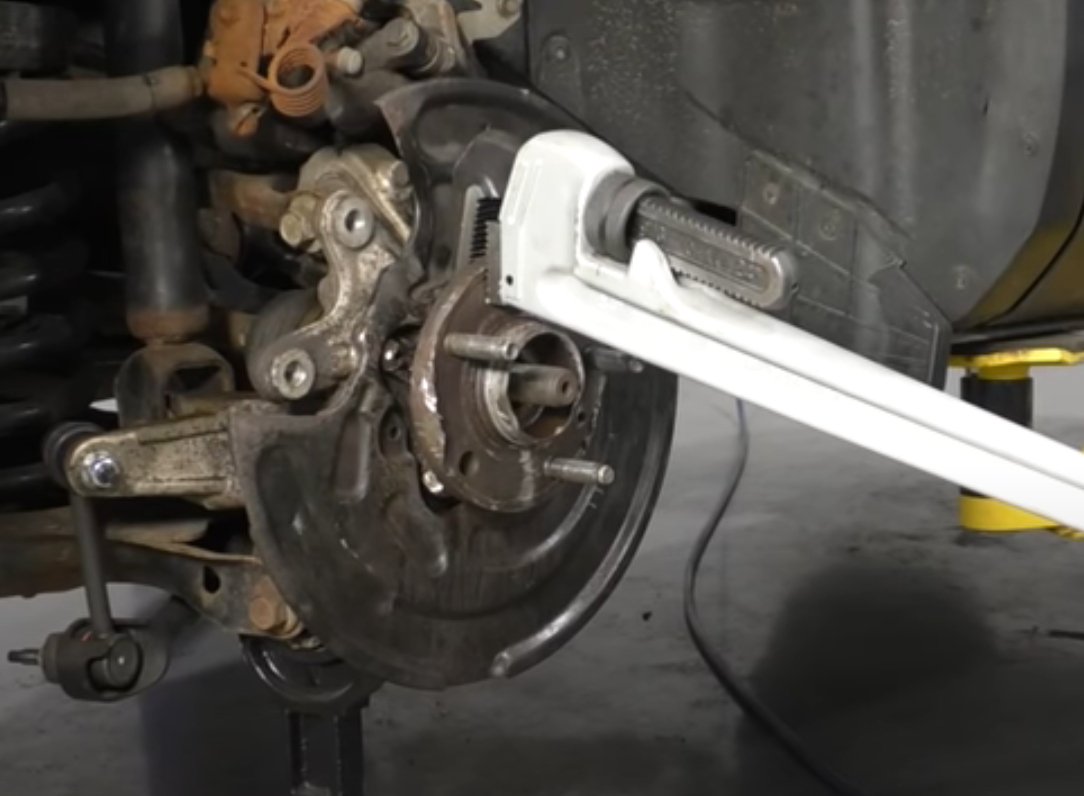
- Loosen the Hub Bolts: On most vehicles, the hub assembly is held in place by four bolts on the backside of the knuckle. Locate these bolts and spray them with penetrating oil as well. Use a socket and breaker bar to loosen these bolts. Again, these can be very tight. Do not completely remove the bolts at this point.
- Use a Slide Hammer: This is where the real work begins. Attach the hub puller attachment to the slide hammer. Position the puller over the wheel studs and tighten the lug nuts to hold it securely in place. Then, repeatedly slide the hammer to deliver forceful blows to the hub assembly. Continue working around the hub, alternating between hitting different areas.
- Heat Application (Optional): If the slide hammer alone isn't working, you can carefully apply heat to the knuckle around the hub assembly using a torch. Be extremely cautious when using a torch, and avoid heating the wheel bearing directly. The heat will help to expand the metal and break the corrosion bond. After heating, reapply penetrating oil and continue using the slide hammer.
- Hammering from the Back: With the hub bolts loosened, but not removed, you may be able to carefully hammer the hub from the backside using a punch or drift pin through the bolt holes. Be careful not to damage the threads on the hub bolts.
- Remove the Hub Assembly: Once the hub assembly is loose, remove the remaining bolts and carefully pull it out. If the axle is still attached to the hub, you might need to use a rubber mallet to gently tap the end of the axle to dislodge it from the hub.
- Clean the Mating Surface: Thoroughly clean the mating surface on the knuckle or spindle using a wire brush or sandpaper to remove any remaining rust or corrosion. This is crucial for ensuring a proper fit with the new hub assembly.
- Apply Anti-Seize: Before installing the new hub assembly, apply a generous amount of anti-seize compound to the mating surface. This will help prevent future corrosion and make removal easier down the road.
- Install the New Hub Assembly: Install the new hub assembly and tighten the bolts to the manufacturer's specified torque. Reinstall the axle nut (if applicable) and torque it to the specified value as well.
- Test Drive: After completing the installation, take the vehicle for a test drive to ensure that the noise and vibration are gone. Check for any warning lights on the dashboard.
Important Note: If you are not comfortable performing these steps yourself, it is best to take your vehicle to a qualified mechanic. Improper removal or installation of the hub assembly can damage the vehicle's suspension or braking system.
Cost Estimates and Shop Advice
If you decide to tackle this job yourself, the cost will primarily depend on the price of the new hub assembly. These can range from $50 to $300 or more depending on the vehicle make, model, and quality of the part. Tools like penetrating oil, anti-seize, and sandpaper are relatively inexpensive.
If you opt to take your vehicle to a mechanic, labor costs will vary depending on the shop rate and the complexity of the job. Expect to pay anywhere from $200 to $500 or more per wheel for labor, in addition to the cost of the hub assembly. Always get a written estimate from the mechanic before authorizing any work.
When choosing a mechanic, look for a shop that specializes in your vehicle make or has extensive experience with suspension and brake repairs. Read online reviews and ask for referrals from friends or family. Don't be afraid to ask the mechanic questions about their experience and the repair process.
Pro Tip: If one wheel hub assembly has failed, it's often a good idea to replace the hub assembly on the opposite side as well. This is because the other hub assembly is likely to be in a similar condition and may fail soon anyway. Replacing both at the same time can save you time and money in the long run.
TSB & Community Data: Many vehicle manufacturers have issued Technical Service Bulletins (TSBs) related to wheel hub assembly issues. Check online forums and resources specific to your vehicle make and model to see if there are any relevant TSBs. These bulletins often provide valuable information about common failure modes, diagnostic procedures, and recommended repair procedures. For example, certain Ford Explorers and Expeditions have known issues with rear hub assembly corrosion, often requiring specialized tools for removal. Online forums dedicated to these vehicles frequently discuss solutions and best practices.
In conclusion, removing a stuck wheel hub assembly can be a challenging but manageable task. By understanding the underlying causes, following a systematic approach, and using the right tools, you can often save yourself a significant amount of money and get your car back on the road safely.