How To Remove Tail Light Assembly
Are you noticing your tail light acting strangely? A dim bulb, flickering, or complete failure can be a real safety hazard, not to mention a potential ticket from law enforcement. In most cases, addressing this issue involves removing the tail light assembly. This guide will walk you through the process step-by-step, allowing you to diagnose the problem and potentially save money by performing the repair yourself. Even if you decide to take your vehicle to a mechanic, understanding the procedure will give you a better perspective on the repair and its associated costs. So, let's get started with removing your tail light assembly to diagnose and fix the problem!
Recognizing Tail Light Assembly Issues
Before diving into the removal process, it's crucial to accurately identify the symptoms of a faulty tail light assembly. Early detection can prevent more serious issues and ensure your safety on the road.
Common Symptoms:
- Dim or Faint Tail Light: This is often the first sign of a failing bulb or a problem within the assembly itself.
- Flickering Tail Light: A flickering light indicates an inconsistent electrical connection, which could be due to a loose bulb, corrosion, or a wiring issue.
- Complete Tail Light Failure: The tail light doesn't illuminate at all when activated. This could be a blown bulb, a faulty socket, or a wiring problem.
- Other Lights Out: Brake lights, turn signal, or reverse lights within the same assembly don't work, but other lights on the vehicle do.
- Water Accumulation Inside the Assembly: Moisture can cause corrosion and short circuits, leading to bulb failure and other electrical problems.
- Cracked or Damaged Lens: Physical damage can compromise the seal of the assembly, allowing water and debris to enter.
- Error Codes on Dashboard: Many modern vehicles have sensors that detect bulb failures and display warning messages on the dashboard.
- Burning Smell: (Less Common) This could indicate overheating within the tail light assembly, which is a serious safety concern.
Root Causes of Tail Light Assembly Problems
Understanding the underlying causes of tail light assembly issues is key to effective troubleshooting and repair. Here are some common culprits:
- Burned-Out Bulbs: This is the most frequent cause. Bulbs have a limited lifespan and eventually burn out due to normal use.
- Loose Bulb Sockets: Vibrations and temperature changes can loosen the bulb socket, disrupting the electrical connection.
- Corrosion: Moisture and road salt can corrode the bulb socket terminals and wiring connections, leading to poor conductivity.
- Wiring Problems: Damaged or frayed wires can cause shorts or open circuits, preventing the tail light from working properly. This could include damaged grounds.
- Faulty Ground Connection: A bad ground connection prevents proper electrical flow, causing the light to malfunction or not work at all.
- Cracked or Damaged Lens: A crack in the lens can allow water and debris to enter the assembly, leading to corrosion and electrical problems.
- Faulty Tail Light Assembly: In some cases, the tail light assembly itself may be defective, requiring replacement.
- Fuse Problems: Though less likely to affect only one tail light in an assembly, a blown fuse for the tail light circuit should always be checked.
Consequences of Ignoring Tail Light Issues
Ignoring tail light problems can have serious consequences, both legally and in terms of safety. It's crucial to address these issues promptly.
- Reduced Visibility: A dim or non-functioning tail light makes it difficult for other drivers to see your vehicle, especially at night or in bad weather.
- Increased Risk of Accidents: Reduced visibility significantly increases the risk of rear-end collisions.
- Legal Penalties: Driving with a faulty tail light is illegal in most jurisdictions and can result in a ticket and fines.
- Vehicle Inspection Failure: Many states require vehicles to pass a safety inspection, and a faulty tail light will likely cause a failure.
- Further Damage: Ignoring corrosion or water accumulation can lead to more extensive damage to the tail light assembly and surrounding electrical components.
Recommended Fixes: Removing and Diagnosing the Tail Light Assembly
The first step in fixing a tail light issue is often removing the assembly. Here’s a detailed guide to help you:
Tools You'll Need:
- Screwdrivers (Phillips and flathead, depending on the vehicle)
- Socket set with extensions (metric or SAE, depending on the vehicle)
- Pliers (for removing clips, if necessary)
- Gloves (to protect your hands)
- Safety glasses (to protect your eyes)
- Multimeter or test light (for testing electrical connections) - Optional but highly recommended
- Penetrating oil (for stubborn screws or bolts)
Step-by-Step Removal Process:
- Safety First: Park your vehicle on a level surface, engage the parking brake, and turn off the ignition.
- Consult Your Owner's Manual: Before starting, refer to your vehicle's owner's manual for specific instructions and diagrams related to tail light assembly removal. Procedures can vary slightly between models.
- Access the Tail Light Assembly: In most cases, you'll need to access the tail light assembly from inside the trunk or cargo area. Remove any carpeting, trim panels, or access covers that are blocking the assembly.
- Disconnect Electrical Connectors: Locate the electrical connectors that plug into the tail light assembly. Carefully disconnect them by pressing on the release tabs (if any) and gently pulling them apart. Never pull on the wires themselves.
- Important Tip: Take a photo of the connectors before disconnecting them. This will help you remember which connector goes where during reassembly.
- Remove Fasteners: Identify the screws, bolts, or clips that secure the tail light assembly to the vehicle.
- Screws/Bolts: Use the appropriate screwdriver or socket to remove the fasteners. Place them in a safe place to avoid losing them.
- Clips: Use pliers or a flathead screwdriver to carefully pry the clips loose. Be gentle to avoid breaking them.
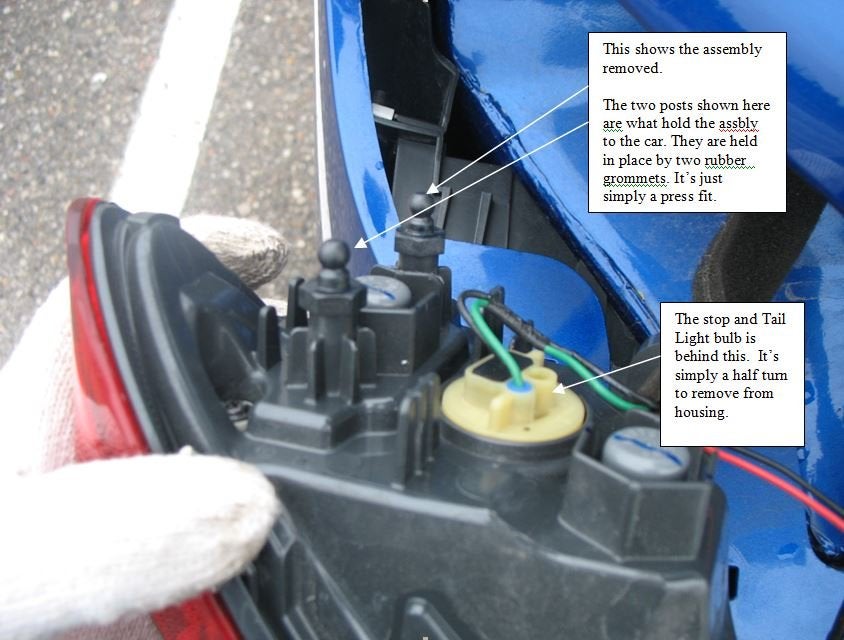
- Remove the Assembly: Once all the fasteners are removed, carefully wiggle the tail light assembly to loosen it. It may be held in place by rubber grommets or sealant.
- Stubborn Assembly: If the assembly is stuck, try gently tapping around the edges with a rubber mallet or using a plastic trim removal tool to pry it loose.
- Caution: Avoid using excessive force, as this could damage the assembly or the surrounding body panels.
- Inspect and Diagnose: With the assembly removed, carefully inspect the bulbs, sockets, and wiring for any signs of damage, corrosion, or loose connections.
- Bulb Check: Remove the bulbs and inspect the filaments for breaks. Use a multimeter to test the bulbs for continuity.
- Socket Check: Check the bulb sockets for corrosion or damage. Clean the terminals with a wire brush or electrical contact cleaner.
- Wiring Check: Inspect the wiring for any signs of damage, fraying, or exposed wires. Use a multimeter to test the wiring for continuity and shorts.
- Replace Faulty Components: If you find any faulty components, replace them with new ones. This could include bulbs, sockets, wiring connectors, or even the entire tail light assembly.
- Reassemble: Once you've replaced the faulty components, reassemble the tail light assembly in the reverse order of disassembly.
- Electrical Connectors: Reconnect the electrical connectors, making sure they are securely seated.
- Fasteners: Reinstall the screws, bolts, or clips, tightening them to the proper torque specifications.
- Test the Tail Light: Before completely reassembling the trunk or cargo area, test the tail light to make sure it's working properly. Turn on the headlights, brake lights, turn signals, and reverse lights to ensure that all functions are working correctly.
Important Considerations:
- Vehicle-Specific Procedures: Always consult your vehicle's owner's manual or a repair manual for specific instructions and diagrams related to tail light assembly removal and installation.
- Torque Specifications: When reinstalling fasteners, be sure to tighten them to the proper torque specifications to avoid over-tightening or under-tightening.
- Sealing: If the tail light assembly uses a rubber gasket or sealant to create a watertight seal, be sure to replace it when reinstalling the assembly.
- LED Assemblies: If your vehicle has LED tail lights, the entire assembly usually needs to be replaced if there's a problem with the LEDs. LED bulbs are often integrated into the assembly and not individually replaceable.
Cost Estimates and Shop Advice
The cost of repairing a tail light assembly can vary depending on the severity of the problem and whether you choose to do the repair yourself or take your vehicle to a mechanic.
- DIY Repair: If the problem is a simple burned-out bulb, you can typically replace it yourself for a few dollars. If the problem is a faulty socket or wiring, you may need to purchase additional parts, which could cost between $10 and $50.
- Professional Repair: If you take your vehicle to a mechanic, the cost of the repair will depend on the labor rate and the cost of parts. A simple bulb replacement may cost around $50-$100, while replacing the entire tail light assembly could cost several hundred dollars, especially for vehicles with complex LED systems.
Shop Advice:
- Get Multiple Quotes: Before taking your vehicle to a mechanic, get quotes from several different shops to compare prices.
- Ask About Warranty: Ask the mechanic about the warranty on the repair. A reputable shop should offer a warranty on both parts and labor.
- Check Online Reviews: Before choosing a mechanic, check online reviews to see what other customers have said about their experience.
- Consider Aftermarket Parts: If you're looking to save money, ask the mechanic about using aftermarket parts. Aftermarket parts are often less expensive than OEM (original equipment manufacturer) parts. However, be sure to choose a reputable brand to ensure quality and reliability.
TSBs and Common Failure Points
Technical Service Bulletins (TSBs) are issued by vehicle manufacturers to address common problems and provide repair procedures. Check online resources for TSBs related to your specific vehicle make and model, as they may offer valuable insights into common tail light assembly issues.
Additionally, online forums and communities dedicated to your vehicle may have discussions about common tail light problems and solutions. This information can be helpful in diagnosing the problem and finding the best repair options. For example, some vehicles are known to have issues with water intrusion into the tail light assembly, leading to corrosion and electrical problems. Knowing this beforehand can help you focus your troubleshooting efforts.
Another point to consider is the age and mileage of your vehicle. Certain parts, like bulbs and sockets, degrade over time. For example, some vehicles experience tail light assembly failures more frequently after 80,000-100,000 miles. Understanding these trends can help you anticipate potential problems and take preventative measures.
By following these steps and considering the factors outlined in this article, you can effectively diagnose and repair tail light assembly problems, ensuring your safety and the safety of others on the road.