How To Remove Tail Light Bulb
Are you noticing that your tail light isn't shining as bright as it used to, or perhaps it's completely out? A burnt-out tail light bulb is a common problem, and replacing it yourself is often a straightforward process that can save you time and money. This article will guide you through the steps, helping you restore proper visibility and safety to your vehicle. Driving with a faulty tail light is not only illegal in many jurisdictions but also significantly increases your risk of an accident, especially at night or in adverse weather conditions. Addressing this issue promptly is crucial for your safety and the safety of others on the road.
Symptoms of a Bad Tail Light Bulb
Recognizing the symptoms of a failing or burnt-out tail light bulb is the first step in addressing the problem. Here's a breakdown of the most common signs:
- Complete Darkness: This is the most obvious symptom. The tail light simply doesn't illuminate when the headlights are on or when the brake pedal is pressed (if it's a combined brake and tail light).
- Dim Illumination: The tail light may be noticeably dimmer than the other tail light, indicating a weakened or failing bulb. This is often a precursor to complete failure.
- Flickering or Intermittent Function: The tail light may flicker on and off or only work sporadically. This can be caused by a loose filament inside the bulb or a poor connection.
- Error Message on the Dashboard: Many modern vehicles have systems that monitor bulb functionality. A "bulb out" warning light or a specific error message (e.g., "Check Tail Light") may appear on your dashboard.
- Rapid Blinking of Turn Signal (Hyper Flashing): If the tail light bulb also functions as the turn signal, a burnt-out filament can cause the turn signal on the same side to blink much faster than usual. This is a common indicator and often a result of reduced electrical resistance in the circuit.
Root Cause: Why Tail Light Bulbs Fail
Tail light bulbs fail for a variety of reasons, most commonly due to:
- Normal Wear and Tear: Like all light bulbs, tail light bulbs have a limited lifespan. Over time, the filament inside the bulb degrades and eventually breaks, leading to failure. This is the most common cause.
- Vibration: Vehicles are constantly subjected to vibrations, especially from rough roads. These vibrations can weaken the filament inside the bulb, shortening its lifespan.
- Voltage Fluctuations: Irregularities in the vehicle's electrical system can cause voltage spikes that damage the bulb's filament. This can be caused by a failing alternator or a poorly regulated electrical system.
- Moisture Intrusion: If moisture gets inside the tail light housing, it can corrode the bulb socket and cause the bulb to fail prematurely. Cracked or damaged tail light lenses are a common entry point for moisture.
- Improper Installation: Installing a bulb incorrectly or using the wrong type of bulb can also lead to premature failure. Always refer to your vehicle's owner's manual for the correct bulb type.
Consequences of Ignoring a Faulty Tail Light
Ignoring a burnt-out or failing tail light can have serious consequences:
- Reduced Visibility: The primary function of tail lights is to make your vehicle visible to other drivers, especially in low-light conditions. A faulty tail light significantly reduces your visibility, increasing the risk of rear-end collisions.
- Legal Penalties: Driving with a burnt-out tail light is illegal in most jurisdictions. You could be pulled over and issued a ticket, resulting in fines and points on your driving record.
- Increased Accident Risk: As mentioned earlier, reduced visibility significantly increases your chances of being involved in an accident, particularly at night or in bad weather.
- Failed Vehicle Inspection: Many states require vehicles to pass safety inspections, and a faulty tail light will almost certainly result in a failed inspection. This means you won't be able to legally drive the vehicle until the issue is resolved.
Recommended Fixes: Replacing the Tail Light Bulb
Replacing a tail light bulb is usually a simple DIY project that can be completed in under 30 minutes. Here's a step-by-step guide:
- Gather Your Tools and Materials: You'll need a new tail light bulb (refer to your owner's manual for the correct type), a screwdriver (usually a Phillips head or flathead, depending on your vehicle), and possibly a pair of gloves.
- Access the Tail Light Assembly: The method for accessing the tail light assembly varies depending on your vehicle. Consult your owner's manual for specific instructions. Common methods include:
- Through the Trunk: Many vehicles have access panels inside the trunk that allow you to reach the back of the tail light assembly.
- From Outside the Vehicle: Some tail light assemblies are held in place by screws or clips on the outside of the vehicle.
- Remove the Tail Light Assembly (if necessary): If the bulb is not directly accessible, you may need to remove the entire tail light assembly. Carefully disconnect any electrical connectors attached to the assembly.
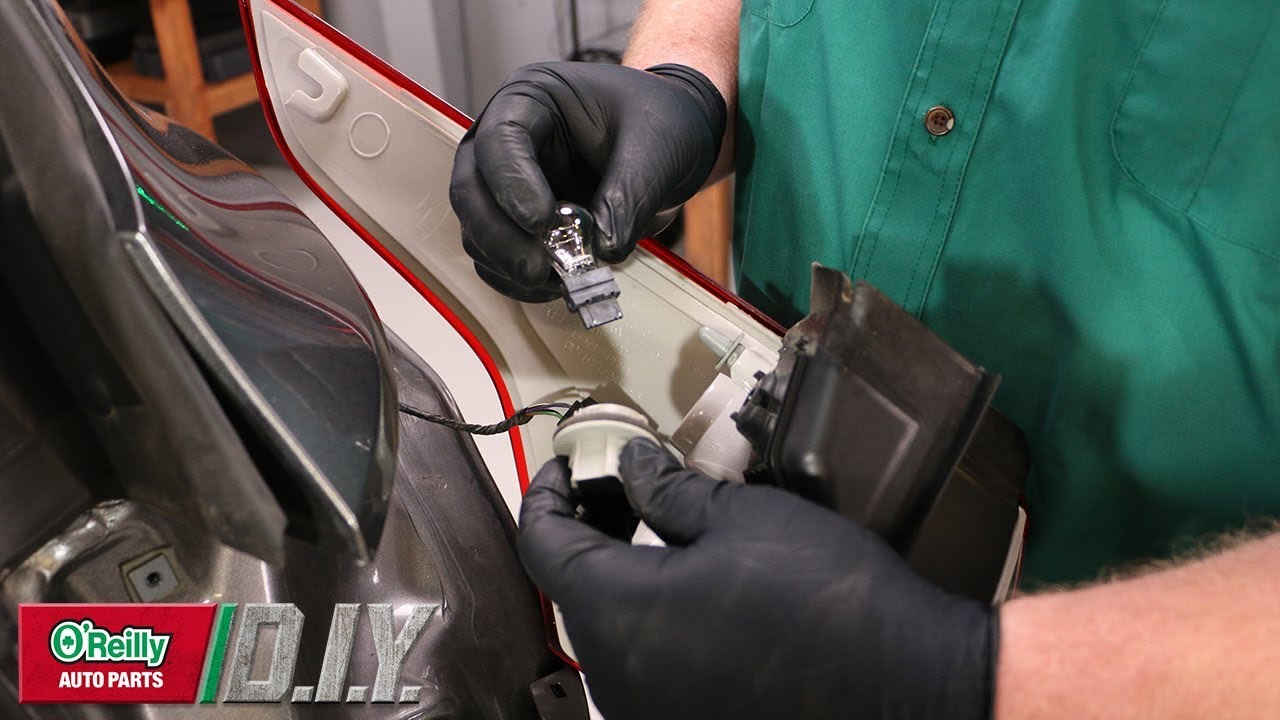
- Remove the Old Bulb: Once you have access to the bulb, carefully twist and remove it from the socket. Some bulbs may require you to press down and twist.
- Install the New Bulb: Insert the new bulb into the socket, making sure it's properly seated. Twist it until it locks into place.
- Reassemble the Tail Light Assembly (if necessary): If you removed the tail light assembly, carefully reattach it to the vehicle, reconnecting any electrical connectors.
- Test the Tail Light: Turn on your headlights and/or press the brake pedal to ensure the new bulb is working correctly. Also, test the turn signal if the bulb serves that function.
- Dispose of the Old Bulb Properly: Check your local regulations for proper disposal of used light bulbs.
Important Notes:
- Always disconnect the negative battery terminal before working on any electrical components of your vehicle. This will prevent accidental shocks or damage to the electrical system. While not always strictly necessary for a simple bulb replacement, it's a good safety practice.
- Handle the new bulb with care. Avoid touching the glass portion of the bulb, as oils from your skin can shorten its lifespan. If you do touch it, clean it with a clean, lint-free cloth.
- Consult your owner's manual. Your owner's manual contains specific instructions for replacing the tail light bulbs on your vehicle. It also lists the correct bulb type.
Cost Estimates and Shop Advice
The cost of replacing a tail light bulb can vary depending on the type of bulb and whether you do it yourself or have a mechanic do it. Here's a general breakdown:
- DIY Replacement:
- Bulb Cost: A standard tail light bulb typically costs between $5 and $15. LED bulbs, which are more durable and energy-efficient, may cost between $15 and $30.
- Tools: If you don't already have the necessary tools (screwdriver, etc.), you may need to purchase them. A basic screwdriver set can cost between $10 and $20.
- Total Cost: $5 - $50 (depending on bulb type and tools)
- Professional Replacement:
- Labor Cost: Labor costs can vary depending on the shop and the complexity of the job. Expect to pay between $25 and $75 for labor. Some shops may have a minimum labor charge.
- Bulb Cost: The shop will typically charge a markup on the bulb, so expect to pay more than if you bought it yourself.
- Total Cost: $30 - $105 (or more, depending on the vehicle and shop)
Shop Advice:
- Get a quote beforehand. Before having a mechanic replace your tail light bulb, get a written estimate that includes the cost of the bulb and the labor charge.
- Ask about warranty. Some shops offer a warranty on their work, which can provide peace of mind in case the bulb fails prematurely.
- Consider doing it yourself. As you've seen, replacing a tail light bulb is often a simple and straightforward process. If you're comfortable working on your car, you can save money by doing it yourself.
Credibility: TSBs, Community Data, and Failure Mileage
While specific Technical Service Bulletins (TSBs) addressing general tail light bulb failures are uncommon, TSBs may exist for specific vehicle models experiencing recurring issues with tail light assemblies, wiring harnesses, or related components. For example, some vehicles have known issues with moisture intrusion into the tail light assembly, which can lead to premature bulb failure. Searching online databases for TSBs related to your specific vehicle model and tail light issues can sometimes reveal valuable information.
Community forums and online automotive resources often provide valuable data on common tail light bulb failure rates. You may find that certain vehicle models or bulb types are more prone to failure than others. This anecdotal evidence, combined with your own observations, can help you anticipate and address potential issues before they become major problems.
The mileage at which tail light bulbs typically fail can vary widely depending on factors such as bulb type, driving conditions, and the quality of the vehicle's electrical system. However, as a general guideline, expect to replace tail light bulbs every 2-5 years, or around 30,000 to 60,000 miles. Keep an eye on your tail lights and replace them proactively if you notice any signs of dimming or flickering. Regularly checking your lights is part of good vehicle maintenance.
By understanding the symptoms, causes, and solutions for tail light bulb failures, you can keep your vehicle safe and compliant with traffic laws. Remember, proactive maintenance and timely repairs are essential for ensuring your safety and the safety of others on the road.