How To Remove The Brake Light Switch
The brake light switch is a small but crucial component of your vehicle's safety system. It's responsible for activating your brake lights when you press the brake pedal, alerting drivers behind you that you're slowing down or stopping. Knowing how to remove a faulty brake light switch can save you money on costly mechanic bills and help ensure your vehicle remains safe and compliant with traffic laws. This article provides a comprehensive guide on how to remove a brake light switch, offering practical advice, safety precautions, and helpful insights to empower you to tackle this task confidently.
Why Replacing a Faulty Brake Light Switch Matters
A malfunctioning brake light switch can lead to several serious problems, jeopardizing your safety and potentially leading to accidents. Here's why addressing a faulty switch promptly is essential:
- Safety Hazard: The most obvious risk is the failure of your brake lights to illuminate when braking. This significantly increases the risk of rear-end collisions, especially in low-visibility conditions or heavy traffic.
- Cruise Control Issues: Many vehicles use the brake light switch signal to disengage the cruise control system. A faulty switch can prevent the cruise control from disengaging, leading to dangerous situations if you need to quickly slow down.
- Starting Problems: In some vehicles, the brake light switch is integrated into the starting system. If the switch fails, it may prevent you from starting your car.
- Check Engine Light: A faulty brake light switch can trigger the check engine light, indicating a problem with your vehicle's system.
- ABS and Traction Control Issues: In modern vehicles, the brake light switch signal is often used by the ABS (Anti-lock Braking System) and traction control systems. A faulty switch can affect the performance of these critical safety features.
How to Choose the Right Replacement Brake Light Switch
Before you even think about removing the old switch, it's paramount you have the correct replacement. Here's how to ensure you get the right one:
- Vehicle Year, Make, and Model: This is the most important information. Consult your vehicle's owner's manual or a reliable auto parts website (like RockAuto, AutoZone, or Advance Auto Parts) and enter your vehicle's details to find compatible switches.
- Original Part Number: If possible, locate the original part number on the existing brake light switch. This ensures a perfect match. The part number is typically stamped or printed on the switch housing.
- Connector Type: The electrical connector on the switch must match the connector in your vehicle's wiring harness. Examine the connector on your old switch and compare it to the new one.
- Adjustability: Some brake light switches are adjustable, allowing you to fine-tune the point at which the brake lights activate. Make sure the new switch has the same adjustability as the old one, if applicable.
- Quality and Brand: Opt for reputable brands known for producing reliable automotive parts. While cheaper, generic brands might save you a few dollars initially, they are often less durable and more prone to failure. Consider brands like Bosch, ACDelco, or Standard Motor Products.
Step-by-Step Guide: How to Remove the Brake Light Switch
Important Safety Precautions: Before you begin, disconnect the negative terminal of your vehicle's battery. This prevents accidental electrical shocks and safeguards the vehicle's electrical system. Also, ensure the vehicle is parked on a level surface and the parking brake is engaged.
- Gather Your Tools: You'll typically need a few basic tools:
- Screwdrivers (Phillips and flathead)
- Wrench or socket set (depending on the switch mounting)
- Pliers (optional)
- Work light
- Safety glasses
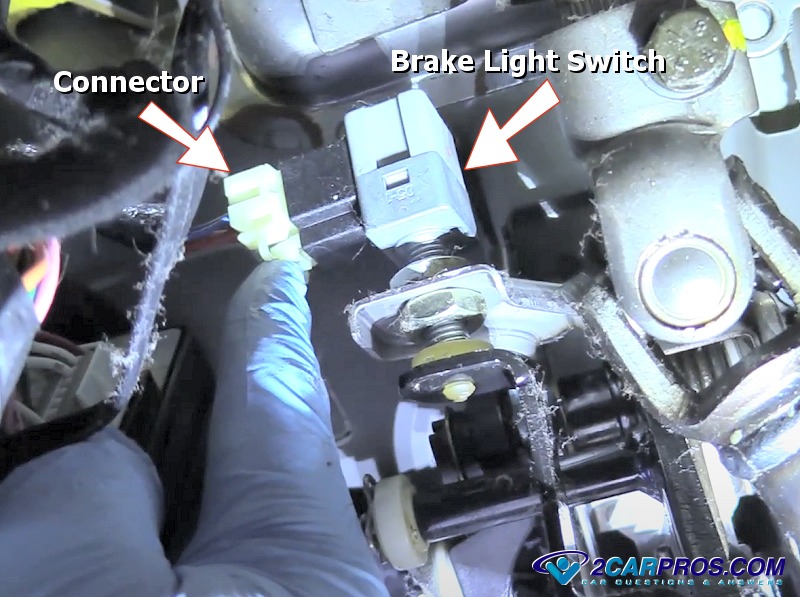
- Locate the Brake Light Switch: The brake light switch is typically located under the dashboard, near the brake pedal. You may need to remove a lower dash panel to gain access. Consult your vehicle's repair manual for specific instructions on panel removal. Look for a small, cylindrical switch attached to the brake pedal arm.
- Disconnect the Electrical Connector: Carefully disconnect the electrical connector from the brake light switch. There's usually a small locking tab or clip that you need to depress or release before pulling the connector off. Do not yank on the wires.
- Remove the Old Switch: The method for removing the switch varies depending on the vehicle. Some switches are held in place by a retaining clip, while others are threaded into a mounting bracket.
- Retaining Clip: If the switch is held in place by a clip, use a flathead screwdriver to gently pry the clip off. Be careful not to damage the clip, as you may need to reuse it.
- Threaded Switch: If the switch is threaded, use a wrench or socket to unscrew it from the mounting bracket. You may need to adjust the brake pedal position slightly to gain better access.
- Install the New Switch: Install the new brake light switch in the reverse order of removal.
- Retaining Clip: Insert the new switch into the mounting bracket and secure it with the retaining clip. Ensure the clip is properly seated.
- Threaded Switch: Screw the new switch into the mounting bracket until it's snug. Do not overtighten.
- Reconnect the Electrical Connector: Reconnect the electrical connector to the new brake light switch. Make sure the connector is securely attached.
- Test the Brake Lights: Reconnect the negative terminal of the battery. Have someone stand behind the vehicle and observe the brake lights while you press the brake pedal. Ensure the brake lights illuminate when the pedal is pressed and turn off when the pedal is released. Also check that the cruise control disengages when you press the brake.
- Adjust the Switch (If Necessary): Some brake light switches are adjustable. If the brake lights are not functioning correctly, you may need to adjust the switch position. Consult your vehicle's repair manual for specific adjustment instructions.
- Reinstall the Dash Panel: If you removed a lower dash panel to access the brake light switch, reinstall it securely.
Real-World Owner Experiences
Many vehicle owners have successfully replaced their brake light switches, saving money and gaining valuable experience. Here are a few common experiences:
- Difficulty Accessing the Switch: The most common challenge is the tight space under the dashboard. Using a work light and taking your time can help overcome this obstacle. Some owners find it helpful to remove the driver's seat for better access.
- Broken Retaining Clips: Retaining clips can become brittle with age and break easily. Be extremely careful when removing them. If the clip breaks, you may need to purchase a replacement from an auto parts store or a junkyard.
- Incorrect Switch Adjustment: Incorrect switch adjustment can lead to brake lights that are always on or that don't activate at all. Follow the adjustment instructions in your vehicle's repair manual carefully.
- Benefits of DIY: Many owners report feeling a sense of accomplishment and satisfaction after successfully completing the repair themselves. It's also a great way to learn more about your vehicle and its systems. The money saved on labor costs is an added bonus.
Frequently Asked Questions (FAQs)
Here are some frequently asked questions about brake light switches:
- Q: How much does it cost to replace a brake light switch at a mechanic?
A: The cost can vary depending on the vehicle and the mechanic's labor rate, but it typically ranges from $80 to $200. This includes the cost of the switch and the labor. - Q: How long does it take to replace a brake light switch?
A: For a DIY repair, it usually takes about 30 minutes to an hour, depending on your experience and the accessibility of the switch. A mechanic can typically complete the job in about 30 minutes. - Q: Can I drive with a faulty brake light switch?
A: It's generally not recommended to drive with a faulty brake light switch, as it poses a safety risk. If your brake lights are not working, you could be rear-ended. If you must drive, do so cautiously and during daylight hours. Get it repaired as soon as possible. - Q: How often should I replace my brake light switch?
A: There's no set replacement interval for brake light switches. They typically last for many years, but they can fail due to wear and tear or electrical issues. Replace the switch when it malfunctions. - Q: What are the symptoms of a bad brake light switch?
A: The most common symptoms include brake lights that don't work, brake lights that are always on, cruise control that doesn't disengage, starting problems, and a check engine light. - Q: Is it difficult to replace a brake light switch myself?
A: Replacing a brake light switch is generally a straightforward task that most DIYers can handle. The difficulty level varies depending on the vehicle and the accessibility of the switch.
By following these steps and taking the necessary precautions, you can confidently remove and replace your brake light switch, ensuring your vehicle's safety and saving yourself money on expensive repairs. Remember to always consult your vehicle's repair manual for specific instructions and torque specifications.