How To Remove The Center Console
So, you're thinking about tackling the task of removing your car's center console? Maybe you're planning to upgrade your stereo system, replace a faulty shifter, run new wiring, or simply give the interior a thorough cleaning. Whatever your reason, understanding the process involved is crucial for a successful and damage-free operation. Let's dive into the mechanics and considerations behind disassembling this often-overlooked component of your vehicle's interior.
The Center Console: More Than Just a Storage Space
Think of the center console as the command center of your car's interior. It's not just a place to stash your sunglasses and spare change. It often houses vital components such as the gear shifter, parking brake lever, climate control modules, infotainment system controls, and various wiring harnesses. Removing it requires a methodical approach, understanding the order of disassembly, and identifying potential pitfalls.
Imagine your car's interior as a multi-layered cake. The center console is one of the middle layers, sitting atop the transmission tunnel and often tucked beneath the dashboard. To get to it without making a mess (read: breaking plastic clips and snapping wires), you need to carefully peel back the surrounding layers in the right sequence.
Understanding the Mechanical System
At its core, the center console's attachment relies on a combination of fasteners and friction. Here's a breakdown of the common components:
Fasteners
- Screws: Typically Phillips head or Torx screws, often hidden beneath plastic covers or inside storage compartments. These are the most common and straightforward to deal with.
- Bolts: Larger than screws, usually found securing the console to the floor or transmission tunnel.
- Clips: The bane of many DIY mechanics. These small plastic or metal clips hold trim panels together. They're designed for quick assembly at the factory, but they can be brittle and easily broken if not handled with care.
- Snap-fit connectors: Used for electrical connections, these require depressing a release tab before they can be separated. Forcefully pulling them apart can damage the connector or the wiring.
Friction and Interlocking
- Trim panels: Often interlock with each other, requiring a specific sequence of removal to avoid damaging the attachment points.
- Rubber seals and gaskets: Can create friction and make removal more difficult.
The console's shape is designed to fit snugly within the car's interior. Its integration with the dashboard, seats, and floor creates a network of interlocking parts. Disassembly is almost always a reverse process of assembly, so paying close attention to how things fit together during removal is vital for reassembly.
The Removal Process: A Step-by-Step Guide
While the exact procedure varies from vehicle to vehicle, a general outline can be followed:
- Preparation:
- Safety First: Disconnect the negative terminal of the battery. This prevents accidental shorts or airbag deployment.
- Gather Your Tools: You'll need a set of screwdrivers (Phillips and flathead), Torx bits, a socket set, plastic trim removal tools (essential for avoiding damage to plastic panels), and a flashlight.
- Consult Your Service Manual: The most accurate guide is your car's service manual. It provides detailed instructions and diagrams specific to your model.
- Take Pictures: Before you start removing anything, take pictures of the console from different angles. This will serve as a valuable reference during reassembly.
- Initial Disassembly:
- Remove the Shift Knob: This is usually threaded or held in place by a set screw. Consult your manual for the specific method.
- Remove the Parking Brake Handle: Similar to the shift knob, it may be threaded, bolted, or secured with a pin.
- Remove any Removable Components: Empty the console compartments, remove any floor mats or liners, and take out any accessories plugged into power outlets.
- Exposing the Fasteners:
- Locate and Remove Hidden Covers: Many screws are hidden beneath small plastic covers. Use a trim removal tool to carefully pry these covers off.
- Remove Trim Panels: Gently pry off any trim panels surrounding the console. Work slowly and methodically, listening for the sound of clips releasing. If a panel feels stuck, double-check for hidden screws.
- Disconnecting Electrical Connectors:
- Identify Connectors: Look for wiring harnesses connected to switches, outlets, and control modules.
- Release the Locks: Most connectors have a small locking tab that needs to be depressed before the connector can be separated.
- Do NOT Pull on Wires: Always grasp the connector body to avoid damaging the wires.
- Label Everything: Use masking tape and a marker to label each connector as you disconnect it. This is crucial for proper reassembly.
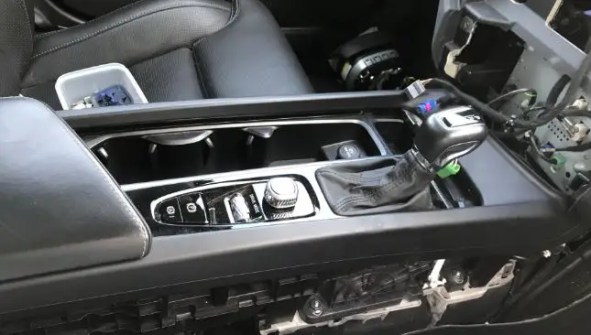
- Removing the Console Body:
- Remove the Screws/Bolts: With all the trim panels and electrical connections out of the way, you should now have access to the screws or bolts that secure the console to the floor or transmission tunnel.
- Lift and Remove: Once all the fasteners are removed, carefully lift the console body out of the car. You may need to wiggle it slightly to disengage it from any remaining interlocking parts.
Pros and Cons of DIY Console Removal
Pros:
- Cost Savings: Avoid the labor costs of a professional mechanic.
- Increased Understanding: Gain a deeper understanding of your car's inner workings.
- Customization: Allows for easier modification and customization of the interior.
- Flexibility: Work at your own pace and on your own schedule.
Cons:
- Risk of Damage: Improper technique can lead to broken clips, scratched panels, or damaged wiring.
- Time Commitment: Can be time-consuming, especially for complex consoles.
- Potential for Frustration: Dealing with stubborn fasteners and hidden clips can be frustrating.
- Warranty Implications: Removing components yourself may void certain aspects of your car's warranty.
Use Cases and Manufacturer Examples
Consider a scenario: You want to install a new aftermarket stereo system in your 2015 Honda Civic. This typically involves removing the center console to access the wiring harness and mounting points for the head unit. Alternatively, imagine you need to replace a faulty shifter in your 2018 Ford Mustang. This necessitates removing the center console to gain access to the shifter assembly.
Different manufacturers approach center console design in various ways. BMW, for instance, often integrates their infotainment system controls (iDrive) into the center console, making its removal a bit more complex due to the electrical connections involved. Toyota tends to use a more straightforward design with fewer hidden fasteners, making it relatively easier to disassemble. Tesla vehicles often have a minimalist center console design, but due to the integration of numerous functions into the central touchscreen, removing it requires specialized knowledge and tools.
Real-World Insights and Recommendations
Based on real-world experience, here are some crucial recommendations:
- Invest in Quality Tools: A good set of trim removal tools is worth its weight in gold. Avoid using screwdrivers to pry off plastic panels, as this will almost certainly result in scratches and damage.
- Take Your Time: Rushing the process increases the risk of mistakes. Work slowly and methodically, paying close attention to each step.
- Don't Be Afraid to Ask for Help: If you're unsure about something, don't hesitate to consult a mechanic or experienced friend.
- Document Everything: Take pictures and notes throughout the process. This will be invaluable during reassembly.
- Organize Your Parts: Keep all the screws, bolts, and clips organized in labeled containers. This will prevent confusion and ensure that you have everything you need for reassembly.
- Consider Purchasing Replacement Clips: Plastic clips are prone to breaking, so it's a good idea to have a supply of replacements on hand. You can usually find them at your local auto parts store or online.
Removing your car's center console can be a rewarding experience, allowing you to customize your interior, perform repairs, and gain a deeper understanding of your vehicle. By following these guidelines and taking your time, you can tackle this project with confidence and achieve a successful outcome. Remember, patience and meticulousness are your best friends in this endeavor. Good luck, and happy wrenching!