How To Remove The Drive Shaft
The driveshaft, a seemingly simple component, is the unsung hero in many rear-wheel drive and four-wheel drive vehicles. Its primary task is to transmit torque from the transmission to the differential, and ultimately to the wheels, propelling the vehicle forward (or backward!). But what happens when this crucial link needs replacement, repair, or simply inspection? Removing a driveshaft might seem daunting, but with the right knowledge and tools, it's a task achievable by a competent DIY enthusiast. This guide will walk you through the process, explaining the mechanics involved and offering practical advice.
Understanding the Challenge: Why Remove the Driveshaft?
Imagine trying to ride a bicycle with a broken chain. No matter how hard you pedal, the power won't reach the rear wheel. Similarly, a damaged or worn driveshaft prevents the transmission's rotational force from reaching the differential, rendering the vehicle immobile or causing serious vibrations and noises. There are several reasons why you might need to remove a driveshaft:
- Replacement: Damage from impacts, excessive wear, or corrosion can necessitate driveshaft replacement.
- Universal Joint (U-Joint) Repair: U-joints are critical components that allow the driveshaft to articulate as the suspension moves. Worn or damaged U-joints often require removal of the driveshaft for repair or replacement.
- Center Support Bearing Replacement: On longer vehicles, a center support bearing helps support the driveshaft and reduce vibrations. These bearings can wear out and require replacement, which often involves driveshaft removal.
- Transmission or Differential Repair: Sometimes, accessing the transmission or differential for repairs is easier with the driveshaft removed, providing more working space.
- Off-Road Modifications: Installing a lifted suspension may require a longer driveshaft or the addition of a slip yoke eliminator (SYE) kit, both necessitating driveshaft removal.
Think of the driveshaft as the backbone of your vehicle's drivetrain. Just as a chiropractor might need to adjust your spine to alleviate pain and improve mobility, a mechanic might need to remove or adjust the driveshaft to fix drivetrain problems.
Mechanical Deep Dive: How the Driveshaft System Works
The driveshaft isn't just a solid metal rod. It's a carefully engineered component designed to withstand significant torsional stress and accommodate changes in driveline geometry. Let's break down the key elements:
Driveshaft Construction:
Most driveshafts are made of steel or aluminum, chosen for their strength-to-weight ratio. Steel driveshafts are typically heavier but more durable, while aluminum driveshafts are lighter and can improve fuel economy and acceleration. The driveshaft itself is usually a hollow tube, which provides high torsional strength while minimizing weight. Some high-performance vehicles use carbon fiber driveshafts for even greater weight reduction and improved responsiveness.
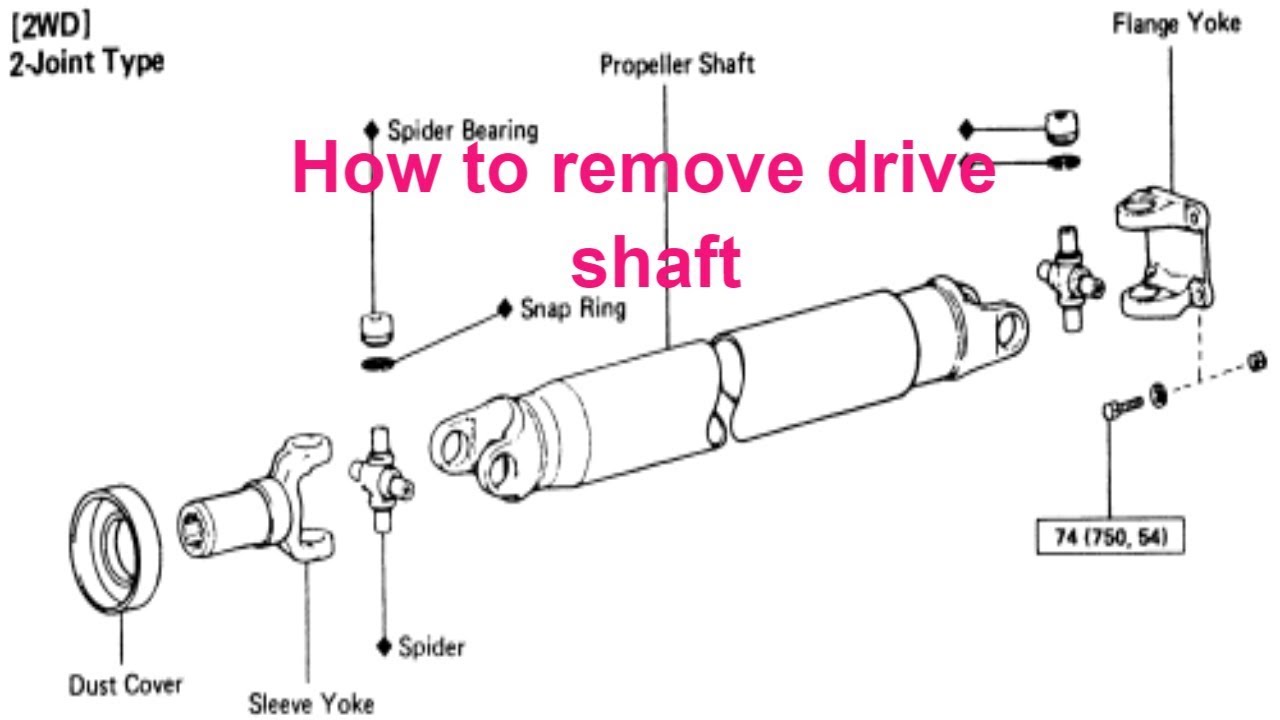
Universal Joints (U-Joints):
U-joints are critical components that allow the driveshaft to transmit torque through varying angles. They consist of two yokes connected by a cross-shaped journal with needle bearings. These bearings allow the yokes to rotate relative to each other, accommodating the constant changes in angle between the transmission and differential as the suspension moves. There are different types of U-joints, including standard U-joints, CV (constant velocity) joints, and double cardan joints, each suited for different applications and operating angles.
Slip Yoke:
The slip yoke is a splined fitting that connects the driveshaft to the transmission. It allows the driveshaft to slide in and out, compensating for changes in length as the suspension articulates. This is particularly important in vehicles with rear suspension that moves significantly.
Center Support Bearing (if applicable):
On longer vehicles, such as trucks and vans, a center support bearing is used to support the driveshaft and prevent it from vibrating excessively. This bearing is typically mounted to a crossmember on the vehicle's frame.
Flanges and Bolt Patterns:
The driveshaft is typically connected to the transmission and differential via flanges or yokes that are bolted together. The bolt pattern and size of these flanges vary depending on the vehicle make and model. It's crucial to identify the correct bolt pattern to ensure proper installation and prevent vibration or damage.
The Removal Process: Step-by-Step Guide
Before starting any automotive work, safety is paramount. Always wear safety glasses and gloves. Use jack stands to support the vehicle securely. Disconnect the negative battery terminal to prevent accidental electrical shocks.
- Preparation: Gather your tools: wrench set, socket set, penetrating oil, floor jack, jack stands, wheel chocks, and a drain pan (for potential fluid spillage).
- Loosen Lug Nuts: Slightly loosen the lug nuts on the rear wheels. This will make removing the wheels easier later.
- Raise and Secure the Vehicle: Use a floor jack to raise the rear of the vehicle. Place jack stands under the frame rails for support. Never work under a vehicle supported only by a jack.
- Remove Rear Wheels: Completely remove the rear wheels to provide better access to the driveshaft.
- Mark the Driveshaft: Use a paint marker or scribe to mark the driveshaft and the differential flange. This ensures that you reinstall the driveshaft in the same orientation, which can help prevent vibration.
- Disconnect the Driveshaft: Locate the bolts or straps that secure the driveshaft to the differential flange. Apply penetrating oil to the bolts to loosen them. Use a wrench or socket to remove the bolts or straps. Be prepared for some fluid to leak out of the transmission or differential. Place a drain pan underneath to catch any spills.
- Slide the Driveshaft Out: Once the bolts are removed, carefully slide the driveshaft out of the transmission. If the driveshaft has a slip yoke, it should slide out easily. If the driveshaft is a fixed-yoke type, you may need to lower the differential slightly to create enough clearance.
- Support the Driveshaft: As you slide the driveshaft out, support its weight to prevent it from dropping and potentially causing damage.
- Inspect the Driveshaft: Once the driveshaft is removed, inspect it for any signs of damage, such as dents, cracks, or worn U-joints.
Pros and Cons of DIY Driveshaft Removal
Pros:
- Cost Savings: Performing the removal yourself can save you a significant amount of money on labor costs.
- Learning Experience: It provides a valuable learning experience and allows you to gain a deeper understanding of your vehicle's mechanics.
- Control: You have complete control over the process and can ensure that the work is done to your satisfaction.
Cons:
- Time Commitment: It can be time-consuming, especially if you're not familiar with the process.
- Potential for Mistakes: If not done correctly, you could damage the driveshaft or other components.
- Special Tools: Some tasks may require specialized tools that you may not have.
Use Cases and Manufacturer Examples
Driveshaft removal is common across various vehicle types. Here are a few examples:
- Jeep Wrangler: Off-road enthusiasts often remove the driveshaft to install a slip yoke eliminator (SYE) kit or upgrade to a stronger driveshaft to handle the increased stresses of off-road driving.
- Ford Mustang: Performance enthusiasts might remove the driveshaft to upgrade to a one-piece aluminum or carbon fiber driveshaft for improved acceleration and reduced driveline vibration.
- Chevrolet Silverado/GMC Sierra: Truck owners might need to remove the driveshaft to replace the center support bearing or U-joints due to wear and tear from heavy use.
- BMW 3 Series: A common repair on older BMWs is replacing the driveshaft flex disc (guibo) which requires driveshaft removal for access.
Manufacturers like Dana Spicer and AAM (American Axle & Manufacturing) are major suppliers of driveshafts and related components to various automotive manufacturers. These companies offer a wide range of driveshaft solutions for different applications, from standard passenger vehicles to heavy-duty trucks and off-road vehicles.
Real-World Insights and Recommendations
Based on real-world experience, here are a few recommendations to keep in mind:
- Penetrating Oil is Your Friend: Don't underestimate the power of penetrating oil. Apply it liberally to any rusted or corroded bolts well in advance of attempting to remove them.
- Proper Tools are Essential: Using the correct tools will make the job much easier and prevent damage to the components.
- Take Your Time: Rushing the process can lead to mistakes and potential injuries. Work carefully and methodically.
- Inspect Everything: While the driveshaft is removed, take the opportunity to inspect other components, such as the transmission output shaft seal and the differential pinion seal. Replace any worn or leaking seals.
- Consider a Repair Manual: A repair manual specific to your vehicle can provide detailed instructions and torque specifications.
- Torque Specifications: Always use a torque wrench and tighten all fasteners to the manufacturer's specified torque. This is crucial for ensuring proper clamping force and preventing vibration or loosening.
- If in Doubt, Seek Professional Help: If you're unsure about any aspect of the removal process, it's always best to consult a qualified mechanic.
Removing a driveshaft can be a satisfying and empowering experience. By understanding the mechanics involved, following the proper procedures, and taking your time, you can successfully complete this task and save money on costly repairs. Remember to prioritize safety and consult a professional if you encounter any difficulties. A well-maintained driveshaft ensures smooth power delivery and a comfortable driving experience.