How To Remove Tie Rod End
Alright, let's talk about tie rod ends. These little guys are critical for steering, and knowing how to replace them is a valuable skill for any serious DIY mechanic. This guide isn't about just blindly wrenching; it's about understanding the system, diagnosing the problem, and tackling the job safely and effectively.
Purpose: Why Understanding Tie Rod End Removal Matters
You might be diving into this because your steering feels loose, you've got a clunking noise when turning, or your tires are wearing unevenly. Maybe you're upgrading to stronger tie rod ends for off-roading, or simply performing routine maintenance. Whatever the reason, understanding the removal and installation process for tie rod ends allows you to:
- Save Money: Labor costs at a shop can be significant. Doing it yourself can save you a bundle.
- Gain Confidence: There's a great feeling of accomplishment that comes from tackling a repair yourself.
- Improve Understanding: You'll gain a deeper understanding of your vehicle's steering system.
- Prevent Future Problems: Identifying worn components early can prevent more serious and costly repairs down the road.
Key Specs and Main Parts
Before we get our hands dirty, let's break down the components we'll be dealing with. The tie rod end is a crucial part of your vehicle's steering linkage, connecting the steering rack or center link to the steering knuckle (also sometimes called the spindle). This connection allows the rotational movement of the steering wheel to be translated into the lateral movement that turns the wheels.
Main Parts:
- Outer Tie Rod End: This is the part we'll focus on. It connects to the steering knuckle. It has a threaded stud that goes through the knuckle and is secured with a nut and usually a cotter pin.
- Inner Tie Rod End: Connects the outer tie rod end to the steering rack (in rack and pinion systems) or the center link (in older parallelogram steering systems). It's often protected by a bellows boot (also known as a dust boot).
- Adjusting Sleeve/Turnbuckle: Connects the inner and outer tie rod ends. This is a threaded sleeve that allows for adjustment of the toe angle during wheel alignment.
- Locking Nuts/Clamps: Secure the adjusting sleeve in place after the toe angle has been adjusted.
- Cotter Pin: A small split pin that secures the nut on the tie rod end stud, preventing it from loosening.
- Grease Fitting (Zerk Fitting): Some tie rod ends have grease fittings that allow you to lubricate the joint.
Key Specs (Important for Replacement):
- Thread Size and Pitch: The thread size and pitch of the tie rod end stud and the adjusting sleeve threads are critical for compatibility. Make sure you get the correct replacement parts.
- Length: The overall length of the tie rod end, including the stud, needs to be correct to maintain proper steering geometry.
- Taper Angle: The taper angle of the stud that fits into the steering knuckle must match the angle of the hole in the knuckle.
How It Works: A Simplified Explanation
The steering system works like this: when you turn the steering wheel, it rotates the steering shaft. In a rack and pinion system, this rotation moves a rack laterally. This lateral movement is then transferred to the tie rod ends, which push or pull on the steering knuckles, causing the wheels to turn. In a parallelogram steering system, the steering wheel rotates a pitman arm, which connects to the center link. The center link then moves the tie rods to turn the wheels.
The tie rod ends are ball joints, meaning they allow for movement in multiple directions. This is necessary because the suspension moves up and down while you're steering. Without the flexibility of the ball joint, the steering would bind up or break.
Real-World Use: Troubleshooting and Diagnosis
Here are some common symptoms of worn tie rod ends and basic troubleshooting tips:
- Loose Steering: The steering wheel feels vague or has excessive play.
- Wandering: The vehicle drifts from side to side on the road.
- Uneven Tire Wear: Especially wear on the inside or outside edge of the tires.
- Clunking Noise: A noticeable clunking sound, especially when turning or going over bumps.
- Visual Inspection: Check for excessive play in the tie rod end. You can do this by jacking up the vehicle and trying to move the tire back and forth. If you feel play in the tie rod end joint, it needs to be replaced. Also look for torn or damaged dust boots.
Removing the Tie Rod End: A Step-by-Step Guide
Tools You'll Need:
- Jack and Jack Stands
- Wheel Chocks
- Wrenches (various sizes)
- Hammer
- Pickle Fork (Tie Rod Separator) or Tie Rod End Puller
- Penetrating Oil (like PB Blaster)
- Torque Wrench
- Measuring Tape or Marking Tool
- Safety First: Chock the rear wheels, loosen the lug nuts on the wheel you'll be working on, jack up the vehicle, and secure it with jack stands. Never work under a vehicle supported only by a jack. Remove the wheel.
- Loosen the Locking Nut: Locate the locking nut on the adjusting sleeve that secures the outer tie rod end. Spray it with penetrating oil and let it soak for a few minutes. Use a wrench to loosen the locking nut. Do not remove it completely.
- Mark the Tie Rod End Position: This is crucial for getting the alignment close when you reinstall the new tie rod end. Measure the distance from a fixed point on the inner tie rod to a point on the outer tie rod end. Alternatively, you can use a marking tool to scribe a line on the adjusting sleeve at the point where the outer tie rod end threads in.
- Remove the Cotter Pin: Locate the cotter pin on the castle nut that secures the tie rod end stud to the steering knuckle. Remove the cotter pin with pliers. If it's rusted and difficult to remove, you may need to use a small punch or screwdriver to help dislodge it.
- Loosen the Castle Nut: Loosen the castle nut on the tie rod end stud. Do not remove it completely at this stage. Leaving it partially threaded on will prevent the knuckle from suddenly dropping when you separate the tie rod end.
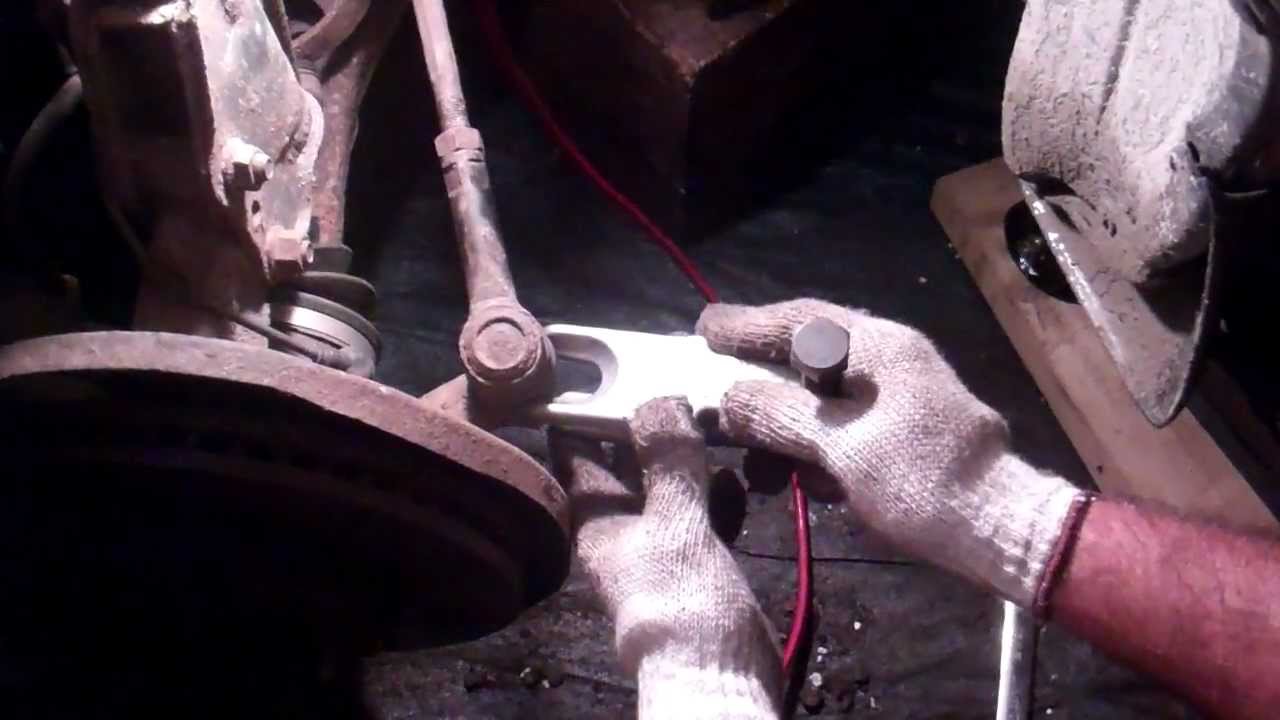
- Separate the Tie Rod End from the Knuckle: This is where the pickle fork or tie rod end puller comes in.
- Pickle Fork Method: Insert the pickle fork between the steering knuckle and the tie rod end. Use a hammer to strike the end of the pickle fork until the tie rod end separates. Be aware that this method will likely damage the dust boot, so only use it if you're replacing the tie rod end anyway.
- Tie Rod End Puller Method: Place the puller over the tie rod end stud and tighten it until the tie rod end separates. This method is less likely to damage the dust boot.
- Remove the Castle Nut: Now that the tie rod end is separated from the knuckle, you can completely remove the castle nut.
- Unscrew the Tie Rod End: Unscrew the outer tie rod end from the adjusting sleeve. Keep track of the number of turns it takes to remove the old tie rod end. This will help you get the new one installed in the correct position.
Safety Considerations
- Eye Protection: Always wear safety glasses when working on vehicles.
- Penetrating Oil: Be careful when using penetrating oil, as it can be flammable. Avoid spraying it near open flames or hot surfaces.
- Suspension Components Under Load: Suspension components are under significant load. Make sure the vehicle is properly supported with jack stands before working on them. Never put any part of your body under a vehicle that's only supported by a jack.
- Damaged Dust Boots: A torn or damaged dust boot allows dirt and moisture to enter the tie rod end joint, leading to premature wear and failure. Always replace a tie rod end if the dust boot is damaged.
- Proper Torque: Always use a torque wrench to tighten nuts and bolts to the manufacturer's specifications. Over-tightening can damage the components, while under-tightening can lead to them coming loose.
Remember, this is a general guide. Specific procedures may vary depending on the make and model of your vehicle. Always consult your vehicle's repair manual for detailed instructions and torque specifications.
We have a detailed diagram available for download to further assist you with visualizing the process and understanding the components. Having a visual reference can be invaluable, especially when dealing with complex systems.