How To Replace A Brake Light Switch
Replacing a brake light switch is a common car repair task that many vehicle owners can tackle themselves. When your brake lights aren't functioning properly, it can be a serious safety hazard. This article will guide you through the process of diagnosing a faulty brake light switch, selecting the correct replacement, and performing the replacement safely and effectively. Whether you're a seasoned DIYer or a first-timer, this guide will equip you with the knowledge you need to get the job done right.
Why Replacing Your Brake Light Switch Matters
A functioning brake light system is absolutely critical for road safety. Brake lights alert other drivers when you are slowing down or stopping, giving them time to react and avoid a collision. A faulty brake light switch can lead to several dangerous scenarios:
- No Brake Lights: This is the most obvious and dangerous issue. Other drivers won't know you're braking, significantly increasing the risk of a rear-end collision.
- Constantly On Brake Lights: If your brake lights are always illuminated, it can confuse other drivers and mask genuine braking, potentially leading to accidents. It can also drain your car battery.
- Intermittent Brake Lights: Sometimes, the brake lights might work intermittently. This inconsistency is equally dangerous because other drivers can't rely on your signals.
Beyond the immediate safety concerns, a malfunctioning brake light switch can also cause other issues. It's often tied into other systems like cruise control and transmission shifting. For example, your cruise control might not engage, or you might have difficulty shifting out of "Park" if the switch isn't sending the correct signals to the car's computer.
Ignoring a faulty brake light switch can lead to legal consequences too. Driving with malfunctioning brake lights is often a traffic violation, resulting in fines and points on your driving record. Therefore, addressing this issue promptly is crucial for your safety, the safety of others, and to avoid potential legal problems.
How to Choose the Right Brake Light Switch
Selecting the correct replacement brake light switch is paramount for a successful repair. Using the wrong switch can lead to improper function, electrical issues, or even damage to your vehicle's electrical system. Here's how to make sure you get the right one:
1. Identify Your Vehicle Information
The most crucial step is to accurately identify your vehicle's year, make, and model. This information is essential for finding a compatible brake light switch. You can usually find this information on your vehicle registration, insurance card, or a sticker located on the driver's side doorjamb.
2. Check Your Owner's Manual
Your owner's manual might contain information about the specific type of brake light switch used in your vehicle. While it might not give you the exact part number, it can provide helpful details about the switch's specifications.
3. Consult a Reputable Auto Parts Store
Visit a reputable auto parts store, either online or in person. Provide them with your vehicle's year, make, and model. They will be able to look up the correct brake light switch for your car. They often have different brands and price points available.
4. Use Online Part Finders
Many online auto parts retailers have part finder tools. Enter your vehicle's information, and the tool will generate a list of compatible brake light switches. Be sure to double-check the results to ensure they are accurate.
5. Compare Part Numbers
If possible, compare the part number of the old brake light switch with the part number of the replacement switch. This is the most reliable way to ensure compatibility. The part number is usually printed on the switch itself. Be aware that different manufacturers might have equivalent part numbers, so cross-referencing is always a good idea.
6. Read Reviews
Before purchasing a brake light switch, read reviews from other car owners who have used the same part. This can give you valuable insights into the switch's reliability and performance.
7. Consider the Brand
While there are many aftermarket brake light switches available, it's generally recommended to choose a reputable brand. Well-known brands often have better quality control and a longer lifespan. OEM (Original Equipment Manufacturer) parts are usually the best choice for guaranteed compatibility and reliability, but they might be more expensive.
Replacing Your Brake Light Switch: A Step-by-Step Guide
Now, let's get to the actual replacement process. Always prioritize safety. Disconnect the negative battery terminal before starting any electrical work on your vehicle. This will prevent accidental shorts and potential injuries.
- Gather Your Tools and Materials: You'll need the new brake light switch, a wrench or socket set (the size will depend on your vehicle), a screwdriver (usually Phillips head), and possibly a multimeter (for testing). You might also need a flashlight to see clearly under the dashboard.
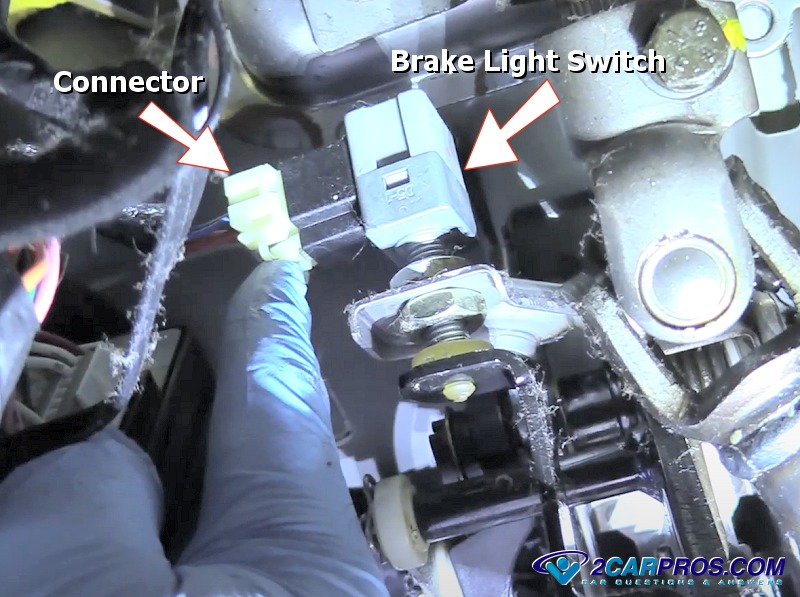
- Locate the Brake Light Switch: The brake light switch is typically located near the top of the brake pedal arm, under the dashboard. You might need to contort yourself a bit to get a good view. Use a flashlight to help you see clearly.
- Disconnect the Wiring Harness: Carefully disconnect the wiring harness from the old brake light switch. There's usually a small clip or locking mechanism that you'll need to release. Be gentle; you don't want to break the connector.
- Remove the Old Switch: Depending on the vehicle, the switch might be threaded or held in place with a clip or fastener. If it's threaded, unscrew it. If it's held by a clip, carefully release the clip and pull the switch out.
- Install the New Switch: Install the new brake light switch in the reverse order of removal. Make sure it's securely fastened. If it's threaded, don't overtighten it, as this could damage the switch or the surrounding components.
- Reconnect the Wiring Harness: Reconnect the wiring harness to the new brake light switch. Make sure the connector clicks into place and is securely attached.
- Test the Brake Lights: Reconnect the negative battery terminal. Have a helper stand behind the vehicle and observe the brake lights while you press the brake pedal. If the brake lights illuminate correctly, you've successfully replaced the switch. If not, double-check your connections and the switch installation.
- Adjust the Switch (If Necessary): Some brake light switches are adjustable. If your brake lights are staying on constantly or not coming on at all, you might need to adjust the switch's position. Refer to your vehicle's repair manual or an online guide for specific instructions on how to adjust the switch.
Important Considerations:
- Safety First: Always disconnect the battery before working on electrical components.
- Take Pictures: Before disconnecting anything, take pictures of the switch and wiring connections. This will help you remember how everything goes back together.
- Don't Force Anything: If something isn't coming apart easily, don't force it. Double-check that you've released all clips and fasteners.
Real-World Owner Experiences
Many car owners have successfully replaced their brake light switches themselves, saving money on labor costs. Here are a few common experiences and tips shared by others:
- Common Issue: A recurring issue is the switch being difficult to reach, requiring some flexibility and patience. Using a small mirror and a flashlight can help.
- Adjustment Challenges: Some owners have struggled with adjusting the new switch to the correct position. Consulting a vehicle-specific forum or repair manual can be invaluable in these situations.
- Aftermarket Switch Quality: While aftermarket switches are often cheaper, some owners have reported that they don't last as long as OEM switches. Investing in a higher-quality switch can save you time and money in the long run.
- Testing Tips: A multimeter can be used to test the continuity of the switch to ensure it's working correctly. This can help diagnose problems before and after installation.
Frequently Asked Questions (FAQs)
Here are some frequently asked questions about replacing brake light switches:
- Q: How much does it cost to replace a brake light switch?
- A: The cost can vary depending on the vehicle and the type of switch. The switch itself typically costs between $10 and $50. If you have a mechanic do it, labor costs can add another $50 to $150.
- Q: How long does it take to replace a brake light switch?
- A: For most vehicles, replacing a brake light switch is a relatively quick job, usually taking between 30 minutes to an hour.
- Q: Can I drive with a broken brake light switch?
- A: It's highly not recommended to drive with a broken brake light switch. It's a safety hazard and can lead to accidents. It's also illegal in many jurisdictions.
- Q: What are the symptoms of a bad brake light switch?
- A: The most common symptoms are brake lights that don't work, brake lights that stay on constantly, intermittent brake lights, cruise control that doesn't work, and difficulty shifting out of "Park".
- Q: Is it difficult to replace a brake light switch?
- A: Replacing a brake light switch is generally considered a relatively easy DIY repair. However, it does require some basic mechanical skills and tools.
- Q: What if my brake lights still don't work after replacing the switch?
- A: If your brake lights still don't work after replacing the switch, check the brake light bulbs, fuses, and wiring connections. There might be another issue in the brake light circuit.
By following this guide, you can confidently diagnose, select, and replace your brake light switch, ensuring your vehicle's safety and avoiding potential legal issues. Remember to prioritize safety and consult a professional mechanic if you're unsure about any part of the process.