How To Replace A Broken Stud On A Wheel
Replacing a broken wheel stud might seem daunting, but with the right tools, knowledge, and a little patience, it's a repair you can often handle yourself. This guide will walk you through the process step-by-step, ensuring you do it safely and effectively.
Why Replacing a Broken Wheel Stud Matters
A broken wheel stud is more than just an inconvenience; it's a serious safety hazard. Wheel studs are the crucial components that secure your wheel to the hub assembly. When one breaks, the remaining studs bear a greater load, increasing the risk of further stud failure. This can lead to wheel wobble, vibrations, and in the worst-case scenario, complete wheel separation from the vehicle while driving. Ignoring a broken wheel stud is simply not an option.
Beyond safety, a broken stud can cause damage to your wheel, hub, and even the brake rotor. Driving with a compromised wheel attachment puts undue stress on these components, potentially leading to costly repairs down the line. Addressing the issue promptly saves you money and keeps you and other drivers safe on the road.
Furthermore, many vehicle inspections will fail a car with a broken wheel stud. Getting it fixed is often a necessary step to keep your car legally compliant and roadworthy.
How to Choose the Right Replacement Wheel Stud
Selecting the correct replacement wheel stud is absolutely essential. Using the wrong size or type of stud can lead to improper wheel attachment, thread damage, and ultimately, a dangerous situation. Here's what you need to consider:
1. Vehicle Make, Model, and Year
The first and most crucial step is to identify the correct wheel stud for your specific vehicle. Consult your owner's manual or use online parts finders that allow you to input your vehicle information. These resources will typically list the correct stud size, thread pitch, and length for your car.
2. Stud Dimensions: Size, Thread Pitch, and Length
Wheel studs are defined by three primary measurements:
- Diameter (Size): This refers to the diameter of the stud's shank. Common sizes include 12mm and 14mm.
- Thread Pitch: This describes the spacing between the threads. Common thread pitches are 1.25, 1.5, and 1.75.
- Length: This is the overall length of the stud, from the base of the head to the tip.
You can usually find this information in your owner's manual or by searching online parts catalogs. If you're unsure, it's best to consult a mechanic or auto parts specialist.
3. Stud Type: Knurled or Serrated
Wheel studs are typically either knurled or serrated at the base. This knurling or serration is what provides the interference fit that holds the stud in the hub. Make sure to purchase the same type of stud that was originally installed on your vehicle.
4. Material and Quality
Opt for high-quality replacement studs made from durable materials such as heat-treated steel. Avoid inexpensive, generic studs, as they may not meet the necessary strength requirements and could fail prematurely.
5. Brand Reputation
Stick to reputable brands known for producing quality automotive parts. Some well-regarded brands include Dorman, ARP, and Raybestos. Reading online reviews can provide valuable insights into the performance and reliability of different brands.
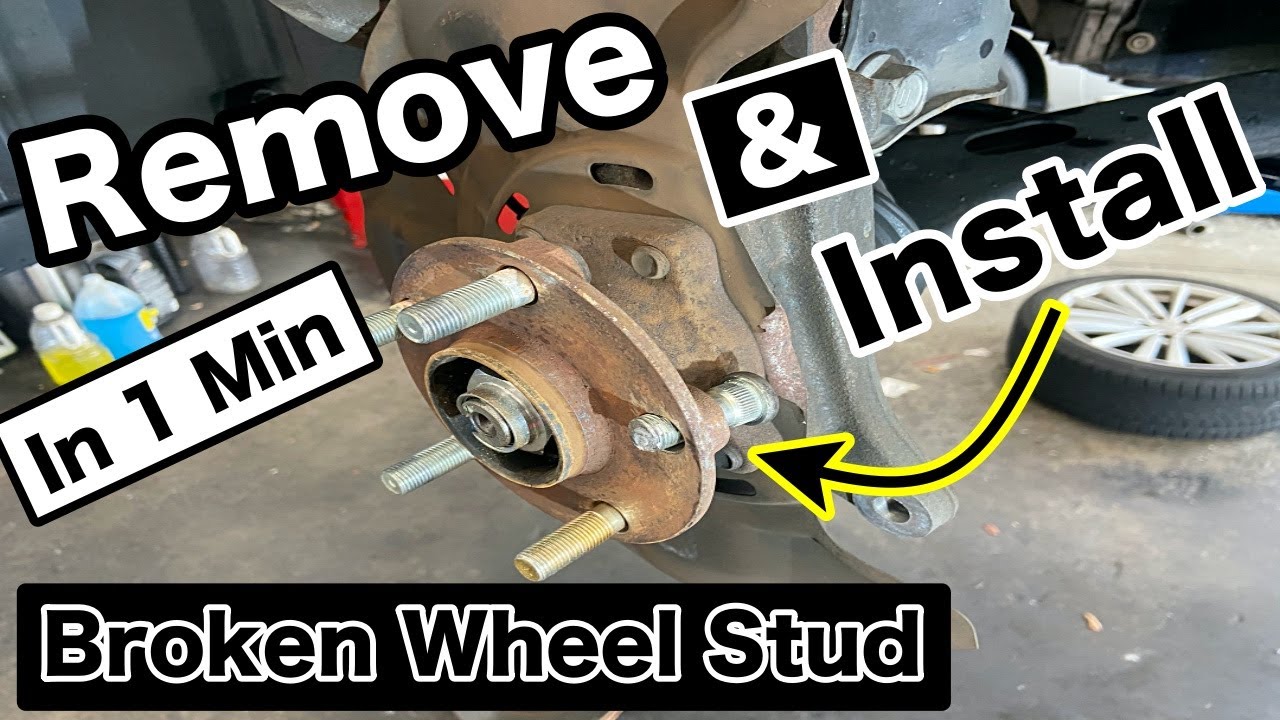
Step-by-Step Guide: Replacing a Broken Wheel Stud
Safety First: Before you begin, ensure your vehicle is parked on a level surface, the parking brake is engaged, and the wheels are chocked to prevent rolling. Wear safety glasses and gloves throughout the process.
Tools You'll Need:
- Jack and jack stands
- Lug wrench
- Socket set
- Hammer
- Punch or drift pin
- Wheel stud installation tool (or a lug nut and washers)
- Penetrating oil (like WD-40)
- Torque wrench
- Loosen the Lug Nuts: Use the lug wrench to loosen the lug nuts on the wheel with the broken stud. Do not remove them completely at this stage.
- Jack Up the Vehicle and Secure It: Use the jack to lift the vehicle and place jack stands securely under the frame. Never work under a vehicle supported only by a jack.
- Remove the Wheel: Finish removing the lug nuts and carefully take the wheel off the vehicle.
- Access the Broken Stud: You might need to remove the brake caliper and rotor to gain access to the back of the hub where the stud is located. If you are not comfortable doing this, consult a mechanic. If necessary, detach the brake caliper (without disconnecting the brake line) and secure it out of the way with a bungee cord or wire. Remove the brake rotor by gently tapping it with a rubber mallet if it's stuck.
- Remove the Broken Stud: Spray the broken stud with penetrating oil and let it sit for a few minutes. Use a hammer and punch or drift pin to drive the broken stud out of the hub. Place the punch on the exposed end of the stud (from the rear of the hub) and strike it firmly until the stud is dislodged.
- Install the New Stud: There are two common methods for installing a new wheel stud:
- Using a Wheel Stud Installation Tool: This is the preferred method. The tool pulls the stud into the hub without damaging the threads. Follow the tool's instructions carefully.
- Using a Lug Nut and Washers: Place the new stud through the hub. Stack several washers over the stud, then thread a lug nut onto the stud. Gradually tighten the lug nut, pulling the stud into the hub. Be careful not to overtighten and strip the threads. Ensure the stud is fully seated against the hub flange.
- Reinstall Components: If you removed the brake caliper and rotor, carefully reinstall them, ensuring they are properly aligned and secured.
- Reinstall the Wheel: Mount the wheel back onto the hub, aligning the lug holes with the studs.
- Tighten the Lug Nuts: Hand-tighten the lug nuts in a star pattern (opposite nuts) to ensure even pressure.
- Lower the Vehicle: Carefully lower the vehicle to the ground.
- Torque the Lug Nuts: Use a torque wrench to tighten the lug nuts to the manufacturer's specified torque. This is crucial for proper wheel attachment. Consult your owner's manual for the correct torque specification.
- Double-Check: After driving a short distance (e.g., 50-100 miles), re-torque the lug nuts to ensure they haven't loosened.
Real-World Owner Experiences
Many vehicle owners have successfully replaced broken wheel studs themselves, saving money on labor costs. However, it's important to approach the task with caution and attention to detail. Here are a few common experiences:
- Difficulty Removing the Old Stud: Rusty or corroded studs can be challenging to remove. Generous application of penetrating oil and patience are key. Using a good quality punch and hammer is also essential.
- Stripped Threads: Overtightening the lug nut during stud installation can strip the threads. This is why using a wheel stud installation tool is highly recommended.
- Incorrect Stud Size: Accidentally purchasing the wrong size stud can lead to frustration and delays. Double-check the specifications before buying.
- Brake Rotor Removal Challenges: Brake rotors can sometimes be difficult to remove due to rust and corrosion. Using a rubber mallet and penetrating oil can help.
- Importance of Torqueing: Several owners emphasize the critical importance of properly torqueing the lug nuts to the correct specification. This ensures the wheel is securely attached and prevents future problems.
Frequently Asked Questions (FAQs)
Q: Can I drive with a broken wheel stud?
A: No. Driving with a broken wheel stud is extremely dangerous and should be avoided at all costs. It significantly increases the risk of wheel failure and potential accidents.
Q: How much does it cost to have a mechanic replace a wheel stud?
A: The cost can vary depending on your location and the mechanic's labor rates, but typically ranges from $50 to $200 per stud. Replacing it yourself can save you money on labor costs.
Q: How often should I check my wheel studs?
A: It's a good practice to visually inspect your wheel studs periodically, especially after rotating your tires or having any work done on your brakes. Look for signs of damage, such as cracks, rust, or stretched threads.
Q: Can I replace all the wheel studs at once?
A: Yes, you can replace all the wheel studs on a hub at once if you prefer. This can be a good option if you suspect that other studs may be weakened or damaged.
Q: What if I damage the hub while removing the broken stud?
A: If you accidentally damage the hub, you may need to replace the entire hub assembly. This is a more complex repair that may require professional assistance.
Q: Are all wheel studs the same for the front and rear wheels?
A: No, wheel studs can differ between the front and rear wheels, even on the same vehicle. Always verify the correct part number and specifications for each axle.
By following these steps and taking the necessary precautions, you can safely and effectively replace a broken wheel stud, saving you money and ensuring your vehicle's safety. Remember to prioritize safety and consult a professional if you're unsure about any aspect of the process.