How To Replace A Crankshaft Seal
Replacing a crankshaft seal might seem daunting, but with the right tools, a bit of patience, and a clear understanding of the process, it's a task that many DIY mechanics can successfully tackle. This guide provides a step-by-step breakdown of how to replace a crankshaft seal, ensuring a smooth and efficient repair.
Why Replacing a Crankshaft Seal Matters
The crankshaft seal plays a crucial role in maintaining your engine's health and performance. It's responsible for preventing oil leaks from the front (timing cover side) or rear of the engine, where the crankshaft extends out to connect to the transmission or accessories. Oil leaks, even seemingly minor ones, can lead to several serious problems:
- Low Oil Levels: Oil leaks deplete the engine's oil supply, leading to insufficient lubrication. This can cause increased friction, wear, and ultimately, engine damage.
- Engine Damage: Prolonged low oil levels can result in catastrophic engine failure, requiring expensive repairs or even engine replacement.
- Environmental Concerns: Leaking oil is an environmental hazard and can contaminate soil and water.
- Safety Hazards: Oil leaks can drip onto hot engine components, potentially creating a fire hazard. Oil on the road surface is also a slip hazard for other vehicles, especially motorcycles.
- Aesthetic Issues: Oil leaks are simply messy and can make your vehicle look neglected.
Therefore, addressing a leaking crankshaft seal promptly is essential to protect your engine and prevent more significant problems down the road.
How to Choose the Right Crankshaft Seal
Selecting the correct replacement crankshaft seal is paramount. Using the wrong seal can lead to premature failure and continued oil leaks. Here's how to ensure you get the right one:
- Vehicle Identification Number (VIN): The VIN is the most reliable way to identify your vehicle's exact year, make, and model. Provide this number to your local auto parts store.
- Consult your Vehicle's Manual: Your vehicle's owner's manual or repair manual (like a Haynes or Chilton manual) should list the correct part number for the crankshaft seal.
- Match the Old Seal: If possible, carefully remove the old seal and compare it to the new one. Ensure the dimensions (inner diameter, outer diameter, and thickness) are identical. Pay close attention to the material as well. Some vehicles use specific materials designed to withstand heat and pressure.
- Research Reputable Brands: Choose a crankshaft seal from a reputable manufacturer known for producing high-quality automotive parts. Brands like Fel-Pro, National, and Timken are generally considered reliable.
- Front or Rear Seal: Be sure to specify whether you need the front or rear crankshaft seal. These are not interchangeable. The front seal is behind the crankshaft pulley, while the rear seal is behind the flywheel/flexplate.
Always double-check the seal's compatibility with your vehicle before starting the repair. Purchasing the wrong seal will only waste your time and money.
Step-by-Step Guide to Replacing a Crankshaft Seal
The following steps outline the general procedure for replacing a crankshaft seal. Keep in mind that specific steps may vary depending on your vehicle's make and model. Consult your vehicle's repair manual for detailed instructions specific to your car.
Tools and Materials Needed:
- New crankshaft seal
- Socket set and wrenches
- Torque wrench
- Crankshaft pulley removal tool (if applicable)
- Seal removal tool (seal puller or screwdriver)
- Seal installation tool (seal installer or socket)
- Hammer (if using a socket for installation)
- Shop rags
- Engine cleaner/degreaser
- Gloves
- Safety glasses
- Jack and jack stands (if working on the front seal)
- Wheel chocks (if working on the front seal)
Procedure:
- Safety First: Disconnect the negative battery cable to prevent electrical shorts. If working on the front seal, engage the parking brake, chock the rear wheels, and lift the front of the vehicle with a jack. Securely support the vehicle with jack stands. Never work under a vehicle supported only by a jack.
- Remove Accessories (Front Seal): For the front seal, you'll need to remove any accessories obstructing access to the crankshaft pulley. This may include the serpentine belt, cooling fan, and potentially other components. Consult your repair manual for specific removal instructions.
- Remove the Crankshaft Pulley/Harmonic Balancer (Front Seal): Use the appropriate crankshaft pulley removal tool to loosen and remove the crankshaft pulley bolt. In many cases, you will need to hold the crankshaft from turning to prevent it from spinning while you loosen the bolt. Once the bolt is removed, carefully pull the pulley off the crankshaft. Do not damage the crankshaft snout.
- Access the Seal: With the pulley removed (front seal) or the transmission removed (rear seal), you should have clear access to the crankshaft seal.
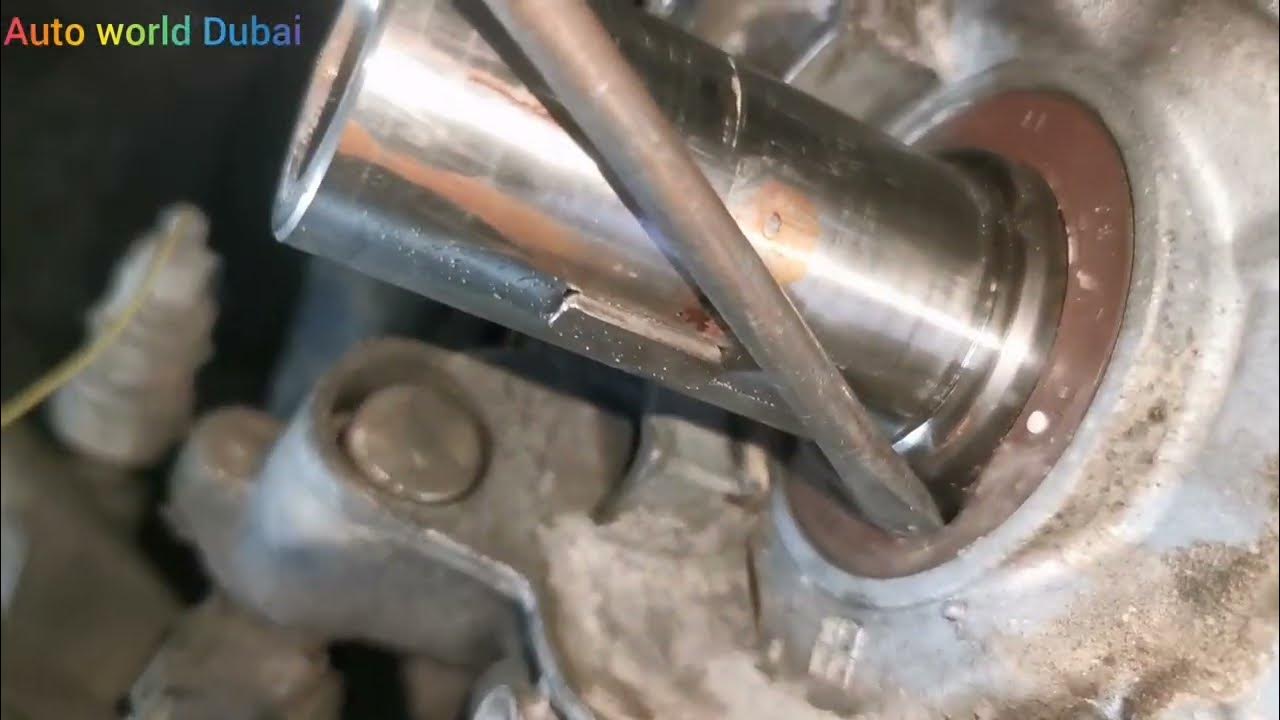
- Remove the Old Seal: Use a seal removal tool (seal puller) or a small screwdriver to carefully pry the old seal out of its housing. Be extremely careful not to scratch or damage the crankshaft or the surrounding metal surfaces. Avoid using excessive force. If using a screwdriver, work your way around the seal gradually.
- Clean the Area: Thoroughly clean the seal housing with engine cleaner or degreaser to remove any dirt, grime, or old sealant. Ensure the surface is clean and dry before installing the new seal.
- Install the New Seal: Apply a thin layer of clean engine oil to the inner lip of the new seal. This will help it slide onto the crankshaft smoothly and prevent damage during installation. Use a seal installation tool (seal installer) or a socket of the correct size to gently tap the new seal into the housing until it is fully seated. If using a socket and hammer, tap evenly around the seal to ensure it goes in straight. Be careful not to damage the seal during installation. It should be flush with the housing.
- Reassemble: Reinstall the crankshaft pulley (front seal) or transmission (rear seal) and any other components that were removed. Torque all bolts to the manufacturer's specified torque specifications.
- Refill Fluids: If any fluids were drained during the process (e.g., coolant if removing a water pump), refill them to the proper levels.
- Reconnect Battery: Reconnect the negative battery cable.
- Start the Engine: Start the engine and check for leaks around the crankshaft seal. Allow the engine to run for a few minutes and monitor the area closely.
Real-World Owner Experiences
Many DIY mechanics have successfully replaced their crankshaft seals, but it's helpful to learn from their experiences:
- "Take your Time": Many owners emphasize the importance of patience, especially when removing the old seal. Rushing the process can lead to damage and frustration.
- "Use the Right Tools": Having the correct tools, especially the seal removal and installation tools, makes the job significantly easier and reduces the risk of damage.
- "Cleanliness is Key": A clean work area and clean surfaces are crucial for a successful repair. Dirt and grime can contaminate the new seal and shorten its lifespan.
- "Don't Over-Tighten": Over-tightening bolts, especially the crankshaft pulley bolt, can damage the threads or the pulley itself. Always use a torque wrench and follow the manufacturer's specifications.
- "Watch Videos": Many owners found helpful videos on YouTube or other online platforms that demonstrated the process for their specific vehicle make and model.
Frequently Asked Questions (FAQs)
How long does it take to replace a crankshaft seal?
The time required can vary depending on your experience and the complexity of the job. Generally, it can take anywhere from 2 to 6 hours.
How much does it cost to replace a crankshaft seal?
The cost can vary depending on whether you do it yourself or hire a mechanic. DIY cost will be the cost of the seal (usually between $10-$50) and any tools you may need to buy. Hiring a mechanic can cost anywhere from $200 to $600 or more, depending on the labor rates in your area and the complexity of the job.
Can I drive with a leaking crankshaft seal?
Driving with a leaking crankshaft seal is not recommended. The longer you drive with a leak, the more oil you'll lose, which can lead to engine damage. It's best to address the issue as soon as possible.
What are the symptoms of a bad crankshaft seal?
The most common symptom is an oil leak near the front or rear of the engine. You may also notice low oil levels, a burning oil smell, or oil spots on your driveway.
Do I need any special tools?
While a basic set of tools can get you started, a crankshaft pulley removal tool and seal removal/installation tools are highly recommended for a smoother and more efficient repair.
Is it possible to replace the crankshaft seal without removing the timing belt/chain (front seal)?
In some cases, yes, but it's generally not recommended. Removing the timing belt/chain provides better access to the seal and allows you to inspect the condition of the timing components. If your timing belt/chain is due for replacement, it's a good idea to do it at the same time as the crankshaft seal.