How To Replace A Tpms Valve Stem
Replacing a Tire Pressure Monitoring System (TPMS) valve stem might seem daunting, but with the right tools and knowledge, it's a manageable task for the experienced DIYer. A damaged or corroded valve stem can lead to slow leaks, inaccurate pressure readings, and ultimately, a flat tire. This article will walk you through the process of replacing a TPMS valve stem, covering everything from the basics of TPMS technology to best practices for ensuring a proper seal.
Background: The TPMS Explained
Modern vehicles are equipped with a Tire Pressure Monitoring System (TPMS), a crucial safety feature mandated in many countries. Its primary function is to alert the driver when tire pressure drops significantly, potentially preventing accidents caused by underinflated tires. There are two main types of TPMS: direct and indirect.
Indirect TPMS relies on the vehicle's Anti-lock Braking System (ABS) sensors. It monitors the rotational speed of each wheel. When a tire loses pressure, its rolling radius decreases, causing it to rotate faster than the other tires. The system detects this difference and triggers a warning light. Indirect TPMS doesn't actually measure tire pressure; it infers it from wheel speed.
Direct TPMS, the more common type, uses pressure sensors mounted inside each wheel. These sensors directly measure tire pressure and transmit the data wirelessly to the vehicle's computer (ECU/PCM). Each sensor has a unique identification code, allowing the system to pinpoint which tire is experiencing a pressure problem. This article focuses on the valve stem replacement for direct TPMS sensors, as they are more prone to physical damage and require replacement more frequently.
Technical Breakdown: How TPMS Valve Stems Work
The TPMS valve stem is more than just a standard tire valve. It's an integral part of the direct TPMS sensor. Here's how it works:
- Sensor Housing: The TPMS sensor is typically housed within the wheel, attached to the valve stem assembly.
- Valve Stem: The valve stem extends through the wheel rim, allowing for inflation and deflation of the tire. It's usually made of rubber or metal (aluminum).
- Sealing Components: O-rings, grommets, and other sealing components are crucial for creating an airtight seal between the sensor, valve stem, and wheel rim.
- Retaining Nut (if applicable): Some TPMS sensors are secured to the wheel with a retaining nut on the valve stem.
- Wireless Communication: The sensor constantly monitors tire pressure and transmits this information, along with its unique ID, to the vehicle's receiver.
When a TPMS valve stem fails, it's usually due to one or more of the following reasons:
- Corrosion: Especially in regions with harsh winters and road salt, corrosion can weaken the metal components of the valve stem, leading to leaks. Aluminum valve stems are particularly susceptible to galvanic corrosion when in contact with steel wheels.
- Rubber Degradation: Rubber valve stems can dry out, crack, and leak over time, especially with exposure to sunlight and ozone.
- Physical Damage: Impact from curbs, potholes, or other road hazards can damage the valve stem, causing it to bend or break.
- Improper Installation: Over-tightening the valve stem nut can damage the sensor housing or strip the threads, leading to leaks. Similarly, using incorrect torque on the core can cause issues.
Replacing the TPMS Valve Stem: A Step-by-Step Guide
Tools and Materials Needed:
- New TPMS valve stem (compatible with your specific sensor)
- Tire mounting machine (or access to a tire shop)
- Valve core tool
- Torque wrench
- Socket set
- Screwdrivers (various sizes)
- Soapy water or tire mounting lubricant
- Gloves
- Eye protection
- Service manual for your vehicle (for torque specifications)
Procedure:
- Safety First: Ensure the vehicle is safely parked on a level surface, with the parking brake engaged. Use wheel chocks for added safety.
- Remove the Wheel: Loosen the lug nuts, jack up the vehicle, and secure it with jack stands. Remove the wheel.
- Deflate the Tire: Using a valve core tool, remove the valve core to completely deflate the tire.
- Separate the Tire from the Rim: This step requires a tire mounting machine. Carefully break the bead of the tire from the rim on both sides. If you don't have access to a tire mounting machine, take the wheel to a tire shop. Attempting to force the tire off the rim without the proper tools can damage the tire or the wheel.
- Locate the TPMS Sensor: Once the tire is partially removed, locate the TPMS sensor inside the wheel.
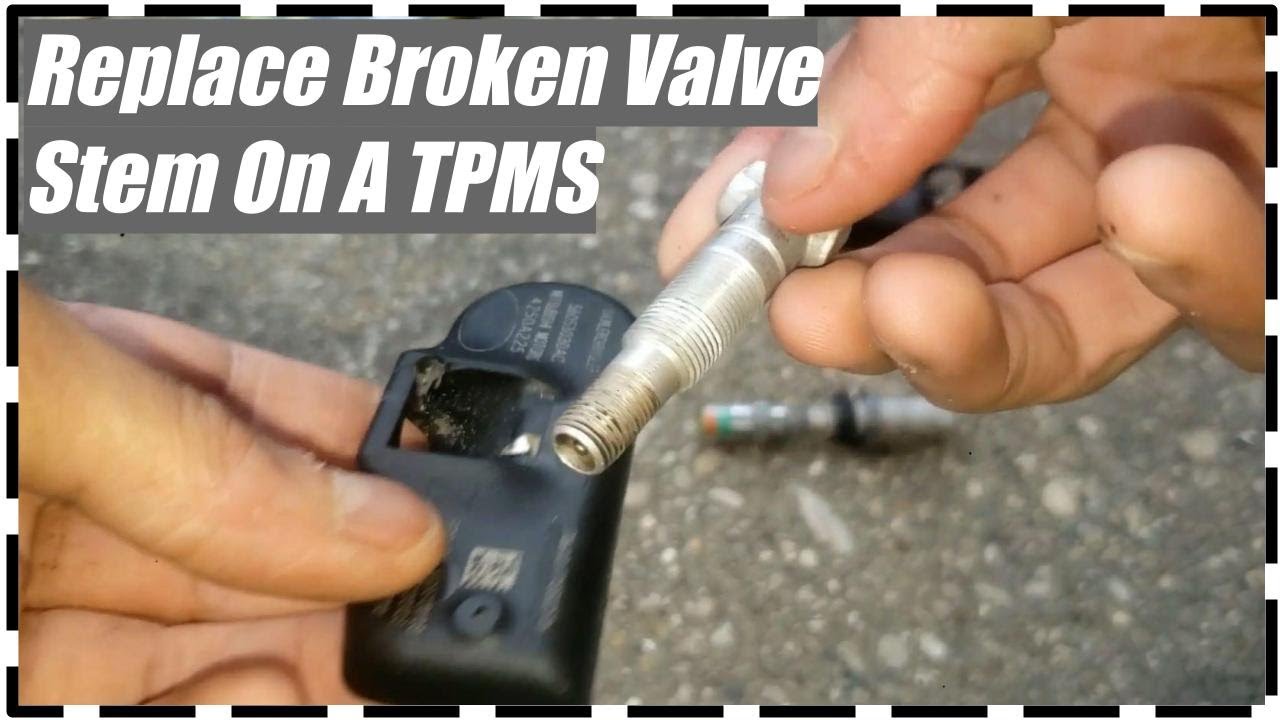
- Remove the Old Valve Stem: Depending on the sensor design, the valve stem may be attached with a nut or screws. Carefully remove the retaining nut or screws, being mindful not to damage the sensor itself. Some sensors are directly molded to the valve stem; in this case, you'll need to replace the entire sensor unit. If replacing just the valve stem, carefully detach it from the sensor housing. Note the orientation of any O-rings or seals.
- Inspect the Sensor: Carefully inspect the TPMS sensor for any signs of damage or corrosion. If the sensor is damaged, it will need to be replaced. Also, inspect the inside of the tire for damage.
- Install the New Valve Stem: Install the new valve stem onto the sensor housing, ensuring that all O-rings and seals are properly seated. Apply a small amount of tire mounting lubricant to the valve stem before inserting it into the wheel rim.
- Secure the Valve Stem: Tighten the retaining nut or screws to the manufacturer's specified torque. Do not overtighten, as this can damage the sensor. Refer to your vehicle's service manual or the TPMS sensor manufacturer's instructions for the correct torque specification. Using a torque wrench is essential for this step.
- Reinstall the Tire: Using the tire mounting machine, carefully reinstall the tire onto the rim. Ensure the tire bead is properly seated all the way around the wheel.
- Inflate the Tire: Inflate the tire to the manufacturer's recommended pressure, which can be found on the tire placard located on the driver's side doorjamb or in the owner's manual.
- Balance the Wheel: After reinstalling the tire, have the wheel balanced by a tire shop. This is crucial to prevent vibrations and uneven tire wear.
- Reinstall the Wheel: Reinstall the wheel onto the vehicle, tightening the lug nuts in a star pattern to the manufacturer's specified torque.
- Lower the Vehicle: Lower the vehicle and remove the jack stands.
- TPMS Relearn Procedure: After replacing a TPMS sensor or valve stem, you may need to perform a TPMS relearn procedure. This procedure allows the vehicle's computer to recognize the new sensor ID. The relearn procedure varies depending on the vehicle make and model. Some vehicles automatically relearn the sensor ID after a short drive. Others require the use of a TPMS scan tool to manually program the sensor ID into the vehicle's computer. Consult your vehicle's owner's manual or a qualified technician for the specific relearn procedure for your vehicle.
- Check for Leaks: After inflating the tire, check the valve stem and the tire bead for leaks using soapy water. If you see bubbles, there is a leak. Deflate the tire and repeat the installation process, ensuring all seals are properly seated.
Common Issues and Maintenance Concerns
- Sensor Battery Life: TPMS sensors have a limited battery life, typically 5-10 years. When the battery dies, the entire sensor needs to be replaced.
- Corrosion: As mentioned earlier, corrosion is a common problem, especially in areas with harsh winters. Regularly inspect the valve stems for signs of corrosion and replace them as needed.
- Incompatibility: Make sure that the new valve stem is compatible with your specific TPMS sensor. Using an incompatible valve stem can damage the sensor or prevent it from functioning properly.
- TPMS Relearn Failures: Sometimes, the TPMS relearn procedure may fail. This can be due to a weak sensor battery, interference from other electronic devices, or a faulty TPMS receiver.
Do's and Don'ts / Best Practices
Do's:
- Use the Correct Tools: Using the right tools is essential for a successful TPMS valve stem replacement. A torque wrench is particularly important to avoid overtightening the retaining nut.
- Follow Torque Specifications: Always follow the manufacturer's specified torque specifications for the retaining nut or screws.
- Use New Seals: Always use new O-rings and seals when replacing a TPMS valve stem.
- Lubricate the Valve Stem: Apply a small amount of tire mounting lubricant to the valve stem before inserting it into the wheel rim.
- Perform a TPMS Relearn Procedure: After replacing a TPMS valve stem, always perform a TPMS relearn procedure to ensure the vehicle's computer recognizes the new sensor ID.
Don'ts:
- Overtighten the Retaining Nut: Overtightening the retaining nut can damage the sensor or strip the threads.
- Use Excessive Force: Avoid using excessive force when removing or installing the valve stem.
- Reuse Old Seals: Never reuse old O-rings or seals.
- Ignore Leaks: If you detect a leak after installing the new valve stem, don't ignore it. Deflate the tire and repeat the installation process.
- Attempt Without Proper Tools: Do not attempt to remove a tire from a rim without the proper tools; this can result in damage to the tire or wheel.
Conclusion
Replacing a TPMS valve stem is a task that requires attention to detail and the right tools. By understanding the workings of the TPMS system, following the proper procedures, and adhering to best practices, you can successfully replace a faulty valve stem and ensure the continued accuracy and reliability of your vehicle's tire pressure monitoring system. If you are uncomfortable with any part of this process, it is always best to consult a qualified technician. Incorrect installation can lead to tire leaks, sensor damage, and ultimately, compromised safety. However, with careful planning and execution, replacing a TPMS valve stem can be a rewarding DIY experience, saving you money and keeping your vehicle running safely.