How To Replace A Wheel Stud
A seemingly small component, the wheel stud, plays a crucial role in vehicle safety. These threaded fasteners are responsible for securing the wheel to the hub, enduring immense stress from acceleration, braking, and cornering. A damaged or broken wheel stud compromises the integrity of the wheel mounting, potentially leading to catastrophic wheel detachment. Replacing a wheel stud isn't just a repair; it's a proactive measure to ensure road safety.
The Perilous Click: When a Wheel Stud Needs Replacing
Imagine this: You're tightening the lug nuts after changing a flat tire. One lug nut spins freely, never quite tightening. Or perhaps you hear a disconcerting click as you apply torque. These are telltale signs of a damaged or sheared wheel stud. Ignoring these symptoms can have dire consequences. A weakened stud can fail under stress, causing the wheel to loosen and, in the worst-case scenario, completely detach from the vehicle. This is especially critical for performance cars or vehicles that frequently carry heavy loads.
Think of your vehicle's wheel studs as the foundation of a house. Each stud acts as a critical support. If one foundation post is compromised, the stability of the entire structure is at risk. Similarly, if one wheel stud fails, the remaining studs bear an increased load, accelerating their wear and increasing the risk of further failures.
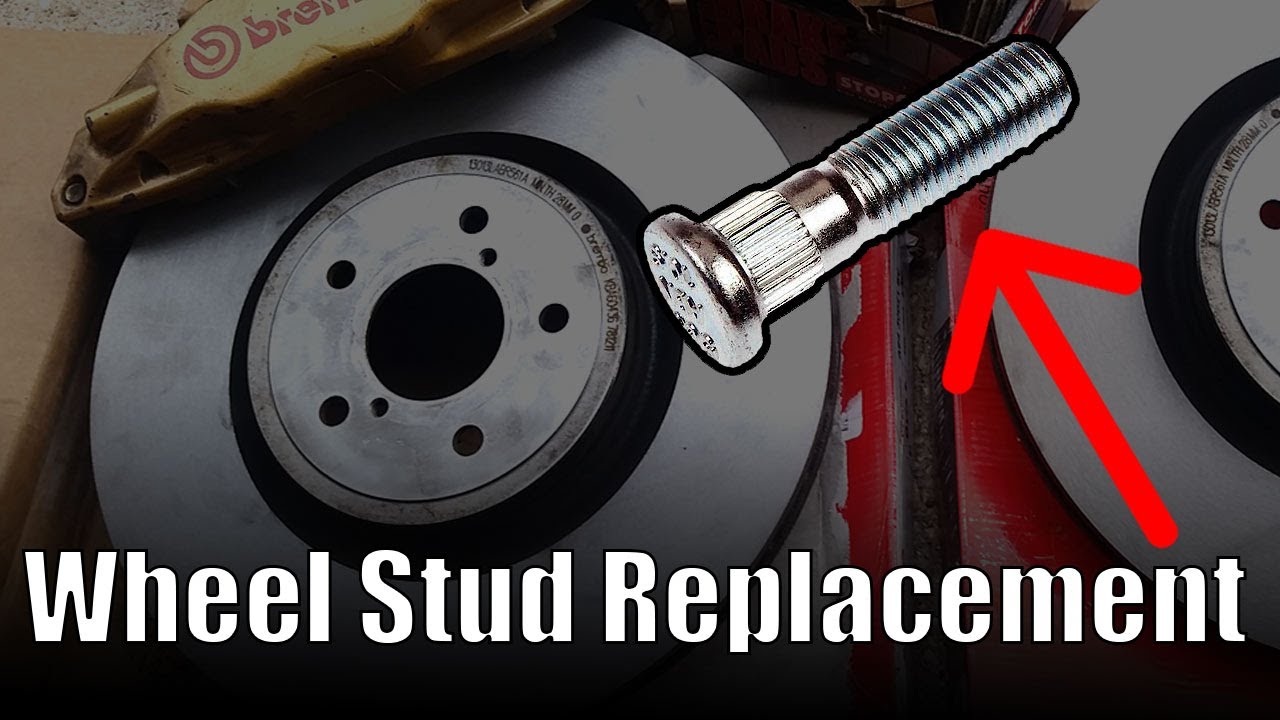
The Anatomy of a Wheel Stud: A Deep Dive
Let's dissect the wheel stud. Typically made from hardened steel, a wheel stud consists of two primary sections: a threaded end that accepts the lug nut and a splined section (or, in some cases, a knurled section or a press-fit collar) that secures the stud to the wheel hub. The splined or knurled section is press-fit into a corresponding hole in the hub flange, creating a strong interference fit. This fit prevents the stud from rotating within the hub when the lug nut is tightened or loosened. The length of the stud must be sufficient to allow for safe and secure lug nut engagement, even when accounting for the thickness of the wheel.
The mechanical principle at play is friction and tensile strength. When the lug nut is tightened, it stretches the wheel stud, creating tension. This tension, combined with the friction between the wheel and the hub, keeps the wheel securely in place. The quality of the steel, the precision of the threading, and the strength of the spline are all critical factors in determining the overall durability and reliability of the wheel stud.
The Replacement Process: A Step-by-Step Guide
Replacing a wheel stud, while not overly complex, requires careful attention to detail. Here's a breakdown of the process:
1. Safety First: Preparation
* Secure the Vehicle: Park on a level surface, engage the parking brake, and chock the wheels on the opposite side of the vehicle.
* Loosen Lug Nuts: Use a lug wrench to loosen the lug nuts on the wheel with the damaged stud. Do not remove them completely at this stage.
* Jack Up the Vehicle: Use a jack to lift the vehicle and secure it with jack stands. Never work under a vehicle supported only by a jack.
* Remove the Wheel: Fully remove the lug nuts and carefully take off the wheel.
2. Accessing the Hub: Removing Obstructions
* Brake Caliper Removal (If Necessary): In some cases, the brake caliper may obstruct access to the rear of the hub. If so, carefully remove the caliper, supporting it with wire or bungee cords to avoid strain on the brake hose. Never let the caliper hang by the brake hose.
* Brake Rotor Removal (Often Necessary): The brake rotor will almost always need to be removed to allow access to the back of the hub where the wheel studs are pressed in. Remove any retaining screws and gently tap the rotor off the hub.
3. Removing the Damaged Stud: Forceful Persuasion
* Knock Out the Old Stud: Using a hammer and a punch or a brass drift, carefully drive the damaged wheel stud out from the back of the hub. Position the punch on the threaded end of the stud and strike it firmly. Avoid damaging the hub or the surrounding components. If the stud is particularly stubborn, a few applications of penetrating oil can help.
4. Installing the New Stud: The Press-Fit Dance
This is where specialized tools or a resourceful approach become essential:
* Option 1: Wheel Stud Installation Tool: The ideal method involves using a dedicated wheel stud installation tool. This tool allows you to pull the new stud into place without damaging the threads or the hub. Follow the tool's instructions carefully.
* Option 2: Lug Nut and Washers (The Clever Hack): If a specialized tool isn't available, you can use a lug nut and washers to pull the new stud into place. Place a stack of washers over the new stud, positioning them between the hub and the lug nut. Thread the lug nut onto the new stud (the same one you’ll use to hold the wheel on). As you tighten the lug nut, it will gradually pull the stud into the hub. Be sure to use a hardened lug nut specifically for this purpose. Periodically check the back of the hub. If the stud starts to bottom out against the vehicle knuckle, add more washers to avoid damaging the threads. Continue tightening until the stud is fully seated. Do not use an impact wrench for this process, as it can easily strip the threads. A hand wrench is far more controllable.
Important: Ensure the stud is fully seated flush against the hub flange. An incomplete seating can lead to wheel instability.
5. Reassembly: Putting it All Back Together
* Reinstall Components: Reinstall the brake rotor, brake caliper (if removed), and any other components that were removed to access the hub.
* Mount the Wheel: Carefully mount the wheel onto the hub, aligning the lug holes with the wheel studs. Hand-tighten the lug nuts in a star pattern.
* Lower the Vehicle: Lower the vehicle to the ground.
* Torque Lug Nuts: Using a torque wrench, tighten the lug nuts to the manufacturer's specified torque in a star pattern. Refer to your vehicle's owner's manual for the correct torque specification. Over-tightening can damage the studs and warp the brake rotors.
6. The Final Check: Peace of Mind
* Re-torque: After driving a short distance (typically 50-100 miles), re-torque the lug nuts to ensure they remain properly tightened.
Pros, Cons, Use Cases, and Manufacturer Examples
Pros of DIY Wheel Stud Replacement: Cost savings compared to professional repair, opportunity to learn about vehicle mechanics, convenience of performing the repair at your own pace.
Cons of DIY Wheel Stud Replacement: Requires mechanical aptitude and appropriate tools, potential for mistakes that could compromise safety, can be time-consuming.
Use Cases: Damaged or sheared wheel studs due to over-tightening, corrosion, or impact damage. Upgrading to longer studs for wheels with thicker mounting surfaces (e.g., aftermarket wheels with different offsets). Replacing studs on vehicles used for racing or other high-performance activities.
Manufacturer Examples: * ARP: ARP is a well-known manufacturer of high-performance wheel studs, often used in racing and high-performance applications. Their studs are typically made from stronger materials than OEM studs and are designed to withstand higher loads.
* Dorman: Dorman offers a wide range of replacement wheel studs for various makes and models. Their studs are typically designed to meet or exceed OEM specifications. * OEM (Original Equipment Manufacturer): Purchasing OEM wheel studs from your vehicle's manufacturer ensures compatibility and quality. However, they may be more expensive than aftermarket options.Real-World Insights and Recommendations
From personal experience, tackling a wheel stud replacement is satisfying and saves money. I would recommend investing in a proper wheel stud installation tool. The “washer and lug nut” method works, but it can be slow and there's a higher risk of damaging threads or not fully seating the stud. Always double-check the torque specifications and use a quality torque wrench. When I replaced studs on my old track car, I opted for ARP studs for the added strength and reliability. I also used anti-seize compound (sparingly) on the splines to make future removal easier (though this is a controversial practice, as some argue it can affect the press-fit). Finally, remember that safety is paramount. If you are uncomfortable with any part of the process, seek the help of a qualified mechanic.
Regularly inspect your wheel studs for signs of damage or corrosion. Listen for any unusual noises when tightening lug nuts. A little preventive maintenance can go a long way in preventing a potentially dangerous situation. Replacing wheel studs might seem like a minor task, but it's a crucial aspect of vehicle safety that deserves your attention.