How To Replace Ac Filter In Car
The cabin air filter, often abbreviated as CAF, is a frequently overlooked but crucial component in your vehicle's HVAC (Heating, Ventilation, and Air Conditioning) system. Replacing it is a simple maintenance task that can significantly improve air quality and system performance. This article provides a detailed, step-by-step guide for intermediate car owners and DIY mechanics on how to effectively replace a CAF, ensuring optimal airflow and a cleaner in-cabin environment.
Background: The Cabin Air Filtration System
Modern vehicles utilize a sophisticated HVAC system not just for temperature control, but also for filtering the air entering the cabin. This filtration process relies heavily on the cabin air filter. Unlike the engine air filter, which protects the engine from contaminants, the cabin air filter cleans the air you and your passengers breathe. It's designed to trap dust, pollen, mold spores, exhaust fumes, and other airborne particles that can enter through the vents. These particles not only affect air quality but can also aggravate allergies and respiratory issues.
Location Matters:
The location of the cabin air filter varies significantly between makes and models. Common locations include:
- Behind the Glove Box: This is the most frequent placement.
- Under the Dashboard: Sometimes accessible from the driver's or passenger's side footwell.
- Under the Hood: In some cases, particularly on older vehicles or trucks, the CAF might be located in the engine compartment near the cowl (the area beneath the windshield).
Consult your vehicle's service manual or owner's manual to pinpoint the exact location for your specific model. Online resources like YouTube videos specific to your car model can also be incredibly helpful.
Technical Breakdown: How the Cabin Air Filter Works
The cabin air filter is typically a pleated paper or fabric filter encased in a plastic or cardboard frame. As air is drawn into the vehicle's HVAC system, it passes through the filter. The pleats increase the surface area of the filter, maximizing its ability to trap contaminants. The filter media itself consists of various layers, often including:
- Pre-Filter Layer: Captures larger particles like leaves and debris.
- Particulate Filter Layer: Traps smaller particles such as dust, pollen, and mold spores.
- Activated Carbon Layer (in some filters): Absorbs odors and gaseous pollutants like exhaust fumes.
The blower motor, an electric fan, forces air through the filter and into the cabin via the vents. A clean CAF ensures optimal airflow, maximizing the efficiency of the HVAC system in both heating and cooling modes. A clogged filter restricts airflow, forcing the blower motor to work harder, potentially leading to premature failure. Furthermore, restricted airflow reduces the effectiveness of the air conditioning system, impacting cooling performance.
Step-by-Step Replacement Guide
Here's a detailed guide to replacing your car's cabin air filter:
- Gather Your Tools and Supplies:
- New Cabin Air Filter: Ensure you purchase the correct filter for your vehicle's year, make, and model. Use an online parts catalog or your local auto parts store to confirm compatibility. Consider a premium filter with an activated carbon layer for enhanced odor and pollutant removal.
- Screwdrivers: A Phillips head and possibly a flathead screwdriver, depending on the fasteners securing the filter housing.
- Pliers (Optional): May be needed for removing stubborn clips or fasteners.
- Shop Towels or Rags: For cleaning the filter housing.
- Vacuum Cleaner (Optional): To remove debris from the filter housing.
- Flashlight or Headlamp: To illuminate the work area.
- Locate the Cabin Air Filter:
Refer to your vehicle's service manual or owner's manual to identify the location of the cabin air filter.
- Access the Filter Housing:
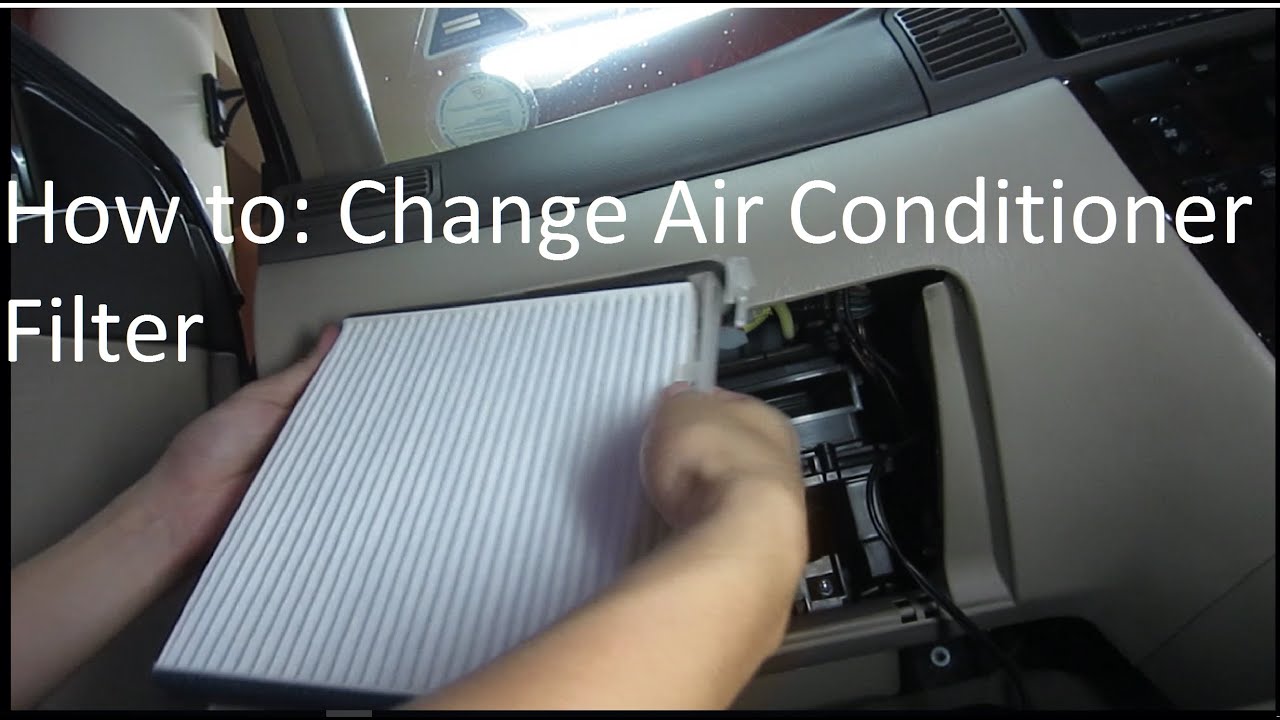
- Behind the Glove Box: If the filter is behind the glove box, empty the glove box completely. Locate the damper arm (a small arm connecting the glove box to the dashboard) and disconnect it. This typically involves squeezing the arm to release it from its socket. Next, disengage the glove box stops, which are usually small tabs on either side of the glove box. Squeezing these tabs inward will allow the glove box to swing down further, revealing the filter housing.
- Under the Dashboard: If the filter is under the dashboard, you may need to remove a plastic panel or access cover. This is often held in place by screws or clips. Use a screwdriver or pliers to carefully remove the fasteners.
- Under the Hood: If the filter is under the hood, the process will be more straightforward. Simply locate the filter housing, which is usually a rectangular plastic box near the cowl.
- Remove the Old Filter:
Once the filter housing is accessible, remove the cover. This may be secured by screws, clips, or tabs. Once the cover is off, carefully remove the old cabin air filter. Note the direction of airflow, which is usually indicated by an arrow on the filter frame. This is crucial for installing the new filter correctly.
- Clean the Filter Housing:
Use a vacuum cleaner or shop towels to remove any debris, leaves, or dirt from the filter housing. A clean housing will prevent new contaminants from entering the cabin.
- Install the New Filter:
Insert the new cabin air filter into the housing, ensuring that the airflow arrow on the filter frame matches the direction of airflow indicated on the housing. If there's no arrow on the housing, match the direction of the arrow on the old filter.
- Reassemble the Filter Housing:
Reattach the filter housing cover, securing it with the screws, clips, or tabs you removed earlier. Ensure that the cover is properly seated to prevent air leaks.
- Reassemble the Access Components:
- Behind the Glove Box: Reconnect the glove box stops and the damper arm. Make sure the glove box operates smoothly.
- Under the Dashboard: Reattach the plastic panel or access cover, securing it with the screws or clips you removed earlier.
- Under the Hood: Ensure the housing cover is securely fastened.
Common Issues and Maintenance Concerns
- Incorrect Filter Installation: Installing the filter backwards can reduce its effectiveness and potentially damage the blower motor. Always check the airflow arrow.
- Incompatible Filter: Using the wrong filter size or type can lead to air leaks and reduced filtration efficiency. Always verify compatibility before purchasing.
- Broken or Damaged Filter Housing: If the filter housing is cracked or damaged, it can allow unfiltered air to enter the cabin. Repair or replace the housing as needed.
- Clogged Filter Indicator: Some vehicles have a cabin air filter indicator light. However, these are not always reliable. It's best to follow a regular maintenance schedule.
Recommended Replacement Interval: Cabin air filters should typically be replaced every 12,000 to 15,000 miles, or once a year. However, if you live in an area with high levels of pollution or experience allergy symptoms, you may need to replace the filter more frequently.
Do's and Don'ts / Best Practices
Do's:
- Do consult your vehicle's service manual or owner's manual for specific instructions.
- Do purchase a high-quality replacement filter. Consider a filter with an activated carbon layer for enhanced odor and pollutant removal.
- Do clean the filter housing before installing the new filter.
- Do note the direction of airflow on the old filter and install the new filter in the same direction.
- Do inspect the filter housing for damage and repair or replace it as needed.
Don'ts:
- Don't force the filter into the housing. If it doesn't fit easily, you may have the wrong filter.
- Don't reuse an old filter. Cleaning a used filter is not effective and can damage the filter media.
- Don't ignore signs of a clogged filter, such as reduced airflow or musty odors.
- Don't neglect to replace the filter regularly.
Conclusion
Replacing your cabin air filter is a simple and cost-effective maintenance task that can significantly improve your vehicle's air quality and HVAC system performance. By following the steps outlined in this guide, you can confidently replace your CAF and enjoy a cleaner, healthier in-cabin environment. Remember to consult your vehicle's service manual for specific instructions and to choose a high-quality replacement filter for optimal results. Regularly replacing your cabin air filter will not only improve your driving experience but also contribute to the longevity and efficiency of your vehicle's HVAC system. If you are uncomfortable performing this task yourself, consult a qualified mechanic.