How To Replace Battery In Nissan Altima Key
Modern car keys, or fobs, are more than just a piece of metal; they're sophisticated electronic devices that allow for keyless entry, push-button start, and even remote engine start. A crucial component of these fobs is the battery. When the battery dies, you'll find yourself struggling to unlock your doors or start your Nissan Altima. Fortunately, replacing the battery in your Altima's key fob is a relatively simple and inexpensive process that most experienced DIYers can handle. This article will provide a detailed, technical breakdown of how to replace the battery in your Nissan Altima key fob, common issues, and best practices.
Understanding the Nissan Altima Key Fob System
Before diving into the battery replacement procedure, it's essential to understand the basic workings of the Nissan Altima's key fob and the Intelligent Key system. The key fob transmits a unique radio frequency (RF) signal to the vehicle's receiver. This signal is encrypted for security, preventing unauthorized access. The receiver, typically located within the car's body control module (BCM), validates the signal against a pre-programmed list of authorized key fobs.
The key fob contains several key components:
- Battery: The power source for the entire system. Usually a common coin-cell battery.
- Microcontroller: The "brains" of the fob, responsible for processing button presses, encrypting the RF signal, and managing power consumption.
- RF Transmitter: Sends the encrypted signal to the vehicle.
- Antenna: Radiates the RF signal.
- Buttons: Activate various functions, such as lock, unlock, trunk release, and panic alarm.
When a button is pressed, the microcontroller activates the RF transmitter, which sends the encrypted signal through the antenna. If the vehicle's receiver recognizes the signal, it performs the corresponding action. The key fob and the vehicle are synchronized, meaning they share a secret key used for encryption and decryption. If the key fob is lost or stolen, it must be removed from the vehicle's system to prevent unauthorized access.
Technical Breakdown: Battery Replacement Procedure
The battery replacement procedure varies slightly depending on the model year of your Altima. However, the fundamental principles remain the same. Here’s a step-by-step guide:
Step 1: Identify Your Key Fob Type
Nissan Altima key fobs come in a few different styles, including those with a physical emergency key and those without. Knowing your key fob type will help you determine the correct opening procedure.
Step 2: Gather Necessary Tools and Materials
You'll need the following:
- Small flathead screwdriver or plastic pry tool: For prying open the key fob casing. Avoid using metal tools if possible to prevent scratching or damaging the plastic.
- Replacement battery: Typically a CR2025 or CR2032 3V coin-cell battery. Check your owner's manual or the old battery to confirm the correct type.
- Soft cloth: To protect the key fob's surface during disassembly.
Step 3: Open the Key Fob Casing
This step is the most delicate. Patience and careful application of force are key.
- Key Fobs with Emergency Key: Locate the release latch or button for the emergency key. Slide or press it to remove the key. Once the key is removed, you should see a small slot or opening on the side of the key fob. This is where you'll insert your flathead screwdriver or pry tool.
- Key Fobs without Emergency Key: Look for a seam running around the perimeter of the key fob. This is where the two halves of the casing meet.
Wrap the tip of your screwdriver or pry tool with a soft cloth to prevent scratches. Carefully insert the tool into the slot or seam and gently twist or pry. Work your way around the perimeter of the key fob, gradually separating the two halves. Be careful not to apply too much force, as you could damage the casing or internal components.
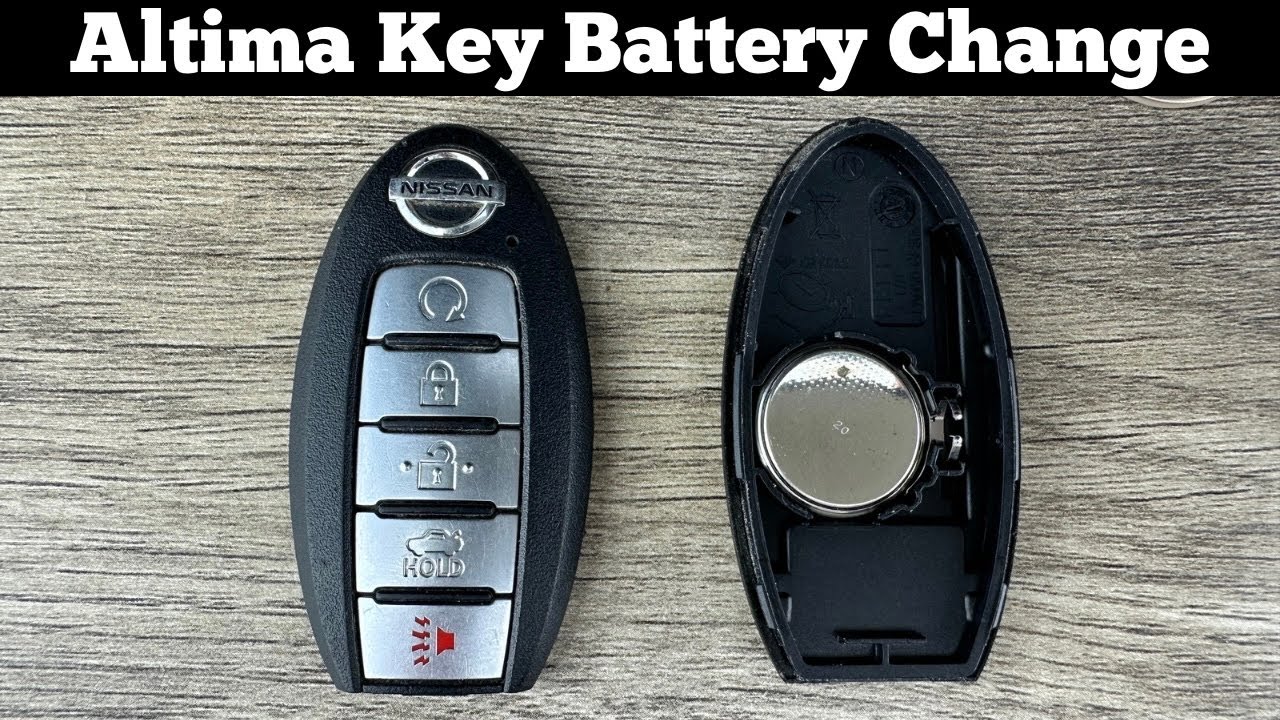
Step 4: Remove the Old Battery
Once the key fob is open, you'll see the battery nestled in a holder. Note the battery's orientation (+ and - sides) before removing it. This is crucial for installing the new battery correctly.
The battery may be held in place by a small clip or retaining mechanism. Gently pry the battery loose using your screwdriver or pry tool. Avoid using excessive force, as you could damage the battery contacts or other internal components.
Step 5: Install the New Battery
Insert the new battery into the holder, ensuring that the polarity (+ and - sides) matches the orientation you noted earlier. The battery should snap or click into place. Make sure the battery is securely seated in the holder.
Step 6: Reassemble the Key Fob
Carefully align the two halves of the key fob casing and press them together until they snap securely into place. Ensure that all seams are closed tightly and that there are no gaps. If you removed an emergency key, reinsert it into the key fob until it clicks into place.
Step 7: Test the Key Fob
Test the key fob to ensure that it's working properly. Press the lock, unlock, and trunk release buttons to verify that the vehicle responds accordingly. If the key fob doesn't work, double-check the battery orientation and ensure that the battery is securely seated in the holder. If problems persist, the key fob may need to be reprogrammed.
Common Issues and Maintenance Concerns
- Incorrect Battery Type: Using the wrong battery type can damage the key fob or prevent it from working correctly. Always verify the correct battery type in your owner's manual or by referencing the old battery.
- Damaged Casing: Applying too much force when opening the key fob can damage the casing or internal components. Be patient and use a soft pry tool to avoid damage.
- Battery Corrosion: If the old battery has been leaking, it can cause corrosion on the battery contacts. Clean the contacts with a cotton swab and isopropyl alcohol before installing the new battery.
- Key Fob Reprogramming: In some cases, replacing the battery may require you to reprogram the key fob to the vehicle. This is more common with newer models. Refer to your owner's manual for instructions on how to reprogram the key fob, or consult a qualified automotive technician.
Do's and Don'ts / Best Practices
Do's:
- Do use the correct battery type.
- Do note the battery's orientation before removing it.
- Do use a soft pry tool to avoid damaging the casing.
- Do clean the battery contacts if there's any corrosion.
- Do test the key fob after replacing the battery.
Don'ts:
- Don't use excessive force when opening the key fob.
- Don't use metal tools without protection, as they can scratch the plastic.
- Don't mix old and new batteries.
- Don't discard old batteries improperly. Dispose of them according to local regulations.
- Don't ignore warning signs of a weak battery, such as reduced range or intermittent operation. Replace the battery promptly to avoid getting stranded.
Best Practices: Always keep a spare battery on hand. Consider replacing the battery every two years, regardless of usage, to prevent unexpected failure. Store the key fob in a safe place away from extreme temperatures or moisture. If you're not comfortable performing the battery replacement yourself, consult a qualified automotive technician.
Conclusion
Replacing the battery in your Nissan Altima key fob is a straightforward task that can save you time and money. By following the steps outlined in this article and adhering to the best practices, you can confidently tackle this DIY project. However, if you encounter any difficulties or are unsure about any aspect of the procedure, it's always best to consult a qualified mechanic or automotive technician. Keeping your key fob functioning optimally ensures convenient access to your vehicle and peace of mind.