How To Replace Brake Light Bulb
The tail light is out. Not just a little flicker, but a complete and utter absence of red glow from the driver's side. It's a common problem, and one that can quickly escalate from a minor annoyance to a safety hazard. Before you find yourself explaining to a police officer why your brake lights aren't functioning, let's delve into the process of replacing a brake light bulb. This isn't just about swapping a part; it's about understanding a fundamental safety system in your vehicle and empowering yourself with the knowledge to maintain it.
Imagine your car as a language. The headlights and turn signals are like your car's voice, communicating your intentions to other drivers. The brake lights? They're the exclamation point, a crucial signal that you're slowing down or stopping. Without them, you're essentially driving with a muted voice, leaving other drivers to guess your actions. The consequences can range from a fender bender to a more serious accident. Replacing a brake light bulb is thus a small but vital act of preventative maintenance.
Understanding the Brake Light System
At its core, the brake light system is deceptively simple. When you depress the brake pedal, it activates a brake light switch, typically located near the pedal linkage. This switch completes an electrical circuit, sending power to the brake light bulbs. The bulbs then illuminate, signaling your intention to slow down or stop.
Mechanical Components
Let's break down the mechanical components involved:
- Brake Pedal: The actuator of the system. Depressing it initiates the entire process.
- Brake Light Switch: A simple on/off switch that closes the circuit when the pedal is pressed. Some vehicles use a pressure sensor instead of a mechanical switch, but the function remains the same.
- Wiring Harness: Conducts the electrical current from the switch to the bulbs. Corrosion, damage, or loose connections within the harness are common causes of brake light failure.
- Bulb Socket: Provides a secure connection for the bulb and completes the electrical circuit. These can corrode over time, hindering proper bulb function.
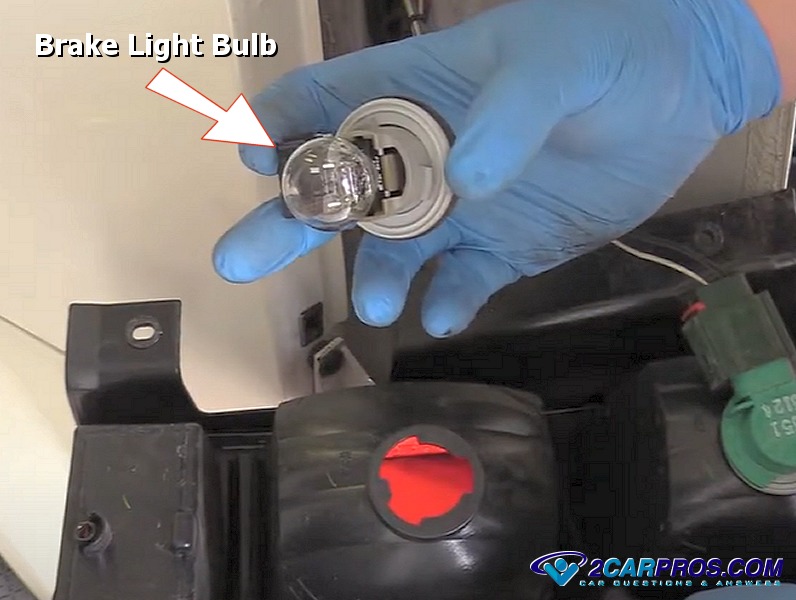
- Brake Light Bulb: The light-emitting element. Typically a dual-filament bulb, one filament for the tail light (lower intensity) and the other for the brake light (higher intensity).
How it Works Electrically
The electrical flow starts at the car's battery, powers the circuit, and back to the battery via ground. When the brake pedal is pressed, the brake light switch bridges the circuit. This sends power through the wiring harness to the bulb socket. The electrical current passes through the bulb's filament, causing it to heat up and emit light. The higher current flow associated with the brake light filament creates a brighter light output than the taillight filament. A common ground connection completes the circuit, allowing the electricity to flow back to the car's battery.
Replacing the Bulb: A Step-by-Step Guide
Now, let's get to the practical part. Before you start, make sure you have the correct replacement bulb for your vehicle. This information can be found in your owner's manual or by consulting an auto parts store.
- Gather your tools: You'll typically need a screwdriver (Phillips or flathead, depending on your car's design), the replacement bulb, and potentially a pair of pliers. Work gloves are always a good idea to protect your hands.
- Access the bulb housing: This is where the process varies significantly between vehicles. Some cars have access panels inside the trunk or cargo area, while others require you to remove the entire tail light assembly. Consult your owner's manual for specific instructions.
- Remove the bulb socket: Once you've accessed the bulb housing, locate the bulb socket. It's usually a twist-lock mechanism. Rotate it counterclockwise and gently pull it out.
- Remove the old bulb: The bulb is typically held in place by a push-and-twist mechanism or a simple push-in. Note how the bulb is oriented before removing it, as some bulbs have specific alignment requirements.
- Install the new bulb: Insert the new bulb into the socket, ensuring it's properly aligned. If it doesn't go in easily, don't force it. Check the alignment again.
- Reinstall the bulb socket: Insert the bulb socket back into the housing and rotate it clockwise to lock it in place.
- Test the brake lights: Have someone depress the brake pedal while you check the brake lights. Ensure both brake lights are functioning correctly. If not, double-check the bulb installation, the socket connection, and the wiring harness.
- Reassemble the tail light assembly (if removed): If you had to remove the entire tail light assembly, carefully reattach it, ensuring all screws and fasteners are securely tightened.
Pros and Cons of DIY Replacement
Pros:
- Cost savings: Replacing a brake light bulb yourself can save you money on labor costs at a mechanic.
- Convenience: You can do it at your own pace and on your own schedule.
- Knowledge and Empowerment: Understanding how your car works and being able to perform basic maintenance tasks can be very empowering.
Cons:
- Potential for errors: If you're not careful, you could damage the bulb socket, the wiring harness, or the tail light assembly.
- Time commitment: It can take some time to figure out the process, especially if you're not familiar with your car's design.
- Safety concerns: Working around electrical systems always carries some risk. Disconnect the negative battery terminal before starting the job to minimize the risk of electric shock.
Use Cases and Manufacturer Examples
The specific procedure for replacing a brake light bulb varies widely between manufacturers and models. Here are a few examples:
- Toyota Camry: Typically involves accessing the bulb housing from inside the trunk and rotating the bulb socket.
- Honda Civic: Often requires removing the entire tail light assembly by unscrewing several bolts.
- Ford F-150: May involve releasing clips to access the bulb housing. Some newer models use LED brake lights, which are typically not user-replaceable and require professional service.
Consider a scenario: You're driving a 2018 Honda Civic. The driver's side brake light is out. The owner's manual indicates that you need to remove the entire tail light assembly. You carefully unscrew the bolts, disconnect the electrical connector, and remove the assembly. You then access the bulb socket, replace the bulb, and reassemble everything. In contrast, a 2022 Toyota Camry might only require opening a small access panel in the trunk and twisting the bulb socket to replace the bulb. The difference highlights the importance of consulting your owner's manual.
Beyond the Bulb: Troubleshooting Tips
Sometimes, replacing the bulb doesn't solve the problem. Here are some additional troubleshooting steps:
- Check the fuse: Locate the fuse for the brake lights in your car's fuse box (again, consult your owner's manual). A blown fuse is a common cause of brake light failure.
- Inspect the bulb socket: Look for corrosion or damage to the bulb socket. Clean any corrosion with a wire brush or sandpaper. If the socket is damaged, it may need to be replaced.
- Examine the wiring harness: Check for any visible damage to the wiring harness. Look for frayed wires, loose connections, or signs of rodent damage.
- Test the brake light switch: If you suspect the brake light switch is faulty, you can test it with a multimeter. Consult a repair manual or online resources for instructions on how to test the switch.
- LED Tail Lights: Many newer cars are using LED tail lights, which are integrated into the tail light assembly. These are not designed to be replaced individually. If an LED tail light fails, you will typically need to replace the entire tail light assembly.
Real-World Insights and Recommendations
Based on real-world experience, here are some recommendations:
- Always use the correct bulb type: Using the wrong bulb can damage your car's electrical system or cause the brake lights to function improperly.
- Wear gloves: The oils on your skin can shorten the lifespan of the bulb.
- Don't overtighten screws or fasteners: Overtightening can strip the threads or damage the plastic components.
- Keep spare bulbs on hand: It's always a good idea to keep a spare set of bulbs in your car in case of emergency.
- Consider upgrading to LED bulbs: LED bulbs are more energy-efficient, longer-lasting, and brighter than traditional incandescent bulbs. However, ensure that the LED bulb is compatible with your car's electrical system. Some cars may require resistors to prevent error messages or hyper-flashing.
- If you're not comfortable working on your car's electrical system, don't hesitate to take it to a professional mechanic. Safety is paramount.
Replacing a brake light bulb is a task that almost any car owner can tackle with a little knowledge and the right tools. By understanding the workings of the brake light system and following the steps outlined in this guide, you can save money, gain confidence, and ensure that your car is safe and visible on the road. Remember, your brake lights are more than just lights; they are a vital form of communication that protects you and other drivers. So, keep those exclamation points shining brightly!