How To Replace Brake Light Switch Stopper
The seemingly insignificant brake light switch stopper, often just a small piece of plastic or rubber, plays a critical role in your vehicle's braking and safety systems. Replacing it is a straightforward task, but understanding its function and how to do it properly can save you from potential headaches down the road. This article will guide you through the process, ensuring you can confidently handle this repair.
Understanding the Brake Light System
Before diving into the replacement procedure, let's establish a solid understanding of the brake light system. Your car's brake lights are activated by a switch located near the brake pedal. This switch signals to other drivers when you're slowing down or stopping, preventing rear-end collisions. The brake light switch stopper is a small component that acts as a physical interface between the brake pedal arm and the brake light switch itself.
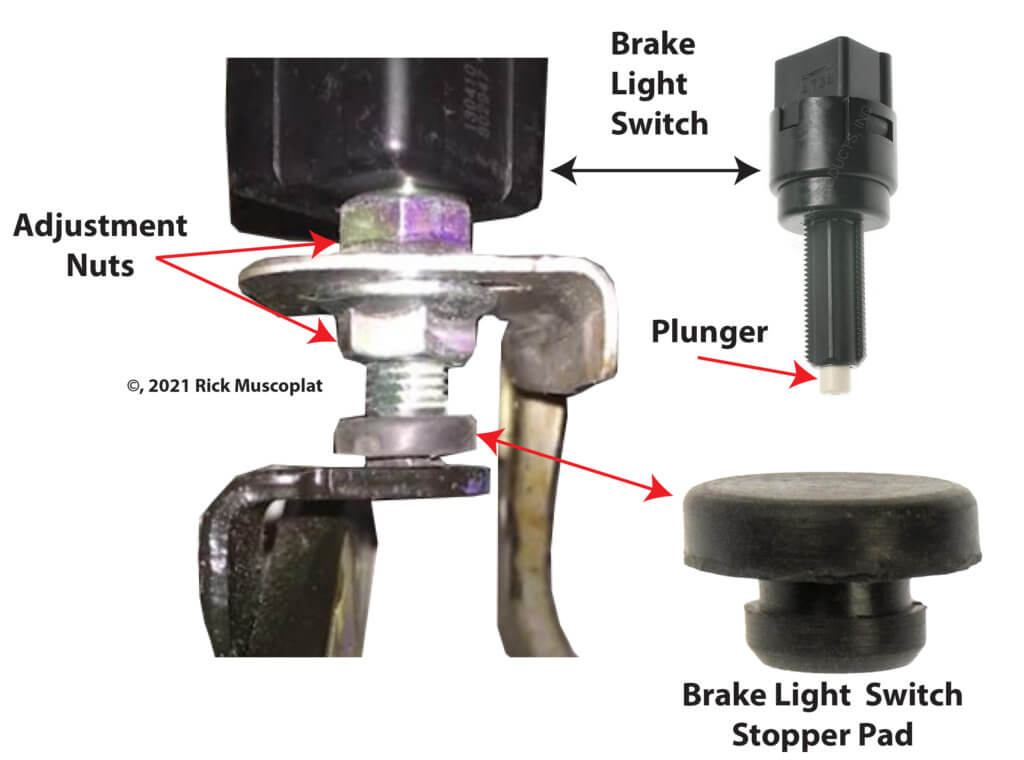
When you press the brake pedal, it moves away from the switch. The stopper, typically a small plastic or rubber pad, fills the gap between the pedal and the switch plunger when the pedal is at rest. With the stopper in place, the switch plunger is fully extended, opening the electrical circuit and keeping the brake lights off. As you depress the brake pedal, the pedal arm moves away from the switch, allowing the switch plunger to retract and close the circuit. This action illuminates the brake lights.
The Role of the Brake Light Switch
The brake light switch is a simple but essential electrical component. It is typically a single-pole, single-throw (SPST) switch, meaning it has two terminals and can only be in one of two states: open or closed. When the switch is open (stopper in place, brake pedal released), no current flows to the brake lights. When the switch is closed (brake pedal depressed), current flows, and the brake lights illuminate. Some vehicles also integrate the brake light switch into other systems, such as cruise control or anti-lock braking systems (ABS). In these cases, the switch might have multiple circuits.
The switch typically uses a plunger type mechanism. When the brake pedal is released, the stopper presses against the end of the plunger, pushing it into the switch body and opening the brake light circuit. When the brake pedal is depressed, the stopper moves away, allowing the plunger to extend from the switch body and close the brake light circuit.
Technical Breakdown: Replacing the Brake Light Switch Stopper
Replacing the brake light switch stopper is usually a simple task, but precision is key. Here's a step-by-step guide:
- Preparation: Before you begin, gather the necessary tools. You'll typically need a new brake light switch stopper (ensure it's the correct part for your vehicle - check your vehicle's repair manual or parts catalog), a flashlight, and possibly a small mirror to aid in visibility. It's also a good idea to disconnect the negative terminal of your car battery to prevent any accidental electrical shorts during the process. Though unlikely, it adds a layer of safety.
- Locating the Stopper: Position yourself comfortably in the driver's seat with good lighting. Use a flashlight to locate the brake light switch, which is usually mounted near the top of the brake pedal arm, close to the pivot point. Look for a small hole or recess in the pedal arm where the stopper is (or was) located. If the original stopper has disintegrated, you'll likely find small pieces of plastic or rubber debris on the floor mat.
- Removing the Old Stopper (if any remains): If any portion of the old stopper is still in place, carefully remove it. You might use a small screwdriver or pick to gently dislodge the fragments. Be careful not to damage the switch or the surrounding components. Ensure the hole is clean and free of any debris.
- Installing the New Stopper: With the old stopper removed and the area clean, carefully insert the new stopper into the hole. The stopper should fit snugly and securely. If the stopper is difficult to insert, check that you have the correct part and that the hole is free of obstructions. Some stoppers may require you to compress them slightly before inserting them.
- Testing the Installation: Once the new stopper is in place, test the brake lights to ensure they are functioning correctly. Have someone observe the brake lights while you depress and release the brake pedal. The brake lights should illuminate when the pedal is pressed and turn off when the pedal is released. If the brake lights remain on continuously, the stopper may not be positioned correctly, or the brake light switch may need adjustment.
- Adjusting the Brake Light Switch (if necessary): If the brake lights are not functioning correctly after replacing the stopper, you may need to adjust the brake light switch. This usually involves loosening a lock nut on the switch and adjusting its position until the brake lights operate as expected. Consult your vehicle's repair manual for specific adjustment procedures. Some switches are self-adjusting.
- Reconnecting the Battery: If you disconnected the battery, reconnect the negative terminal.
Common Issues and Maintenance Concerns
The most common issue related to the brake light switch stopper is its disintegration over time. The plastic or rubber material can become brittle and crumble, leading to several problems:
- Brake Lights Always On: If the stopper is missing or severely damaged, the brake light switch plunger may remain extended, causing the brake lights to stay on continuously. This can drain the battery and attract unwanted attention.
- Brake Lights Not Working: In some cases, a partially damaged stopper may prevent the switch from fully actuating, resulting in the brake lights not working at all. This is a serious safety hazard.
- Cruise Control Issues: As mentioned earlier, the brake light switch is often integrated into the cruise control system. A faulty stopper can cause the cruise control to disengage unexpectedly or not engage at all.
- ABS/Traction Control Problems: Similarly, problems with the stopper can sometimes affect the operation of the ABS and traction control systems.
Regular inspection of the brake light switch stopper is recommended, especially on older vehicles. Look for signs of cracking, crumbling, or general deterioration. Replacing the stopper proactively can prevent more serious problems later on.
Do's and Don'ts / Best Practices
- Do: Use the correct replacement part for your vehicle. Refer to your vehicle's repair manual or parts catalog to ensure you get the right stopper.
- Do: Disconnect the negative battery terminal before working on the electrical system to prevent accidental shorts.
- Do: Clean the area around the brake light switch before installing the new stopper.
- Do: Test the brake lights thoroughly after replacing the stopper.
- Don't: Force the stopper into place. If it doesn't fit easily, double-check that you have the correct part and that the hole is clear of obstructions.
- Don't: Over-tighten the brake light switch adjustment nut, if applicable. This can damage the switch.
- Don't: Neglect to inspect the brake light switch stopper periodically.
- Best Practice: When replacing the stopper, consider inspecting and cleaning the brake light switch contacts. Electrical contact cleaner can improve the switch's reliability.
- Best Practice: If you are experiencing persistent brake light issues, it might be prudent to replace the brake light switch itself along with the stopper. Switches can wear out over time.
Conclusion
Replacing the brake light switch stopper is a simple yet important task that can significantly impact your vehicle's safety and functionality. By understanding the function of the stopper, following the steps outlined in this guide, and adhering to best practices, you can confidently perform this repair and ensure your brake lights are working correctly. Always prioritize safety and consult your vehicle's repair manual for specific instructions and torque specifications. If you're uncomfortable with any aspect of the repair, don't hesitate to seek the assistance of a qualified mechanic. A properly functioning brake light system is crucial for preventing accidents and ensuring a safe driving experience for you and those around you.