How To Replace Fog Lights On 2015 Nissan Altima
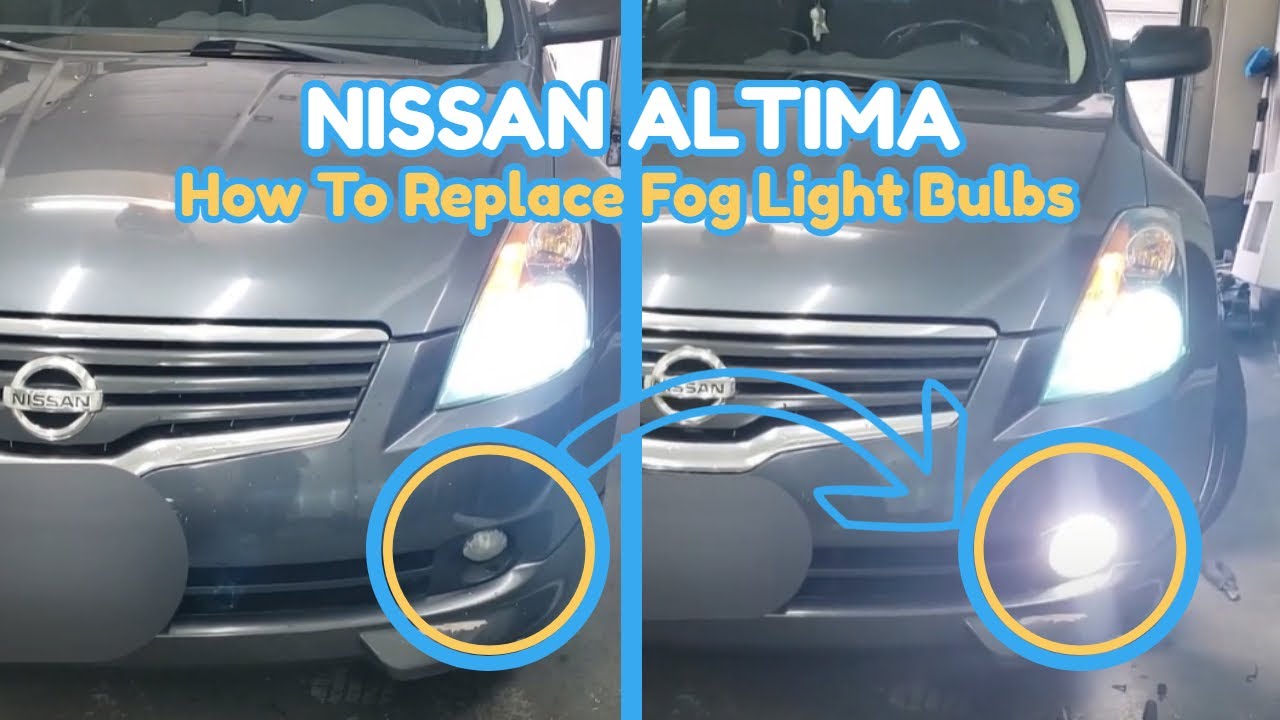
Replacing the fog lights on your 2015 Nissan Altima might seem like a minor task, but it's an excellent opportunity to understand more about your car's electrical system, its exterior components, and basic automotive repair principles. This guide provides a comprehensive walkthrough, blending practical steps with the underlying mechanical and electrical rationale.
The Fog Light Dilemma: Why Replace Them?
Fog lights, as the name suggests, are designed to improve visibility in adverse weather conditions like fog, heavy rain, and snow. They achieve this by projecting a wide, low beam of light that cuts *under* the fog layer, illuminating the road closer to the ground. A malfunctioning fog light not only compromises your visibility but can also be a safety hazard for other drivers. Imagine trying to navigate a dense fog bank on a winding road, relying solely on your headlights. The light reflects off the fog, creating a blinding white glare. Functional fog lights mitigate this issue by providing targeted illumination below the fog, allowing you to see the road markings and edges more clearly.
Common Reasons for Fog Light Replacement:
- Burned-Out Bulb: The most frequent culprit. Bulbs have a limited lifespan and will eventually fail.
- Cracked or Damaged Lens: Road debris, minor accidents, or even extreme weather can crack the lens, compromising the light's effectiveness and allowing moisture to enter.
- Electrical Issues: A faulty wiring harness, blown fuse, or malfunctioning relay can prevent the fog lights from functioning.
Understanding the System: A Simplified Perspective
The fog light system in your Altima, like most automotive lighting systems, is a relatively straightforward electrical circuit. It starts with the battery, the source of electrical power. From there, the power flows through a fuse, protecting the circuit from overloads. A relay, acting as an electrically controlled switch, is activated by the fog light switch in your cabin. When the switch is engaged, it sends a small electrical signal to the relay, which then allows the full power from the battery to flow to the fog lights, illuminating them. The circuit is completed by the grounding wire, which returns the electricity to the battery, creating a closed loop.
Think of it like a water hose. The battery is the water source, the fuse is a flow restrictor preventing bursts, the switch is a valve controlling the flow, the relay is a helper valve powered by the switch, and the fog lights are the sprinklers at the end. If any part of this system fails, the sprinklers (fog lights) won't work.
The Replacement Procedure: Step-by-Step
Safety First: Before commencing any work on your vehicle, ensure it is parked on a level surface, the parking brake is engaged, and the ignition is switched off. Disconnecting the negative terminal of the battery is also recommended to prevent any accidental electrical shocks.
- Gather Your Tools and Materials:
- New fog light assembly (ensure it's compatible with your 2015 Nissan Altima)
- Socket set (typically 10mm, 12mm, and possibly a Torx bit)
- Screwdrivers (Phillips and flathead)
- Pliers
- Jack and jack stands (if accessing the fog lights from underneath)
- Gloves
- Safety glasses
- Accessing the Fog Lights: This is where the procedure can vary slightly depending on the specific model and trim level of your 2015 Altima. Generally, you have two options:
- Option A: Through the Wheel Well: Turn the steering wheel to full lock in the opposite direction of the fog light you're replacing. This creates more space in the wheel well. Locate the access panel (usually a plastic cover held in place by clips or screws) and remove it. You should now have enough room to reach the fog light assembly from behind.
- Option B: From Underneath the Car: This requires lifting the car. Use a jack to raise the vehicle and securely support it with jack stands. *Never work under a vehicle supported only by a jack*. Locate the splash shield or undercarriage panel that covers the fog light area. Remove the screws or clips holding it in place to gain access to the fog lights.
- Disconnecting the Electrical Connector: Once you have access to the back of the fog light assembly, locate the electrical connector. This is usually a plastic connector that plugs directly into the bulb or the back of the fog light housing. Gently squeeze the release tab on the connector and pull it straight out to disconnect it. Be careful not to pull on the wires themselves.
- Removing the Old Fog Light Assembly: The fog light assembly is typically held in place by screws, bolts, or clips. Use the appropriate socket or screwdriver to remove these fasteners. Once the fasteners are removed, carefully wiggle the fog light assembly out of its housing. Take note of how the assembly is positioned so you can install the new one correctly.
- Installing the New Fog Light Assembly: Align the new fog light assembly with the mounting holes and secure it in place with the screws, bolts, or clips you removed earlier. Ensure the assembly is securely fastened and doesn't wiggle.
- Connecting the Electrical Connector: Plug the electrical connector into the back of the new fog light assembly. Make sure the connector clicks into place, indicating a secure connection.
- Testing the Fog Lights: Before reassembling everything, turn on the ignition and activate the fog light switch to ensure the new fog light is working correctly. If it doesn't light up, double-check the electrical connection and the fuse.
- Reassembling: Reinstall the access panel in the wheel well or the splash shield underneath the car. If you lifted the car, carefully lower it back to the ground.
Pros and Cons of DIY Replacement
Pros:
- Cost Savings: Avoid expensive labor charges from a mechanic.
- Learning Experience: Gain valuable knowledge about your car's systems.
- Control Over Parts: Choose the quality of fog lights you prefer.
Cons:
- Time Commitment: Can take a few hours, especially if you're not experienced.
- Potential for Mistakes: Incorrect installation can lead to further problems.
- Warranty Issues: Modifying electrical components *could* void your warranty in some cases (unlikely for fog lights, but worth noting).
OEM vs. Aftermarket: A Matter of Choice
When choosing replacement fog lights, you have two primary options: Original Equipment Manufacturer (OEM) parts and aftermarket parts.
- OEM Fog Lights: These are the same parts that were originally installed on your vehicle at the factory. They are typically more expensive but offer a guaranteed fit and performance.
- Aftermarket Fog Lights: These are produced by third-party manufacturers and can be more affordable than OEM parts. However, the quality and fit can vary significantly. Some aftermarket fog lights may offer improved performance or a different aesthetic compared to the OEM options. Brands like Hella, PIAA, and Osram are well-regarded in the aftermarket lighting industry.
Use Cases:
- OEM: Best for those prioritizing guaranteed fit and original performance.
- Aftermarket: Suitable for those looking for cost savings, performance upgrades, or a different aesthetic, but require careful research to ensure quality.
Real-World Insights and Recommendations
Based on real-world experience, a few points are worth emphasizing:
- Bulb Type Matters: The 2015 Altima likely uses an H11 or similar halogen bulb for its fog lights. Consider upgrading to LED bulbs for brighter, longer-lasting light, but ensure they are DOT-compliant and designed for fog light applications. Using an incorrect bulb type can damage the fog light housing or create glare for other drivers.
- Proper Alignment is Crucial: After installing the new fog lights, check their alignment. Fog lights should be aimed low and wide, illuminating the road close to the ground without shining into oncoming traffic. Many fog light assemblies have adjustment screws for fine-tuning the beam.
- Check the Fuse: If the new fog light doesn't work, even after verifying the connection, check the fuse for the fog lights in the fuse box (usually located under the dashboard or in the engine compartment). A blown fuse is a common cause of lighting problems. Consult your owner's manual for the fuse location and rating.
- Consider Professional Help: If you're uncomfortable working with electrical systems or unsure about any part of the procedure, it's always best to seek professional assistance from a qualified mechanic.
Replacing your fog lights might seem like a simple task, but taking the time to understand the underlying system, choosing the right parts, and following the correct procedure will ensure a successful and safe outcome. By understanding how each component plays its role, you're not just replacing a light; you're gaining valuable insight into your vehicle and enhancing your driving safety.