How To Replace Fuel Sending Unit
Replacing a fuel sending unit might seem daunting, but with the right tools and a bit of patience, it's a repair most DIY enthusiasts can tackle. This guide will walk you through the process, offering clear instructions and helpful tips to ensure a successful replacement. The process typically involves accessing the fuel tank, disconnecting electrical connections and fuel lines, removing the old unit, installing the new one, and reassembling everything securely.
Why Replacing Your Fuel Sending Unit Matters
The fuel sending unit is a crucial component of your vehicle's fuel system. It's responsible for accurately measuring the amount of fuel in your tank and relaying this information to your fuel gauge on the dashboard. A malfunctioning fuel sending unit can lead to several problems, including:
- Inaccurate Fuel Readings: The most obvious symptom is an incorrect fuel level displayed on your gauge. This can range from showing empty when you have plenty of fuel to indicating a full tank when it's nearly empty.
- Running Out of Gas Unexpectedly: Relying on a faulty fuel gauge can leave you stranded on the side of the road.
- Potential Damage to Fuel Pump: Consistently running your fuel tank close to empty can strain and potentially damage your fuel pump, as it relies on the fuel to stay cool.
- Check Engine Light: In some cases, a faulty fuel sending unit can trigger the check engine light.
Ignoring these issues can lead to inconvenience and potentially more costly repairs down the line. Therefore, addressing a suspected fuel sending unit problem promptly is crucial.
How to Choose the Right Fuel Sending Unit
Selecting the correct replacement fuel sending unit is essential for a successful repair. Here's what to consider:
Vehicle Compatibility:
This is the most important factor. Ensure the new fuel sending unit is specifically designed for your vehicle's make, model, and year. Using an incompatible unit can lead to inaccurate readings, improper fitment, and even damage to your fuel system.
Original Equipment Manufacturer (OEM) vs. Aftermarket:
You have two main options: OEM parts directly from the manufacturer or aftermarket parts from third-party suppliers.
- OEM (Original Equipment Manufacturer): These are typically more expensive but offer the best guarantee of quality and compatibility. They are made to the exact specifications of the original part.
- Aftermarket: Aftermarket parts can be more affordable, but quality can vary significantly. Research brands thoroughly and read reviews to ensure you're buying a reliable product. Look for reputable brands known for producing high-quality fuel system components.
Consider your budget and desired level of quality when making this decision. If you prioritize peace of mind and guaranteed compatibility, OEM is often the best choice. If you're on a tighter budget, research reputable aftermarket options carefully.
Fuel Tank Material:
Some vehicles have metal fuel tanks, while others have plastic tanks. The fuel sending unit needs to be compatible with the tank material. Incorrect material compatibility can lead to corrosion or degradation of the unit over time.
Fuel Pump Integration:
In many vehicles, the fuel sending unit is integrated with the fuel pump as a single assembly. If this is the case for your vehicle, you might need to replace the entire assembly. Determine whether your fuel sending unit is a separate component or part of a larger assembly before purchasing a replacement.
Resistance Range:
The resistance range of the fuel sending unit must match the specifications of your vehicle's fuel gauge. This ensures accurate readings. Consult your vehicle's repair manual or online resources to find the correct resistance range for your vehicle.
Check for Included Components:
Some fuel sending units come as a complete kit with new gaskets, seals, and other necessary hardware. This can save you time and money compared to buying these components separately. Ensure the kit includes all the parts you need for a complete installation.
Step-by-Step Guide to Replacing Your Fuel Sending Unit
Safety First! Always disconnect the negative terminal of your battery before working on any electrical components in your vehicle. Work in a well-ventilated area and have a fire extinguisher nearby. Gasoline is highly flammable.
- Gather Your Tools and Materials: You'll need a new fuel sending unit, sockets, wrenches, screwdrivers, pliers, a fuel line disconnect tool (if needed), a multimeter, a container to catch spilled fuel, safety glasses, gloves, and a repair manual for your vehicle.
- Deplete the Fuel Tank (Optional but Recommended): The less fuel in the tank, the easier and safer the job will be. Consider running your vehicle until the fuel level is low, or use a siphon to remove excess fuel.
- Access the Fuel Tank: The fuel tank's location varies depending on the vehicle. It might be accessible from under the vehicle after removing some panels, or you might need to access it from inside the trunk or under the rear seats. Consult your repair manual for specific instructions.
- Disconnect Electrical Connections: Carefully disconnect the electrical connector(s) attached to the fuel sending unit. Use a multimeter to test the wiring and confirm the old unit is faulty.
- Disconnect Fuel Lines: If the fuel sending unit is connected to any fuel lines, use a fuel line disconnect tool (if required) to carefully disconnect them. Be prepared for some fuel spillage. Have a container ready to catch any drips.
- Remove the Old Fuel Sending Unit: Depending on the design, the fuel sending unit may be held in place by a retaining ring, screws, or clips. Carefully remove the retaining mechanism and gently lift the fuel sending unit out of the tank.
- Inspect the Fuel Tank: Before installing the new unit, inspect the inside of the fuel tank for any debris or corrosion. Clean the tank if necessary.
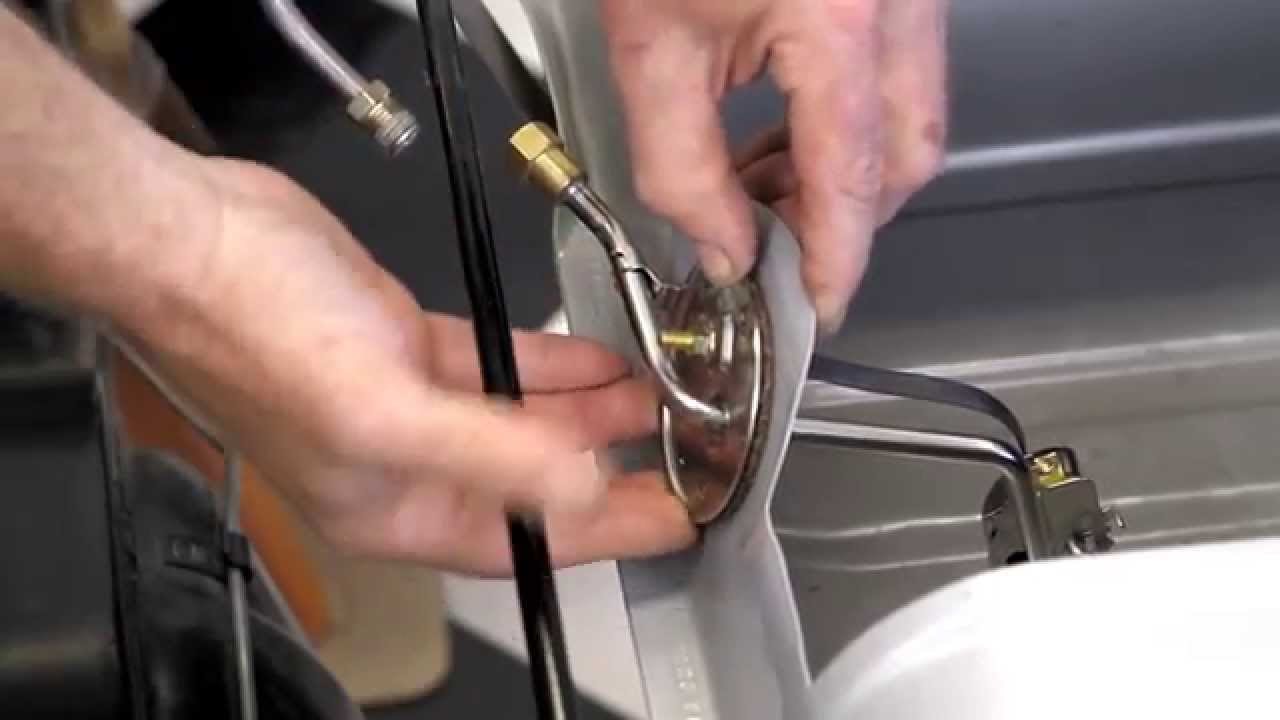
- Install the New Fuel Sending Unit: Carefully insert the new fuel sending unit into the tank, ensuring it's properly aligned. Secure it with the retaining ring, screws, or clips, depending on the design. Make sure the unit seats properly.
- Reconnect Fuel Lines: Reconnect any fuel lines you disconnected earlier. Ensure the connections are secure and leak-free.
- Reconnect Electrical Connections: Reconnect the electrical connector(s) to the new fuel sending unit.
- Test the Fuel Gauge: Reconnect the negative terminal of your battery. Turn the ignition key to the "on" position (without starting the engine) and check the fuel gauge. It should now display an accurate reading.
- Check for Leaks: Start the engine and carefully inspect the fuel tank and fuel lines for any leaks. If you find any leaks, tighten the connections or replace the affected components.
- Reassemble: Reinstall any panels or components you removed to access the fuel tank.
Real-World Owner Experiences
Many owners have successfully replaced their fuel sending units themselves. Here are some common experiences and tips from online forums and communities:
- Difficulty Removing the Retaining Ring: The retaining ring can be difficult to remove, especially if it's corroded. Using a specialized retaining ring tool can make the job easier. WD-40 or a similar penetrating oil can also help loosen the ring.
- Fuel Line Disconnection: Disconnecting fuel lines can be messy. Having a container ready to catch spilled fuel is crucial. Make sure to use the correct fuel line disconnect tool for your vehicle.
- Inaccurate Readings After Replacement: Double-check the resistance range of the new fuel sending unit to ensure it matches your vehicle's specifications. Also, make sure the unit is properly seated in the tank.
- Quality of Aftermarket Parts: Some owners have reported issues with the quality of certain aftermarket fuel sending units. Research brands thoroughly and read reviews before making a purchase.
Remember to consult your vehicle's repair manual for specific instructions and torque specifications. If you're not comfortable performing this repair yourself, it's always best to consult a qualified mechanic.
Frequently Asked Questions (FAQs)
Here are some frequently asked questions about replacing fuel sending units:
Q: How much does it cost to replace a fuel sending unit?
A: The cost varies depending on the vehicle and whether you do it yourself or hire a mechanic. The fuel sending unit itself can range from $50 to $300 or more. Labor costs can add another $100 to $500, depending on the complexity of the job.
Q: How long does it take to replace a fuel sending unit?
A: The time required can vary depending on your experience and the vehicle. It can take anywhere from 2 to 6 hours.
Q: Can I drive with a bad fuel sending unit?
A: While you *can* drive with a bad fuel sending unit, it's not recommended. Inaccurate fuel readings can lead to running out of gas unexpectedly or potentially damaging your fuel pump. It's best to address the problem as soon as possible.
Q: Will a bad fuel sending unit affect my gas mileage?
A: A faulty fuel sending unit primarily affects the accuracy of your fuel gauge. It doesn't directly impact your gas mileage. However, constantly running on low fuel due to relying on a broken fuel gauge can damage the fuel pump, which could indirectly affect gas mileage in the long run.
Q: How do I know if my fuel sending unit is bad?
A: Common symptoms include an inaccurate fuel gauge, the fuel gauge fluctuating erratically, the check engine light illuminating, or running out of gas despite the fuel gauge indicating that there's still fuel in the tank. You can also use a multimeter to test the resistance of the fuel sending unit.
Q: Can I replace just the float on the fuel sending unit?
A: In some cases, the float can be replaced separately. However, it's often recommended to replace the entire fuel sending unit, as other components may also be worn or failing. If the float is the only issue, replacing it can be a more cost-effective solution.