How To Replace Liftgate Fuses In 2014 Nissan Pathfinder Platinum
If your 2014 Nissan Pathfinder Platinum's liftgate suddenly refuses to cooperate, the first suspect should be a blown fuse. This article guides you through the process of locating and replacing the relevant fuses, equipping you with the knowledge to tackle this common issue yourself.
Understanding Your Pathfinder's Liftgate System
Before diving into the fuse replacement, let's briefly review the liftgate system in your 2014 Pathfinder Platinum. This model features a power liftgate, which means it's operated by an electric motor rather than purely mechanical means. This motor is controlled by an Electronic Control Unit (ECU) specifically for the liftgate, and it interfaces with various sensors and switches to ensure smooth and safe operation. These components include:
- Liftgate Motor: The prime mover, responsible for physically opening and closing the liftgate.
- Liftgate Latch Actuator: Engages and disengages the latch mechanism to secure the liftgate.
- Liftgate Control Module (part of ECU): Receives signals from the key fob, interior switch, and liftgate handle, and then commands the motor and latch accordingly.
- Pinch Sensors: Detect obstructions during liftgate operation to prevent injuries or damage.
- Power Liftgate Switch: Located on the liftgate itself and/or the driver's console, allowing for manual operation.
- Key Fob Remote: Provides remote control of the liftgate.
The entire system relies on a consistent and adequate power supply. A blown fuse interrupts this supply, causing the liftgate to malfunction.
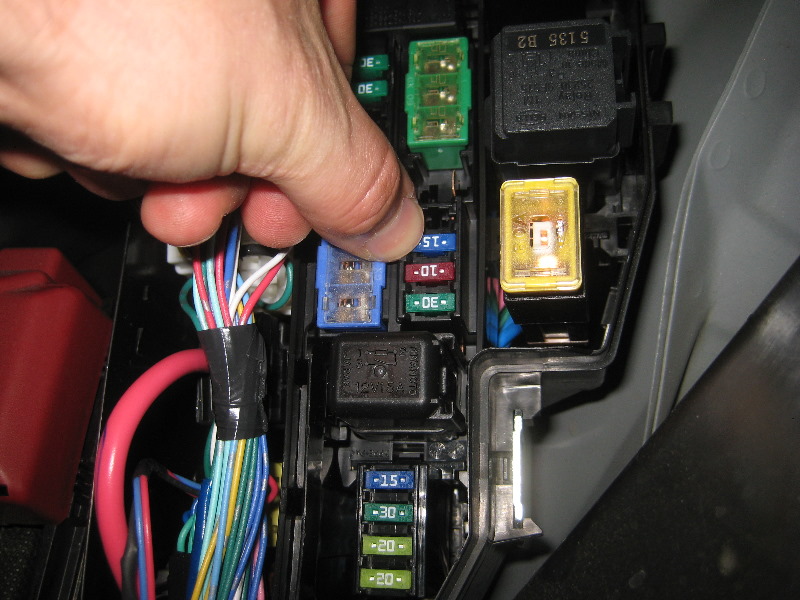
Technical Breakdown: Locating and Replacing the Liftgate Fuses
The 2014 Nissan Pathfinder Platinum typically utilizes several fuses related to the power liftgate system. These fuses are located in two primary fuse boxes:
- Interior Fuse Box: Situated under the dashboard on the driver's side. You'll likely need to contort a bit to access it.
- Engine Compartment Fuse Box: Located under the hood, typically near the battery.
Step-by-Step Procedure:
- Gather Your Tools and Materials: You'll need the following:
- Owner's Manual (essential for fuse location and amperage information)
- Needle-nose pliers or fuse puller (often found in the fuse box)
- New fuses of the correct amperage (verify the amperage rating in your owner's manual or on the fuse box diagram. Never use a fuse with a higher amperage rating.)
- Flashlight or work light
- Consult Your Owner's Manual: This is the most crucial step. Your owner's manual contains the fuse box diagrams that clearly indicate which fuses are related to the liftgate system. Look for fuses labeled "Power Liftgate," "Liftgate Control," "Back Door," or similar terms. The manual will also specify the amperage rating for each fuse. Incorrect amperage fuses can cause serious damage.
- Locate the Interior Fuse Box: Get comfortable on the floor of the driver's side. You may need to remove a small access panel to expose the fuse box.
- Identify the Liftgate Fuses in the Interior Fuse Box: Using your owner's manual diagram and a flashlight, carefully identify the fuses related to the liftgate system.
- Remove the Suspect Fuse(s): Use the needle-nose pliers or fuse puller to gently remove the fuse. Avoid using excessive force, as this could damage the fuse box.
- Inspect the Fuse: Examine the fuse carefully. A blown fuse will have a broken filament inside. If the filament is intact, the fuse is good, and you should look for other potential problems.
- Replace the Blown Fuse: If the fuse is blown, replace it with a new fuse of the exact same amperage rating. Ensure the fuse is firmly seated in the fuse holder.
- Repeat Steps 4-7 for the Engine Compartment Fuse Box: Locate the engine compartment fuse box under the hood. Consult your owner's manual diagram to identify and inspect any liftgate-related fuses in this location. Replace any blown fuses with the correct amperage rating.
- Test the Liftgate: After replacing all the identified blown fuses, test the liftgate operation. Use the key fob, interior switch, and liftgate handle to see if it now opens and closes properly.
- If the Liftgate Still Doesn't Work: If the liftgate still doesn't function after replacing the fuses, there may be a more complex issue. Proceed to the "Common Issues and Maintenance Concerns" section below.
Common Issues and Maintenance Concerns
If replacing the fuses doesn't solve the problem, consider these potential issues:
- Faulty Liftgate Motor: The motor itself could be failing. This is more common with age and heavy use. Diagnostics usually requires a multimeter to test motor voltage and resistance. A faulty motor usually means replacement.
- Defective Liftgate Latch Actuator: The latch mechanism might be malfunctioning, preventing the liftgate from opening or closing properly. You may hear clicking sound but the gate refuses to release.
- Wiring Issues: Damaged or corroded wiring can interrupt the power supply to the liftgate system. Pay close attention to the wiring harness that passes between the body and the liftgate, especially where it flexes with the gate opening and closing.
- Faulty Power Liftgate Switch: A defective switch on the liftgate itself or on the dashboard could prevent operation. Testing requires a multimeter and understanding the wiring diagram.
- Low Battery Voltage: A weak battery can sometimes cause the power liftgate to malfunction. Make sure your battery is fully charged.
- ECU/Liftgate Control Module Failure: In rare cases, the liftgate control module itself may be faulty. This requires specialized diagnostic equipment and is best left to a qualified technician.
- Pinch Sensor Malfunction: Although rarer, a malfunctioning pinch sensor could be falsely detecting an obstruction and preventing the liftgate from operating.
Maintenance: Periodically inspect the liftgate struts (dampers) for signs of wear or leakage. These struts assist in lifting and supporting the liftgate. Replacing them when they become weak can prevent the liftgate from slamming shut.
Do's and Don'ts / Best Practices
- DO consult your owner's manual for fuse location and amperage information.
- DO use the correct amperage replacement fuses. Never use a fuse with a higher amperage rating.
- DO disconnect the negative battery terminal before working on the electrical system (optional, but recommended for safety).
- DO inspect the fuse box for any signs of corrosion or damage.
- DO ensure the replacement fuse is firmly seated in the fuse holder.
- DON'T use excessive force when removing or installing fuses.
- DON'T replace a blown fuse with a piece of wire or any other makeshift substitute. This is a fire hazard.
- DON'T ignore recurring blown fuses. If a fuse blows repeatedly, there's an underlying problem that needs to be addressed.
- DON'T attempt to diagnose or repair complex electrical issues without proper training and equipment.
Conclusion
Replacing a blown liftgate fuse is a relatively simple task that most DIYers can handle. However, it's crucial to follow the proper procedures and use the correct replacement fuses. If replacing the fuses doesn't solve the problem, it's best to consult a qualified mechanic to diagnose and repair the underlying issue. Addressing the root cause of a recurring blown fuse is critical for the long-term reliability of your vehicle's electrical system. Ignoring the problem could lead to more extensive and costly repairs down the road. Remember, safety first! If you are unsure about any aspect of the repair, seek professional assistance. Proper fuse replacement and maintenance can keep your 2014 Nissan Pathfinder Platinum's liftgate operating smoothly for years to come.