How To Replace Power Window Regulator
The dreaded "thunk" followed by silence. A sinking feeling, both literally and figuratively, as your power window refuses to cooperate. You're now faced with the prospect of a drive-through experience requiring acrobatic maneuvers, or worse, a security risk if you can't properly secure your vehicle. The culprit is likely a failed power window regulator, and while professional repair is always an option, understanding the system and tackling the replacement yourself can be a rewarding and cost-effective endeavor.
Understanding the Power Window Predicament
Imagine a seesaw. On one side, you have the weight of the window glass. On the other side, a carefully balanced mechanism designed to lift and lower it smoothly. Now, imagine that seesaw's fulcrum gradually corroding, or its supporting structure weakening. Eventually, it's going to fail. This is essentially what happens with a power window regulator.
The most common symptom of a failing power window regulator is the inability to raise or lower the window. Other telltale signs include:
- Slow or erratic window movement: The window may struggle to move or move unevenly.
- Grinding or clicking noises: These sounds indicate damaged gears or worn components within the regulator mechanism.
- Window falling into the door: This is a clear indication of a broken cable or a completely failed regulator.
A Deep Dive into the Mechanics
The power window system is deceptively simple, relying on a combination of electrical power and mechanical leverage. At its heart lies the DC motor, which, when activated by the window switch, provides the rotational force. This rotational force is then translated into linear motion via the regulator mechanism, which is responsible for moving the window glass up and down.
There are several types of power window regulators, each with its own strengths and weaknesses:
Scissor-Type Regulators
This is one of the older and more robust designs. It utilizes a scissor-like arm that pivots and extends to raise and lower the window. A motor drives a gear that interacts with the scissor arm, providing the necessary leverage. These are generally found in older vehicles and some trucks, favored for their durability and simplicity.
Cable-Type Regulators
A more modern and compact design, the cable-type regulator uses a series of cables and pulleys to move the window. The motor drives a drum that winds or unwinds the cables, which are connected to a carrier that supports the window glass. Cable regulators are lighter and more space-efficient than scissor-type regulators, making them suitable for smaller vehicles. However, the cables themselves are prone to fraying and breakage, which can lead to premature failure. These are often the source of the dreaded "thunk" as a cable snaps.
Rack-and-Pinion Regulators
Less common but still used in some vehicles, the rack-and-pinion regulator uses a gear (pinion) driven by the motor to move a toothed bar (rack) connected to the window. This direct drive system provides precise control but can be more susceptible to damage from obstructions or excessive force.
The window motor itself is a relatively simple component. It's a small DC motor with a built-in gearbox to increase torque and reduce speed. The motor receives power from the vehicle's electrical system via the window switch. When the switch is activated, it sends power to the motor, causing it to rotate. A polarity reversal system allows the motor to turn in both directions, raising and lowering the window.
Pros, Cons, and Use Cases
Scissor-Type Regulator:
- Pros: Durable, reliable, long lifespan.
- Cons: Bulky, heavier, less space-efficient.
- Use Cases: Older vehicles, trucks, vehicles requiring robust window operation.
- Example: Many classic American cars from the 1960s and 70s.
Cable-Type Regulator:
- Pros: Lightweight, compact, space-efficient.
- Cons: Cables prone to fraying and breakage, shorter lifespan.
- Use Cases: Modern vehicles, smaller cars, vehicles where weight and space are critical.
- Example: Many modern sedans and compact cars.
Rack-and-Pinion Regulator:
- Pros: Precise control, relatively simple design.
- Cons: Susceptible to damage from obstructions, can be noisy.
- Use Cases: Niche applications requiring precise window control.
- Example: Some specialty vehicles and older European cars.
Manufacturer Examples and Variations
Different manufacturers may use variations of these basic designs. For example, some regulators might incorporate a clutch mechanism to prevent damage if the window encounters an obstruction. Others may use a more sophisticated motor control system to provide smoother and quieter operation.
Companies like Dorman and A1 Cardone are well-known for producing aftermarket power window regulators. These regulators often offer a cost-effective alternative to OEM (Original Equipment Manufacturer) parts. While OEM parts are generally considered to be of higher quality, aftermarket regulators can be a viable option, especially for older vehicles.
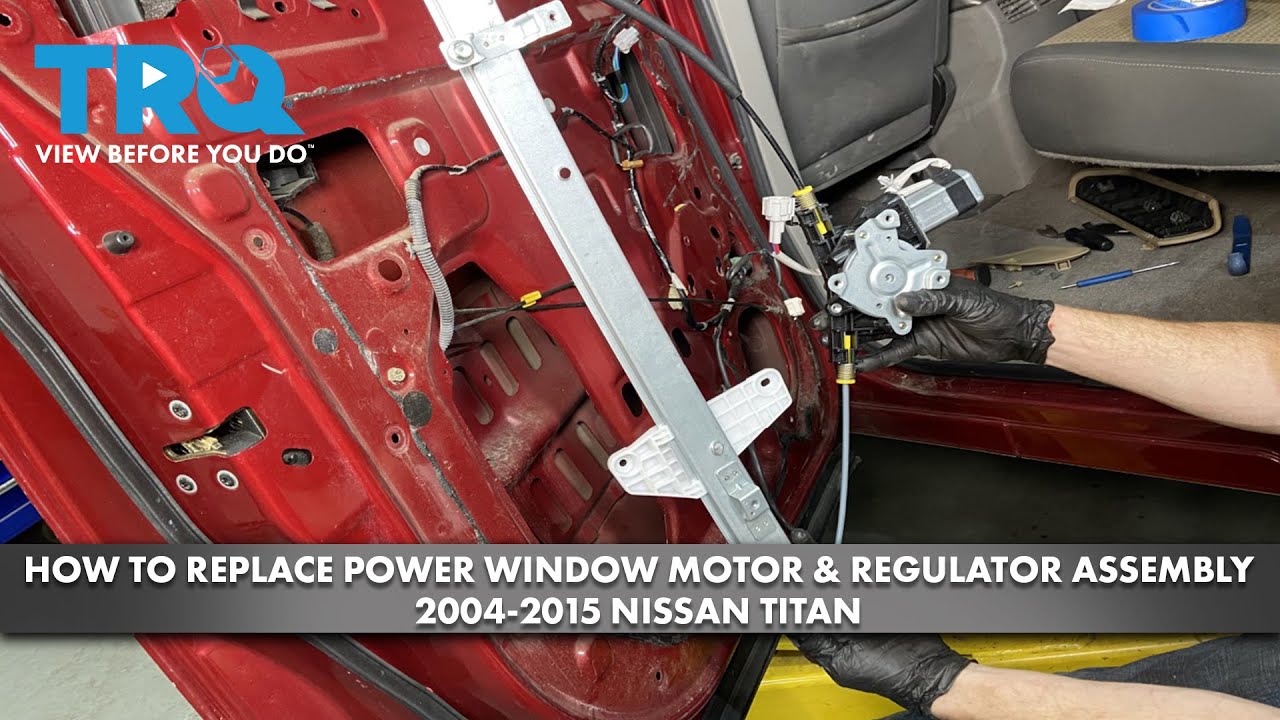
The Replacement Process: A Step-by-Step Guide (Simplified)
While the specific steps may vary slightly depending on the vehicle, the general process for replacing a power window regulator is as follows:
- Safety First: Disconnect the negative battery cable to prevent accidental electrical shocks.
- Remove the Door Panel: This typically involves removing screws, clips, and other fasteners. Be careful not to damage the door panel during removal.
- Disconnect Electrical Connectors: Disconnect the electrical connectors for the window motor and any other components attached to the door panel.
- Remove the Inner Door Panel Shield/Water Barrier: This plastic sheet protects the door's interior from moisture. Carefully peel it back, being mindful not to tear it.
- Access the Regulator: Locate the power window regulator within the door cavity.
- Detach the Window Glass: This usually involves loosening bolts or clips that secure the glass to the regulator. Carefully support the window glass to prevent it from falling. You may need to manually raise the glass to a certain position for easier access.
- Remove the Old Regulator: Remove the bolts or screws that secure the regulator to the door. Carefully maneuver the regulator out of the door cavity.
- Install the New Regulator: Install the new regulator in the reverse order of removal. Ensure that it is properly aligned and securely fastened.
- Attach the Window Glass: Reattach the window glass to the regulator. Ensure that it is properly aligned and securely fastened.
- Reconnect Electrical Connectors: Reconnect the electrical connectors for the window motor and other components.
- Test the Window Operation: Reconnect the negative battery cable and test the window operation. Ensure that the window moves smoothly and properly.
- Reinstall the Door Panel Shield/Water Barrier: Reattach the plastic sheet, ensuring a good seal.
- Reinstall the Door Panel: Reinstall the door panel, securing it with screws, clips, and other fasteners.
Important Notes:
- Safety Glasses: Always wear safety glasses to protect your eyes from debris.
- Gloves: Wear gloves to protect your hands from sharp edges and grease.
- Patience: Take your time and be patient. Rushing the job can lead to mistakes and damage.
- Vehicle-Specific Instructions: Consult your vehicle's repair manual for specific instructions and diagrams.
Real-World Insights and Recommendations
Replacing a power window regulator is a manageable task for DIY enthusiasts with some mechanical aptitude. However, it's crucial to approach the project with the right tools, information, and a healthy dose of caution. Investing in a quality set of automotive trim removal tools will significantly simplify the door panel removal process and minimize the risk of damage.
Before purchasing a replacement regulator, carefully inspect the old one to determine the exact type and configuration. Pay attention to the number of mounting points, the location of electrical connectors, and the overall design. This will help ensure that you purchase the correct replacement part.
When working with cable-type regulators, exercise extreme caution. The cables can be under tension and can snap unexpectedly, causing injury. If possible, secure the cables with clamps or pliers before disconnecting them.
After installing the new regulator, thoroughly test the window operation. Check for smooth movement, proper alignment, and any unusual noises. If you encounter any problems, double-check your work and consult a repair manual or online resources.
Finally, remember that safety is paramount. If you are not comfortable working with electrical or mechanical systems, it's always best to seek professional assistance.