How To Replace The Valve Cover Gasket
Valve cover gaskets: They're often overlooked until they start leaking, but a healthy gasket is crucial for maintaining proper engine function and preventing messy oil leaks. This guide will walk you through the process of replacing a valve cover gasket, providing the technical knowledge and practical steps needed to tackle this common DIY project with confidence.
Background: The Valve Cover and its Gasket
To understand the importance of the valve cover gasket, let's delve into the engine compartment. Your engine's cylinder head is a complex casting containing vital components like the valves, rocker arms (or camshaft followers), and often, the camshaft(s) themselves. These components are constantly bathed in engine oil for lubrication. The valve cover, typically made of metal (aluminum or steel) or sometimes plastic, serves as a protective shield over these components. It's bolted to the cylinder head, creating a sealed enclosure.
The valve cover gasket is the critical sealing element positioned between the valve cover and the cylinder head. Its purpose is simple yet vital: to prevent oil from escaping the valve train area. These gaskets are usually made from materials like rubber, cork, silicone, or a combination thereof. Over time, due to heat cycling, oil exposure, and general aging, the gasket can harden, crack, or become brittle, leading to leaks.
Technical Breakdown: How the Valve Cover Gasket Works
The valve cover gasket works by creating a tight, compression-based seal between the valve cover and the cylinder head. When the valve cover bolts are tightened to the manufacturer's specified torque, the gasket is compressed, filling any microscopic imperfections in the mating surfaces. This compression forces the gasket material to conform to the shape of both the valve cover and the cylinder head, preventing oil from seeping out.
The effectiveness of the seal depends on several factors:
- Gasket Material: Different materials have different properties. Rubber and silicone gaskets generally offer better resistance to heat and oil degradation compared to cork gaskets.
- Surface Finish: A clean, smooth surface on both the valve cover and the cylinder head is essential for a proper seal. Debris, old gasket material, or corrosion can compromise the seal.
- Torque: Proper torque is crucial. Over-tightening can crush the gasket, while under-tightening won't provide sufficient compression.
- Gasket Design: Some gaskets incorporate features like molded seals around bolt holes or raised ribs to enhance sealing.
Step-by-Step Guide: Replacing the Valve Cover Gasket
Now, let's get practical. Here's a detailed step-by-step guide to replacing a valve cover gasket:
1. Preparation and Safety
Safety First! Disconnect the negative battery terminal to prevent accidental electrical shorts. Gather your tools:
- New valve cover gasket (ensure it's the correct one for your vehicle!)
- Socket set and ratchet
- Torque wrench
- Screwdrivers (flathead and Phillips)
- Scraper or gasket remover
- Shop rags or paper towels
- Carburetor cleaner or brake cleaner
- Oil drain pan (if you anticipate oil spillage)
- Gloves and eye protection
2. Accessing the Valve Cover
Identify the valve cover. It's usually on top of the engine. Before you can remove the valve cover, you'll likely need to disconnect or remove several components:
- Air Intake: Remove the air intake ducting and air filter housing if they obstruct access to the valve cover.
- Wiring Harnesses: Disconnect any wiring harnesses or sensors attached to the valve cover or in its immediate vicinity. Label each connector before disconnecting it to avoid confusion during reassembly.
- Vacuum Lines: Disconnect any vacuum lines connected to the valve cover. Again, label them for easy reinstallation.
- PCV Valve: Locate the Positive Crankcase Ventilation (PCV) valve, which is often mounted on the valve cover. Disconnect or remove it.
- Throttle Cables/Linkages: Some vehicles have throttle cables or linkages that might need to be detached or moved out of the way.
3. Removing the Valve Cover
Loosen the valve cover bolts gradually in a crisscross pattern. This prevents warping or damage to the valve cover. Once all the bolts are loose, remove them completely. Gently pry the valve cover loose from the cylinder head. If it's stuck, use a rubber mallet to lightly tap around the edges. Never force it with a screwdriver, as you could damage the mating surfaces.
4. Cleaning the Surfaces
This is the most crucial step! Thoroughly clean both the valve cover and the cylinder head mating surfaces. Use a scraper or gasket remover to remove all traces of the old gasket material. Be careful not to scratch or gouge the aluminum. Use carburetor cleaner or brake cleaner and a shop rag to degrease the surfaces. Inspect the valve cover for any cracks, warps, or damage. If necessary, replace the valve cover.
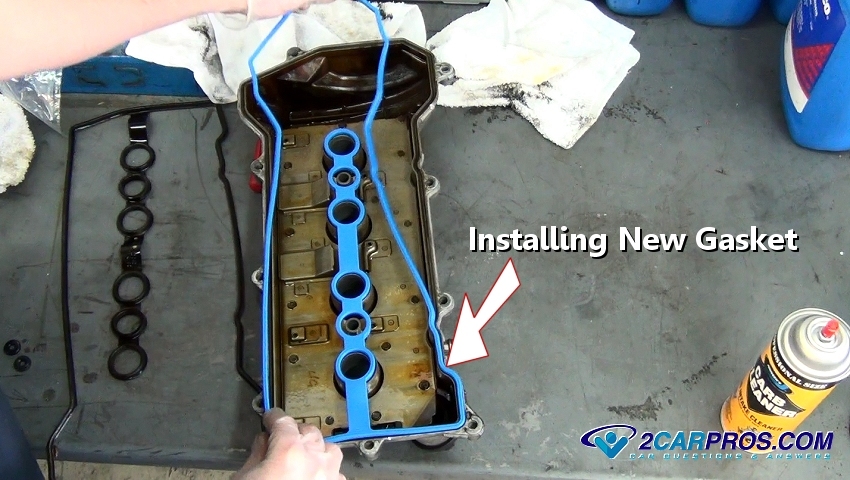
5. Installing the New Gasket
Install the new valve cover gasket. Some gaskets are designed to fit only one way, so pay attention to the orientation. Some gaskets benefit from a thin application of silicone sealant at critical points, such as corners or areas where the cylinder head has a sharp change in elevation. Check the manufacturer's instructions for your specific gasket.
6. Reinstalling the Valve Cover
Carefully place the valve cover back onto the cylinder head, ensuring the gasket is properly seated. Install the valve cover bolts and tighten them by hand until they are snug. Use a torque wrench to tighten the bolts to the manufacturer's specified torque, following a crisscross pattern. This ensures even pressure distribution and prevents warping. Important: Use the correct torque specifications. Over-tightening can damage the gasket or the valve cover.
7. Reconnecting Components
Reconnect all the components you disconnected in Step 2, referring to the pictures you took earlier. Ensure all wiring harnesses, vacuum lines, and sensors are securely reattached.
8. Final Checks
Double-check all your connections. Reconnect the negative battery terminal. Start the engine and let it idle for a few minutes. Inspect the valve cover for any leaks. If you see any leaks, stop the engine immediately and re-torque the valve cover bolts. If the leak persists, you may need to remove the valve cover and inspect the gasket and mating surfaces again.
Common Issues and Maintenance Concerns
- Leaking Oil: The most common symptom of a failing valve cover gasket is oil leaking onto the engine block. This can lead to a burning oil smell and a messy engine compartment.
- Spark Plug Fouling: If the leak is severe, oil can drip onto the spark plugs, causing them to foul and misfire.
- Engine Performance Issues: In extreme cases, a severe oil leak can lead to low oil pressure and engine damage.
- Incorrect Torque: Using the wrong torque specifications is a major cause of gasket failure. Always use a torque wrench and consult your vehicle's service manual.
- Dirty Surfaces: Failing to clean the mating surfaces properly can prevent the gasket from sealing correctly.
- Using the Wrong Gasket: Ensure you use the correct gasket for your specific vehicle and engine.
Do's and Don'ts / Best Practices
Do's:
- Do use a torque wrench to tighten the valve cover bolts to the manufacturer's specified torque.
- Do clean the mating surfaces thoroughly before installing the new gasket.
- Do use the correct gasket for your specific vehicle and engine.
- Do follow the manufacturer's instructions for installing the gasket.
- Do use a crisscross tightening pattern when tightening the valve cover bolts.
Don'ts:
- Don't over-tighten the valve cover bolts. This can damage the gasket or the valve cover.
- Don't use excessive force to remove the valve cover. This can damage the mating surfaces.
- Don't reuse an old gasket. Always use a new gasket when replacing a valve cover.
- Don't ignore oil leaks. Address them promptly to prevent further damage.
Conclusion
Replacing a valve cover gasket is a manageable DIY project for experienced car owners. By following these steps and adhering to best practices, you can effectively address oil leaks and ensure the proper functioning of your engine. Remember to prioritize safety, cleanliness, and accuracy throughout the process. If you're uncomfortable with any of these steps, consult a qualified mechanic. Regular inspection and maintenance of your valve cover gasket can prevent costly engine repairs down the road.