How To Replace The Window Motor
Power windows – a ubiquitous convenience we often take for granted. That is, until they stop working. A window stuck halfway, refusing to budge, can be a major inconvenience and, in some cases, a security risk. While a professional mechanic can certainly fix this, replacing a window motor is a task well within the reach of an experienced DIYer. This article will guide you through the process, providing the technical understanding and practical advice needed to tackle this common automotive repair.
Understanding the Power Window System
Before diving into the replacement procedure, it's crucial to understand the basics of the power window system. This system is a relatively straightforward electro-mechanical setup consisting of a few key components:
- Window Switch: This is your primary interface. When you press the switch, it sends a signal to the window motor.
- Window Motor: The heart of the system. This small DC (Direct Current) motor converts electrical energy into mechanical energy, driving the window up or down.
- Window Regulator: This is the mechanical linkage that translates the rotational motion of the motor into the linear motion of the window. There are two primary types:
- Cable Regulator: Employs a cable and pulley system. These are generally lighter but can be more prone to cable fraying and breakage.
- Scissor Regulator: Uses a scissor-like arm to lift and lower the window. These are typically more robust but can be bulkier.
- Wiring Harness: Connects all the components, providing power and control signals.
- Fuses and Relays: Protect the circuit from overloads and allow a low-current switch to control a high-current motor.
How It Works
When you press the window switch, it completes a circuit. This sends a 12V (typically) signal to the window motor's armature. The armature is the rotating part of the motor, composed of coils of wire. This current interacts with a magnetic field created by permanent magnets or field coils within the motor. This interaction generates a rotational force (torque) that drives the motor's output shaft. The output shaft is connected to the window regulator. The regulator then translates this rotational motion into linear motion, raising or lowering the window glass.
The motor's direction of rotation is controlled by the polarity of the voltage applied to it. Reversing the polarity (positive and negative terminals) causes the motor to rotate in the opposite direction, raising or lowering the window accordingly. Some systems use a relay to handle the polarity reversal, while others achieve it directly through the switch.
Replacing the Window Motor: A Step-by-Step Guide
Now, let's get to the practical part. Replacing a window motor involves several steps, requiring patience and attention to detail. Always disconnect the negative terminal of your car battery before starting any electrical work.
- Gather Your Tools and Materials:
- New Window Motor (ensure it's the correct one for your vehicle!)
- Socket Set
- Screwdriver Set (Phillips and Flathead)
- Trim Removal Tools (plastic pry bars)
- Multimeter (for testing voltage)
- Work Gloves
- Safety Glasses
- Shop Towels
- Pen and Paper (for labeling wires if needed)
- Remove the Door Panel:
This is usually the most delicate part. Use trim removal tools to carefully pry the door panel away from the door frame. Look for screws hidden behind door handles, armrests, or speaker grilles. Once all fasteners are removed, gently lift the panel upwards to disengage it from the window channel. Disconnect any wiring harnesses connected to the door panel (e.g., for power windows, door locks, speakers).
- Peel Back the Vapor Barrier:
Beneath the door panel, you'll find a plastic vapor barrier. Carefully peel it back, being mindful not to tear it. Some adhesives are particularly strong, so work slowly and methodically. You may need to use a heat gun on a low setting to soften the adhesive if it's particularly stubborn. Set the vapor barrier aside; you'll need to reattach it later.
- Locate the Window Motor:
The window motor is typically mounted directly to the window regulator. It's usually a small, cylindrical motor with a wiring harness connected to it. Follow the wiring harness from the window switch to locate the motor. If your window is stuck in the 'up' or 'down' position and you can't easily access the motor bolts, you may need to carefully manually manipulate the window until you can reach them.
- Disconnect the Wiring Harness:
Disconnect the wiring harness from the window motor. Many connectors have a small clip that needs to be depressed before you can pull the connector apart. Be careful not to damage the connector or the wiring.
- Remove the Old Window Motor:
Remove the bolts or screws that secure the window motor to the window regulator. You may need to support the window regulator to prevent it from falling or moving unexpectedly. If the motor is riveted in place, you'll need to drill out the rivets. Use a drill bit that's slightly larger than the rivet shaft. Once the rivets are removed, the motor should come free.
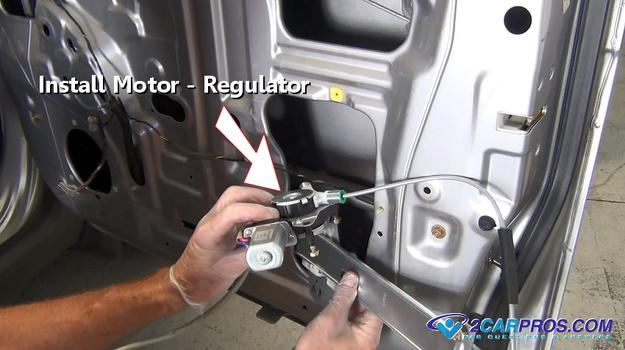
- Install the New Window Motor:
Install the new window motor in the reverse order of removal. If you drilled out rivets, you'll need to replace them with bolts and nuts. Ensure that the motor is securely attached to the window regulator. Tighten all bolts and screws to the proper torque specifications (refer to your vehicle's service manual for torque values). Before fully assembling, connect the wiring harness and test the motor to ensure it operates correctly. Verify the window moves up and down smoothly.
- Reattach the Vapor Barrier:
Carefully reattach the vapor barrier, ensuring that it's properly sealed to prevent moisture from entering the door. Use new adhesive if the old adhesive is no longer sticky.
- Reinstall the Door Panel:
Reinstall the door panel, aligning it properly with the door frame. Reconnect all wiring harnesses and push the panel back into place. Reinstall all screws and fasteners.
- Test the Window:
Reconnect the negative terminal of your car battery. Test the window to ensure that it operates smoothly and correctly. If it doesn't, double-check your wiring connections and the motor's installation.
Common Issues and Maintenance Concerns
Several factors can contribute to power window failure. Here are some common issues:
- Faulty Window Motor: This is the most common cause. Over time, the motor's brushes can wear out, or the motor can overheat and fail.
- Damaged Window Regulator: The regulator can bend, break, or become seized, preventing the window from moving. Cable regulators are particularly susceptible to cable fraying.
- Faulty Window Switch: The switch can become corroded or damaged, preventing it from sending the correct signal to the motor.
- Wiring Problems: Damaged or corroded wiring can interrupt the flow of electricity to the motor.
- Blown Fuse: A blown fuse can prevent the window from operating. Check the fuse box and replace any blown fuses.
- Obstructions: Sometimes, debris or ice can block the window's path, preventing it from moving freely.
Preventative maintenance can help extend the life of your power window system. Periodically lubricate the window tracks with a silicone-based lubricant. This will reduce friction and make it easier for the motor to operate. Also, avoid forcing the window if it's stuck. Forcing it can damage the motor or regulator.
Do's and Don'ts / Best Practices
- DO disconnect the battery before starting any electrical work.
- DO use trim removal tools to avoid damaging the door panel.
- DO take pictures before disconnecting any wiring harnesses to help you remember where everything goes.
- DO label any wires that you disconnect.
- DO test the new motor before fully assembling everything.
- DO lubricate the window tracks.
- DON'T force the window if it's stuck.
- DON'T use excessive force when removing the door panel or other components.
- DON'T ignore unusual noises or slow window movement. These are often early warning signs of a problem.
- DON'T forget to reattach the vapor barrier properly.
Conclusion
Replacing a window motor is a manageable task for the experienced DIYer. By understanding the system's components, following the step-by-step instructions, and adhering to best practices, you can save money and gain valuable experience. However, if you're uncomfortable working with electrical systems or mechanical components, or if you encounter any difficulties, it's always best to consult a qualified mechanic. With careful planning and execution, you can restore your power windows to proper working order and enjoy the convenience they provide.