How To Replace Transmission Speed Sensor
Is your vehicle experiencing erratic shifting, a malfunctioning speedometer, or even triggering the dreaded check engine light? Before you panic and envision a costly transmission overhaul, consider a simpler culprit: the transmission speed sensor. Often overlooked, this small but vital component plays a crucial role in your vehicle's performance. In this guide, we'll delve into the world of transmission speed sensors, exploring their function, troubleshooting methods, and a step-by-step process for replacing them.
The Case of the Erratic Shifter
Imagine this: You're cruising down the highway, and suddenly your car starts shifting erratically. The RPMs are fluctuating wildly, and the transmission seems unsure of which gear to select. Or perhaps your speedometer is bouncing around like a hyperactive hummingbird, giving you a reading that's clearly inaccurate. These symptoms are often indicative of a failing transmission speed sensor. To understand why, let’s think of it like a runner in a relay race. The engine is the starting runner, pushing the car forward, and the transmission is the next runner, selecting the optimal 'pace' (gear) based on the car's 'speed' (information provided by the speed sensor) to conserve energy and maintain momentum. A faulty speed sensor throws off the entire relay, leading to inefficient and unstable performance.
How the Transmission Speed Sensor Works: A Mechanical Deep Dive
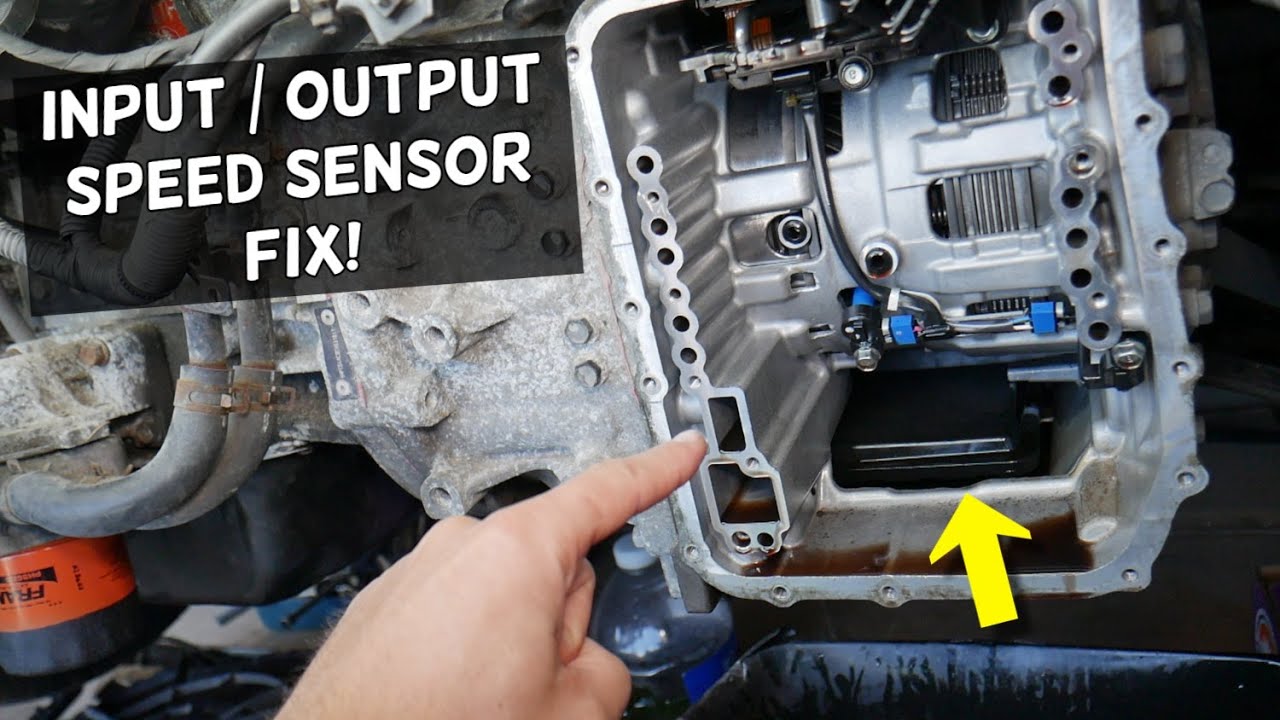
The transmission speed sensor, often referred to as a VSS (Vehicle Speed Sensor), is typically located on the transmission housing, either externally or internally, near the output shaft. Its primary function is to measure the rotational speed of the transmission's output shaft, which is directly related to the vehicle's speed. This information is then transmitted to the vehicle's Engine Control Unit (ECU) or Transmission Control Module (TCM). There are primarily two types of speed sensors:
1. Reluctor Type (Variable Reluctance):
This type uses a toothed wheel (reluctor ring) that rotates with the output shaft. A coil and a permanent magnet are positioned near the toothed wheel. As the teeth pass by the sensor, they disrupt the magnetic field, inducing a small AC voltage in the coil. The frequency of this AC signal is directly proportional to the rotational speed of the output shaft. The ECU/TCM interprets this frequency and calculates the vehicle's speed. Think of it like a tiny generator, where the spinning wheel creates a fluctuating electric current.
2. Hall Effect Sensor:
The Hall effect sensor also uses a toothed wheel, but instead of inducing a voltage, it utilizes the Hall effect. A small semiconductor crystal is placed within a magnetic field. When a tooth of the reluctor ring passes by, it disrupts the magnetic field, altering the voltage across the crystal. This change in voltage is then amplified and sent to the ECU/TCM. Hall effect sensors are generally considered more accurate and reliable than reluctor type sensors, especially at lower speeds. Think of it like a magnetic switch that toggles on and off as the teeth pass by, providing a digital signal of speed.
The ECU/TCM uses the information from the speed sensor to perform several critical functions, including:
- Controlling Gear Shifting: The TCM uses the speed data to determine the optimal shift points for the transmission, ensuring smooth and efficient gear changes.
- Speedometer Operation: The ECU sends the speed information to the instrument cluster, where it is displayed on the speedometer.
- Cruise Control Functionality: The cruise control system relies on accurate speed information to maintain a constant speed.
- ABS (Anti-lock Braking System) and Traction Control: Some vehicles use the transmission speed sensor data as a secondary input for the ABS and traction control systems.
Pros and Cons of Replacing a Transmission Speed Sensor Yourself
Pros:
- Cost Savings: Replacing the sensor yourself can save you significant money compared to having a mechanic do it. The sensor itself typically costs between $20 and $100, while labor charges can add another $100 to $300.
- Increased Understanding: Performing the repair yourself will give you a better understanding of your vehicle's mechanics.
- Satisfaction: There's a sense of accomplishment that comes with successfully repairing your own car.
Cons:
- Requires Mechanical Skill: While the procedure is relatively straightforward, it does require some basic mechanical knowledge and skills.
- Potential for Damage: If not done correctly, you could damage the sensor, the transmission, or other components.
- Time Commitment: Replacing the sensor can take several hours, depending on your experience and the accessibility of the sensor.
- Special Tools May be Required: Some vehicles may require specialized tools to remove or install the sensor.
Use Cases and Manufacturer Examples
The need for transmission speed sensor replacement is common across various vehicle makes and models. Here are a few examples:
- Ford F-150: These trucks are notorious for speed sensor failures, often resulting in erratic shifting and speedometer issues.
- Honda Civic: The Civic's VSS is prone to failure due to its location and exposure to road debris.
- GM Vehicles (Chevrolet, GMC, Buick, Cadillac): Many GM vehicles use similar transmission designs, and the speed sensors are a common point of failure across the board.
- Toyota Camry: While generally reliable, the Camry's speed sensor can fail over time, leading to transmission problems.
These are just a few examples, and the issue can arise in virtually any vehicle. Fortunately, replacement sensors are readily available from various manufacturers, including Standard Motor Products, BWD Automotive, and Delphi. Choose a reputable brand for the best quality and reliability.
Step-by-Step Guide to Replacing a Transmission Speed Sensor
Disclaimer: This guide is for informational purposes only. Always consult your vehicle's repair manual for specific instructions and safety precautions. Disconnect the negative battery terminal before starting any electrical work.
- Gather Your Tools: You'll need the following tools:
- Socket set and wrenches
- Screwdrivers (Phillips and flathead)
- Jack and jack stands
- Wheel chocks
- Penetrating oil (if the sensor is stuck)
- New transmission speed sensor
- Shop towels
- Safety glasses
- Gloves
- Locate the Speed Sensor: Consult your vehicle's repair manual or search online for the specific location of the speed sensor on your transmission. It's typically located on the side or top of the transmission housing, near the output shaft.
- Prepare the Vehicle: Secure the vehicle with wheel chocks, jack it up, and support it with jack stands. Ensure the vehicle is stable before working underneath it.
- Disconnect the Electrical Connector: Carefully disconnect the electrical connector from the speed sensor. You may need to use a small screwdriver to release a retaining clip.
- Remove the Old Sensor: Use a wrench or socket to loosen and remove the old speed sensor. Be prepared for a small amount of transmission fluid to leak out. Have shop towels ready to catch any spills. If the sensor is stuck, apply penetrating oil and let it soak for a few minutes before attempting to remove it.
- Install the New Sensor: Apply a thin coat of transmission fluid to the O-ring on the new sensor. Carefully thread the new sensor into the transmission housing by hand. Tighten the sensor to the specified torque (consult your vehicle's repair manual). Overtightening can damage the sensor or the transmission housing.
- Reconnect the Electrical Connector: Reconnect the electrical connector to the new speed sensor, ensuring it is securely fastened.
- Lower the Vehicle: Remove the jack stands and lower the vehicle to the ground.
- Test the Repair: Reconnect the negative battery terminal. Start the engine and check for any leaks around the sensor. Take the vehicle for a test drive to verify that the speedometer is working correctly and the transmission is shifting smoothly.
- Clear Diagnostic Trouble Codes (DTCs): If the check engine light was illuminated, you may need to clear the DTCs using an OBD-II scanner.
Real-World Insights and Recommendations
Based on real-world experience, here are some additional tips and recommendations:
- Use Quality Parts: Don't skimp on quality when purchasing a replacement sensor. A cheap, poorly made sensor may fail prematurely, leading to the same problems down the road. Stick with reputable brands.
- Inspect the Wiring: Before replacing the sensor, inspect the wiring harness and connector for any signs of damage, such as corrosion, frayed wires, or loose connections. Damaged wiring can cause the same symptoms as a faulty sensor.
- Check Transmission Fluid Level: Low transmission fluid can sometimes cause erratic shifting and other transmission problems. Check the fluid level and add fluid if necessary.
- Use a Torque Wrench: When tightening the new sensor, use a torque wrench to ensure it is tightened to the proper specification. Overtightening can damage the sensor or the transmission housing.
- Consider Professional Help: If you are not comfortable performing the repair yourself, or if you are unsure about any of the steps, it's always best to seek professional help from a qualified mechanic.
Replacing a transmission speed sensor can be a relatively straightforward repair that can save you money and restore your vehicle's performance. By understanding how the sensor works, following the proper procedures, and using quality parts, you can successfully tackle this repair yourself. However, always prioritize safety and seek professional help if you are unsure about any aspect of the repair.