How To Reset Door Lock Actuator
Hey there, fellow gearheads! Today, we're diving deep into the sometimes-frustrating, but ultimately fixable, world of door lock actuators. Specifically, we're going to discuss how to essentially "reset" one. Now, before you reach for a screwdriver, understand that a true reset isn't like rebooting your computer. We're talking about a systematic approach to diagnosing and potentially reviving a stubborn actuator, which often involves troubleshooting the electrical and mechanical components that make it tick. I've been wrenching on cars for years, and trust me, understanding this system can save you a ton of money on dealership repairs.
Purpose – Why This Matters
Why should you care about door lock actuator reset procedures? Simple: convenience and security. Imagine struggling to unlock your door manually in the rain or having to reach across the car to lock every door individually. Actuators provide centralized locking and unlocking, a standard feature in modern vehicles. Understanding how to troubleshoot and potentially "reset" an actuator helps with:
- Repairs: Identifying and fixing issues instead of immediately replacing the entire actuator.
- Cost Savings: Avoiding expensive dealership labor costs by tackling the problem yourself.
- Learning: Gaining a deeper understanding of automotive electrical and mechanical systems.
- Modding/Upgrades: Integrating aftermarket locking systems or modifying existing ones.
Key Specs and Main Parts
Let's break down the key components and their specifications. Understanding these terms is crucial for effective troubleshooting.
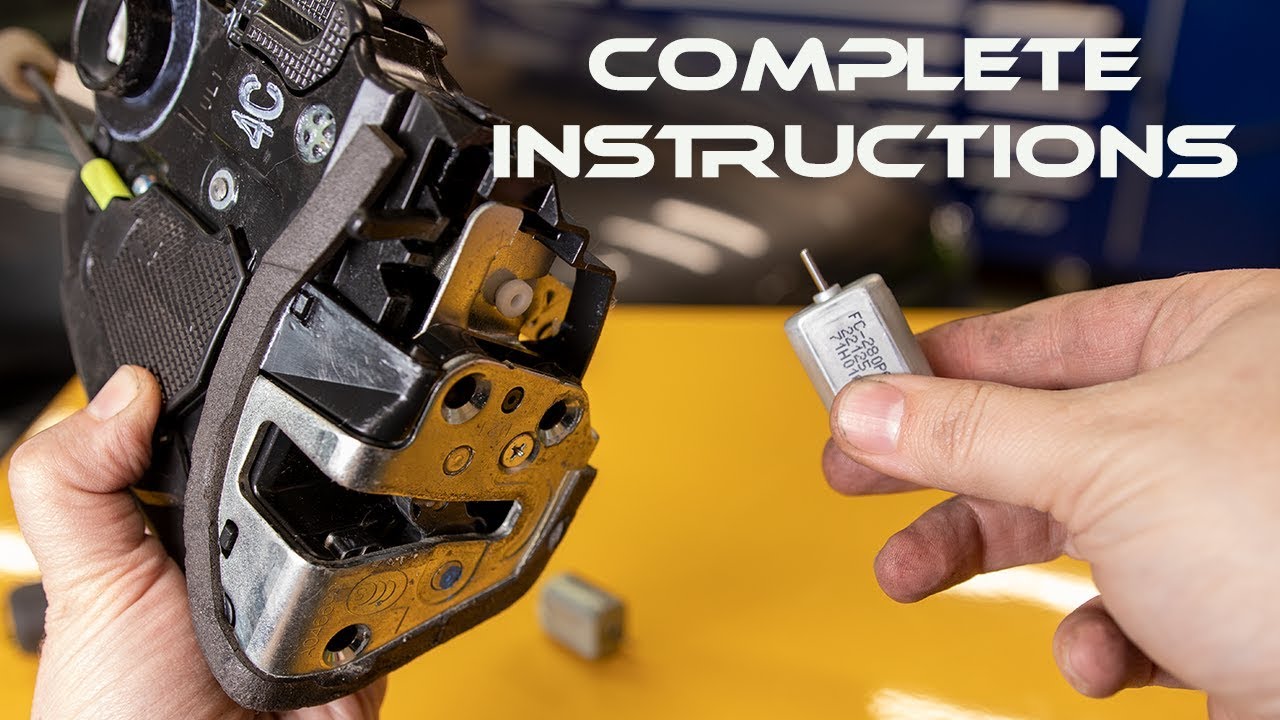
- Actuator Motor: A small DC motor responsible for driving the locking mechanism. Typical voltage range: 12V DC.
- Gearbox: A series of gears that amplify the motor's torque to move the locking rod. The gear ratio determines the actuator's force.
- Locking Rod/Linkage: Connects the actuator to the door lock mechanism. Prone to bending or breakage.
- Electrical Connector: Provides power and control signals to the actuator. Check for corrosion and secure connections.
- Door Lock Switch: Sends signals to the body control module (BCM) to activate the actuators.
- Body Control Module (BCM): The central control unit that manages various electrical functions, including door locking.
- Wiring Harness: The network of wires that connects all the components. Inspect for breaks, shorts, and frayed insulation.
Think of it this way: the BCM is the brain, the door lock switch is the trigger, the wiring harness is the nervous system, and the actuator is the muscle.
How It Works
The door lock actuator system operates on a fairly straightforward principle. When you press the lock or unlock button (either on the door panel or the key fob), the following occurs:
- The door lock switch sends a signal to the BCM.
- The BCM interprets the signal and sends a specific voltage (positive or negative) to the actuator motor. The polarity of the voltage determines whether the actuator locks or unlocks the door.
- The actuator motor spins, turning the gearbox.
- The gearbox amplifies the motor's torque, moving the locking rod.
- The locking rod engages or disengages the door lock mechanism.
A common misconception is that the actuator *directly* locks the door. It doesn't. It moves the linkage that ultimately actuates the lock. This is important because a jammed linkage can mimic a faulty actuator.
Real-World Use – Basic Troubleshooting Tips
Okay, your door lock is acting up. Where do you start? Here's a logical troubleshooting process that mimics a "reset" attempt, focused on identifying and addressing potential issues:
- Check the Fuses: Always the first step! A blown fuse is the easiest fix. Consult your owner's manual for the correct fuse location.
- Inspect the Wiring: Look for any obvious signs of damage, such as frayed wires, loose connections, or corrosion. Use a multimeter to check for continuity in the wires. This is especially important in the door jamb area where wires are constantly flexing.
- Test the Door Lock Switch: Use a multimeter to verify that the switch is sending the correct signal to the BCM when pressed.
- Listen to the Actuator: Can you hear the actuator motor trying to run? If you hear a clicking sound but no movement, the motor may be trying to operate, but something is preventing it.
- Inspect the Linkage: Manually try to move the locking rod. Is it stiff or binding? Lubricate the linkage with a silicone-based lubricant. Sometimes, a simple lubrication can free up a stuck mechanism.
- Voltage Test at the Actuator Connector: With the door lock switch activated, check the voltage at the actuator connector. You should see approximately 12V DC. If there's no voltage, the problem is upstream (fuse, wiring, switch, BCM).
- Direct Actuator Test: Carefully disconnect the actuator from the wiring harness. Apply 12V DC directly to the actuator motor. Observe the actuator's movement. If it works correctly, the actuator is likely fine, and the problem lies elsewhere. If it still doesn't work, the actuator is likely faulty and needs replacement.
- BCM Issues: If all other components check out, the problem could be with the BCM. However, BCM issues are relatively rare and often require specialized diagnostic equipment. This is where a professional mechanic is advisable.
Important Note: Sometimes, disconnecting the battery for a few minutes can "reset" the BCM and resolve minor glitches. However, this should be a last resort and may require you to re-enter radio codes or other settings.
Safety – Highlight Risky Components
Working with automotive electrical systems can be dangerous if you're not careful. Here are some safety precautions to keep in mind:
- Disconnect the Battery: Before working on any electrical components, disconnect the negative battery terminal. This will prevent accidental shorts and potential electrocution.
- Use Proper Tools: Use insulated tools to avoid electrical shock.
- Wear Safety Glasses: Protect your eyes from debris and potential sparks.
- Work in a Well-Ventilated Area: Some automotive chemicals can be harmful if inhaled.
- Be Cautious Around Airbags: Airbags are explosive devices. Avoid working near them unless you are properly trained.
- BCM Caution: The BCM is a sensitive electronic component. Avoid static discharge by grounding yourself before touching it.
Always consult your vehicle's service manual for specific safety instructions and procedures.
That being said, the door lock actuator itself isn't inherently dangerous as long as you've disconnected the battery. The riskiest aspect is working around the electrical system in general.
A Final Word
Troubleshooting door lock actuators can be a bit of a process of elimination, but with a systematic approach and a little patience, you can often identify and resolve the problem yourself. Remember to prioritize safety, use proper tools, and consult your vehicle's service manual for specific information. Replacing parts without proper diagnosis can be expensive and frustrating, so take the time to understand the system and pinpoint the root cause of the issue.
If you're looking for a detailed wiring diagram of the door lock actuator system for your specific vehicle, we have a comprehensive file available for download. This diagram will provide you with a clear visual representation of the electrical connections and components, making troubleshooting even easier. Simply reach out, and we can provide you with the link.