How To Reset Maint Reqd Light
That little "Maint Reqd" (Maintenance Required) light on your dashboard. It's a familiar sight for many car owners, often triggering a mix of annoyance and a nagging sense of responsibility. But what exactly does it mean, and more importantly, how do you get rid of it? While it's easy to simply ignore it, understanding its function and how to reset it yourself can save you a trip to the mechanic and empower you with a better understanding of your car.
Understanding the "Maint Reqd" Light: More Than Just an Oil Change
Think of the "Maint Reqd" light like a pre-programmed reminder from your car's computer. It's designed to prompt you to perform routine maintenance, primarily an oil change, after a specific mileage interval. It's not a direct indicator of a problem like the check engine light, which signals an issue with the engine's performance or emissions system. The Maint Reqd light is simply a timer, dutifully counting down the miles until it believes it's time for service.
Imagine it like setting a reminder on your phone for a recurring task. You set it to remind you to take out the trash every Tuesday. The phone doesn't know *if* the trash needs taking out, it just knows it's Tuesday. Similarly, your car's computer doesn't actually analyze your oil. It just knows you've driven a predetermined number of miles since the last reset.
How the System Works: The Odometer and the Algorithm
The "Maint Reqd" light system is surprisingly simple in concept. At its core, it relies on the car's odometer and a pre-programmed algorithm within the engine control unit (ECU), or in some cases, a dedicated maintenance reminder module. Here's a breakdown of the process:
- Mileage Tracking: The odometer accurately tracks the total distance your vehicle has traveled.
- Pre-set Interval: The ECU is programmed with a factory-set interval, usually 5,000 or 7,500 miles, depending on the vehicle's make and model. This interval represents the recommended oil change frequency. Some newer vehicles may have flexible intervals based on driving conditions.
- Countdown and Activation: As you drive, the ECU counts down from the pre-set interval. When the odometer reading reaches a point close to the maintenance interval (often a few hundred miles before), the "Maint Reqd" light illuminates, serving as a visual warning.
- Reset Function: After performing the maintenance (ideally an oil change, but potentially other services depending on your car's needs), you need to manually reset the system. This tells the ECU to start counting down again from the pre-set interval.
The simplicity of this system also contributes to its limitations. Because it's based on mileage, it doesn't account for actual oil condition. Factors like heavy towing, frequent short trips (which don't allow the oil to fully warm up and burn off contaminants), and aggressive driving can all significantly impact oil life. This is why following your car's recommended maintenance schedule and regularly checking your oil level and condition are crucial, regardless of what the "Maint Reqd" light indicates.
Resetting the Light: The DIY Approach
The specific procedure for resetting the "Maint Reqd" light varies significantly depending on the vehicle manufacturer and model year. However, most methods involve a combination of key positions and button presses. Here are a few common approaches:
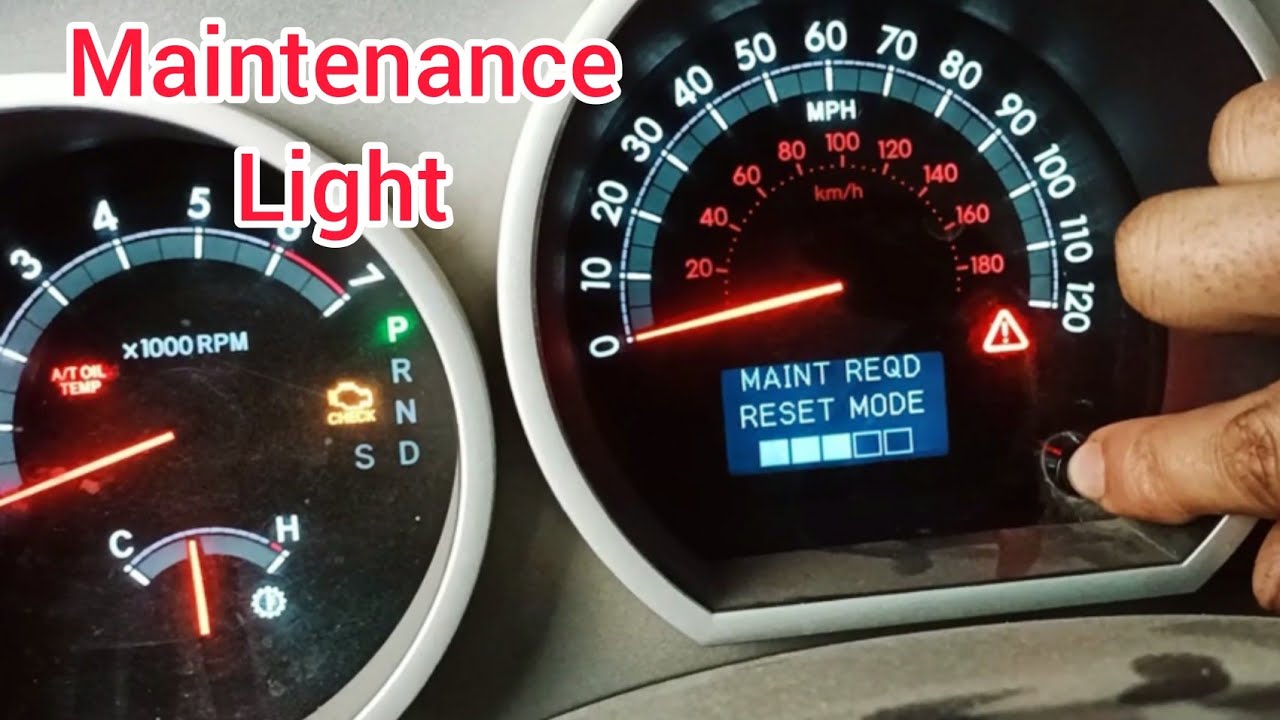
Method 1: The Classic Key and Button Dance (Toyota/Lexus Example)
- Turn off the Ignition: Ensure the engine is off, but the key is in the ignition.
- Press and Hold the Odometer Reset Button: Locate the odometer reset button on the instrument cluster (usually near the speedometer). Press and hold it down.
- Turn the Ignition On: While still holding the reset button, turn the ignition key to the "ON" position (but do *not* start the engine).
- Hold Until Reset: Continue holding the reset button until the "Maint Reqd" light flashes or disappears, typically after 5-10 seconds. The odometer may also display a series of dashes or zeros.
- Release and Verify: Release the reset button and turn the ignition off. Then, turn the ignition back on to verify that the "Maint Reqd" light has been successfully reset.
Method 2: Steering Wheel Controls (Honda/Acura Example)
- Access Maintenance Minder: Use the steering wheel controls (usually the "Info" or "Select" buttons) to navigate through the menu options on the driver information display. Find the "Maintenance Minder" or "Oil Life" display.
- Select Reset: Select the "Reset" option (often by pressing and holding the "Enter" or "Select" button).
- Confirm Reset: The system may prompt you to confirm the reset. Select "Yes" or "Execute" to confirm.
- Verify Reset: The display should now show 100% oil life (or a similar indicator that the maintenance interval has been reset).
Method 3: Scan Tool (Generic Method)
For more advanced vehicles or if the manual methods fail, a basic OBD II scan tool can often be used to reset the maintenance light. Here's the general process:
- Connect Scan Tool: Plug the scan tool into the OBD II port, typically located under the dashboard on the driver's side.
- Power On: Turn the ignition to the "ON" position (engine off).
- Navigate Menu: Follow the scan tool's on-screen instructions to navigate to the "Service Reset," "Maintenance Reset," or similar option.
- Select Vehicle: You may need to manually select your vehicle's make, model, and year.
- Execute Reset: Choose the "Oil Life Reset" or "Maintenance Light Reset" option and follow the prompts to execute the reset.
- Verify Reset: Once the reset is complete, turn off the ignition, disconnect the scan tool, and turn the ignition back on to verify that the light is off.
Important Note: Always consult your vehicle's owner's manual for the specific reset procedure for your make and model. Incorrectly following the procedure could potentially cause unintended consequences.
Pros and Cons of DIY Resetting
Pros:
- Cost Savings: Avoid the cost of having a mechanic reset the light.
- Convenience: Reset the light at your own convenience, without scheduling an appointment.
- Increased Understanding: Learn more about your vehicle's systems and maintenance requirements.
Cons:
- Potential for Error: Incorrectly following the procedure could lead to unintended consequences.
- Doesn't Address Underlying Issues: Resetting the light doesn't fix any actual maintenance needs. You MUST perform the necessary maintenance.
- Limited Functionality: May not be suitable for vehicles with more complex maintenance monitoring systems.
- Requires Research: Finding the correct reset procedure for your specific vehicle may require some research.
Use Cases and Manufacturer Examples
The "Maint Reqd" light system is a ubiquitous feature in modern vehicles, but its implementation and reset procedures vary. Here are some examples:
- Toyota/Lexus: Often uses the key and odometer reset button method described above.
- Honda/Acura: Typically relies on the Maintenance Minder system accessed through the steering wheel controls.
- Nissan/Infiniti: May use a combination of key positions and accelerator pedal presses or the vehicle information display.
- General Motors (GM): Usually involves navigating the driver information display using the steering wheel controls.
- Ford/Lincoln: Commonly utilizes a sequence of key positions, brake pedal presses, and accelerator pedal presses.
- BMW/Mercedes-Benz: Often requires a specialized scan tool or access to the vehicle's iDrive or COMAND system.
It's crucial to note that some luxury vehicles, particularly those from European manufacturers, may have more sophisticated maintenance monitoring systems that require specialized scan tools or dealer intervention for resetting. These systems often incorporate sensors to monitor oil quality and other parameters, providing a more accurate assessment of maintenance needs.
Real-World Considerations and Recommendations
While resetting the "Maint Reqd" light is a relatively straightforward task, it's essential to approach it responsibly. Here are some final recommendations based on real-world use:
- Prioritize Maintenance: The "Maint Reqd" light is a reminder, not a suggestion. Always perform the necessary maintenance (especially oil changes) according to your vehicle's recommended schedule.
- Keep Records: Maintain accurate records of your maintenance activities, including dates, mileage, and services performed. This will help you stay on top of your car's needs and provide valuable documentation for future resale.
- Don't Ignore Warning Signs: If you notice any unusual noises, smells, or performance issues, don't rely solely on the "Maint Reqd" light. Consult a qualified mechanic immediately.
- Use Quality Parts: When performing maintenance, use high-quality parts and fluids that meet your vehicle's specifications. This will help ensure optimal performance and longevity.
- Consider Oil Analysis: For high-mileage vehicles or those subjected to demanding driving conditions, consider having your oil analyzed periodically. This can provide valuable insights into the oil's condition and help you optimize your oil change intervals.
- When in Doubt, Consult a Professional: If you're unsure about any aspect of resetting the "Maint Reqd" light or performing maintenance on your vehicle, don't hesitate to seek professional assistance.
By understanding the function of the "Maint Reqd" light and following these recommendations, you can keep your car running smoothly and reliably for years to come.