How To Sand And Paint A Car
So, you're ready to tackle a sand and paint job on your car, huh? That's ambitious, but with the right knowledge and preparation, it's absolutely achievable. This guide will walk you through the entire process, from prepping the surface to laying down the final coat of clear. We'll cover the tools, techniques, and safety precautions you need to get a professional-looking finish in your own garage. Think of this as your comprehensive roadmap to automotive refinishing.
Purpose
Why bother learning how to sand and paint a car yourself? Several reasons. First, cost savings. Body shop work can be expensive, and doing it yourself saves you a significant amount of money. Second, control. You get to choose the materials, the color, and the level of detail. Third, skill development. It's a rewarding skill to learn, and it opens up opportunities for future projects and repairs. Finally, it allows you to customize your vehicle exactly to your liking, whether it's a simple touch-up or a full custom paint job.
Key Specs and Main Parts
Before we dive in, let's talk about the essential tools and materials. Understanding these components is crucial for achieving a quality finish.
Tools:
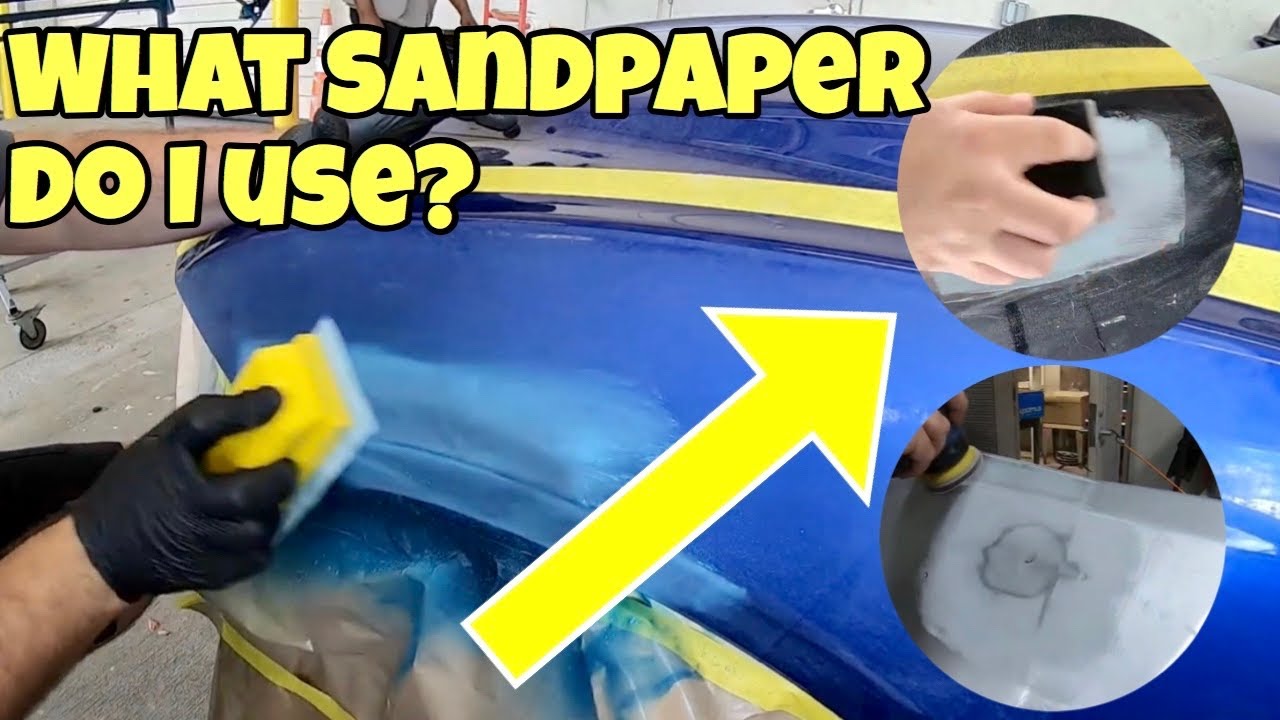
- Sanding Block and Sandpaper: Various grits, ranging from coarse (e.g., 80 grit) for removing rust and body filler to fine (e.g., 400 grit, 600 grit, 800 grit) for smoothing surfaces. We'll even use wet sanding with grits like 1000, 1500, and 2000 for a glass-like finish before polishing.
- DA Sander (Dual Action Sander): A power tool that oscillates and rotates, making it ideal for sanding large, flat surfaces quickly and efficiently. A 6-inch DA sander is a popular choice.
- Air Compressor and Spray Gun: Essential for applying primer, base coat, and clear coat. HVLP (High Volume Low Pressure) spray guns are preferred for their efficiency and reduced overspray.
- Mixing Cups and Sticks: For accurately mixing paint components.
- Tack Cloth: A sticky cloth used to remove dust and debris before painting.
- Masking Tape and Paper: To protect areas you don't want to paint. Use automotive-grade masking tape, which leaves a clean edge.
- Respirator: Crucial for protecting your lungs from harmful paint fumes.
- Safety Glasses: To protect your eyes.
- Body Filler (Bondo): For repairing dents and imperfections.
- Putty Knife/Spreaders: For applying body filler smoothly.
- Clean Rags: For wiping surfaces. Use lint-free rags.
- Rubbing Compound and Polishing Compound: For buffing the clear coat to a high gloss.
- Polishing Pads: Used with a polishing machine to apply rubbing and polishing compounds.
- Polishing Machine (Rotary or Dual Action): A power tool for buffing the paint.
Materials:
- Primer: Provides a smooth, uniform surface for the base coat to adhere to. Consider a 2K (two-component) primer for durability.
- Base Coat: The colored paint that provides the final color of your car. Can be single-stage or multi-stage (requiring clear coat).
- Clear Coat: A protective layer that adds gloss and protects the base coat from UV damage and scratches. Again, 2K clear coat is highly recommended.
- Reducer/Thinner: Used to adjust the viscosity of the paint for optimal spraying.
- Hardener/Activator: Used with 2K primers and clear coats to initiate the curing process.
How It Works: The Process
The process of sanding and painting a car involves several key stages, each crucial to the final result.
1. Preparation:
Key Concept: Surface preparation is 90% of a good paint job.
This involves thoroughly cleaning the car, removing any rust, dents, or scratches. Start by washing the car with soap and water. Then:
- Rust Removal: Use a wire brush, sandpaper, or a rust remover product to eliminate any rust.
- Dent Repair: Apply body filler to fill in dents and imperfections. Follow the manufacturer's instructions for mixing and application. Let it cure completely, then sand it smooth with progressively finer grits of sandpaper (80, 180, 320).
- Sanding: Sand the entire surface to be painted with 320 grit sandpaper to create a uniform surface for the primer to adhere to.
- Masking: Carefully mask off any areas you don't want to paint, such as windows, trim, and lights.
- Cleaning: Wipe down the entire surface with a tack cloth to remove any remaining dust or debris.
2. Priming:
Apply several thin coats of primer, allowing each coat to dry according to the manufacturer's instructions. This will ensure proper adhesion and prevent the base coat from being absorbed into the old paint. Sand the primer smooth with 400 grit sandpaper, then wipe down with a tack cloth.
3. Base Coat Application:
Mix the base coat according to the manufacturer's instructions, paying close attention to the mixing ratios. Apply several thin, even coats, overlapping each pass by about 50%. Allow each coat to dry before applying the next. The number of coats will depend on the color and the desired coverage. Usually 2-3 coats are sufficient.
4. Clear Coat Application:
This is the final layer that protects the base coat and provides the gloss. Mix the clear coat with the hardener according to the manufacturer's instructions. Apply several thin, even coats, again overlapping each pass. Allow the clear coat to dry completely for at least 24 hours.
5. Wet Sanding and Polishing (Optional but Recommended):
For a show-quality finish, wet sand the clear coat with progressively finer grits of sandpaper (1000, 1500, 2000) to remove any orange peel or imperfections. Then, use a rubbing compound and polishing compound with a polishing machine to buff the clear coat to a high gloss. This step requires patience and skill, but the results are worth it.
Real-World Use: Basic Troubleshooting Tips
Even with careful preparation, problems can arise. Here are some common issues and how to address them:
- Orange Peel: Caused by paint drying too quickly or improper spray gun settings. Can be corrected by wet sanding and polishing.
- Runs/Sags: Caused by applying too much paint in one area. Can be corrected by sanding down the run and re-spraying.
- Fish Eyes: Small craters in the paint caused by contamination (e.g., oil, silicone). Clean the surface thoroughly before painting. If fish eyes occur, sand down the affected area and re-spray.
- Bubbling: Can be caused by moisture trapped under the paint. Ensure the surface is completely dry before priming.
- Poor Adhesion: Often caused by inadequate surface preparation. Ensure the surface is properly sanded and cleaned before painting.
Safety
Painting a car involves working with potentially hazardous materials. Always follow these safety precautions:
- Wear a Respirator: Protect your lungs from harmful paint fumes. A respirator with organic vapor cartridges is essential.
- Wear Safety Glasses: Protect your eyes from paint splatters and debris.
- Work in a Well-Ventilated Area: Ensure adequate ventilation to prevent the buildup of fumes.
- Wear Gloves: Protect your skin from paint and solvents.
- Avoid Open Flames: Paint and solvents are flammable. Keep away from open flames and sparks.
- Dispose of Waste Properly: Dispose of used paint, solvents, and rags according to local regulations.
Remember, patience and attention to detail are key to a successful paint job. Don't rush the process, and take your time to do each step correctly. Good luck!
To help you visualize the process, we have a detailed diagram available for download. This diagram illustrates the steps involved in sanding and painting a car, including tool selection, surface preparation, paint application, and troubleshooting tips. This diagram is a valuable resource for understanding the complexities of automotive refinishing and achieving professional results. It includes:
- A detailed breakdown of the sanding process with recommended grit levels.
- Spray gun setup recommendations for different types of paint.
- Illustrations of common paint defects and how to fix them.
- Safety guidelines for working with automotive paints and solvents.
Contact us and we'll provide the download link.