How To Switch To 4 Wheel Drive
So, you're ready to delve deeper into understanding and using your 4-wheel drive (4WD) system. Excellent! Whether you're planning some off-road adventures, tackling snowy roads, or just want to be prepared, knowing how your 4WD system works and how to engage it properly is crucial. This article will provide a practical, in-depth look at 4WD systems, focusing on how to switch between 2-wheel drive (2WD) and 4WD, with practical advice for DIYers and modders. We'll cover everything from the underlying mechanics to troubleshooting common issues, all explained in a way that's easy to understand, even if you’re not a professional mechanic.
Purpose: Understanding Your 4WD System
Why is understanding your 4WD system so important? Several reasons. First, it empowers you to make informed decisions about when and how to use it, maximizing traction and control in challenging conditions. Second, it allows you to perform basic maintenance and troubleshooting, potentially saving you money and downtime. Third, if you're considering modifications or upgrades to your 4WD system, a solid understanding of its components and operation is essential to avoid costly mistakes. For example, if you have a problem with your 4WD not engaging or disengaging, this guide, coupled with the diagnostic diagram (available for download at the end), will equip you to pinpoint the issue and potentially resolve it yourself.
Key Specs and Main Parts
Before we dive into the switching process, let's cover the core components of a typical part-time 4WD system. (Note: This guide focuses on part-time 4WD, as full-time 4WD systems operate differently and don't require manual switching in the same way.)
- Transfer Case: The heart of the 4WD system. The transfer case receives power from the transmission and splits it between the front and rear axles. It also provides a low range gear selection for increased torque in off-road situations.
- Front Axle: Contains the differential and axleshafts that transmit power to the front wheels.
- Rear Axle: Similar to the front axle, but in many 4WD vehicles, it's a solid axle design.
- Front Differential: Allows the front wheels to rotate at different speeds when turning.
- Rear Differential: Similar to the front differential, but located in the rear axle. Some vehicles may have a limited-slip or locking differential for enhanced traction.
- Axleshafts (or Halfshafts): These connect the differentials to the wheels.
- Shift Mechanism: This can be a lever, button, or electronic switch that engages and disengages the 4WD system. Older vehicles often use a manual lever, while newer vehicles typically use electronic controls.
- Vacuum or Electronic Actuators: Used to engage and disengage the front axle. In some systems, vacuum actuators are used to lock the front hubs. Modern systems typically use electronic actuators for faster and more reliable engagement.
- Hubs (Locking or Automatic): Connect the front wheels to the axleshafts. Some vehicles have manual locking hubs that require manual engagement, while others have automatic hubs that engage when 4WD is selected.
Key specifications to consider when evaluating your 4WD system include the transfer case gear ratios (especially the low range ratio), the type of differentials (open, limited-slip, or locking), and the type of front hub engagement (manual or automatic).
Symbols and the 4WD System Diagram
Understanding the symbols in a 4WD system diagram is essential for diagnosing problems and performing repairs. Here are some common symbols and their meanings:
- Solid Lines: Represent mechanical connections, such as shafts and gears.
- Dashed Lines: Indicate vacuum or electrical lines.
- Circles: Often represent gears or bearings.
- Squares or Rectangles: Typically represent components like the transfer case, differentials, or actuators.
- Arrows: Indicate the direction of power flow.
- Colors: Colors can vary depending on the diagram, but they often differentiate between different systems or components. For example, blue might represent hydraulic lines, while green might represent vacuum lines.
- Icons: Icons can represent specific components, such as a battery for electrical connections or a gear for mechanical components.
The diagnostic diagram you can download will use these symbols to illustrate the flow of power and the function of various components within the 4WD system. Familiarizing yourself with these symbols will make the diagram much easier to interpret.
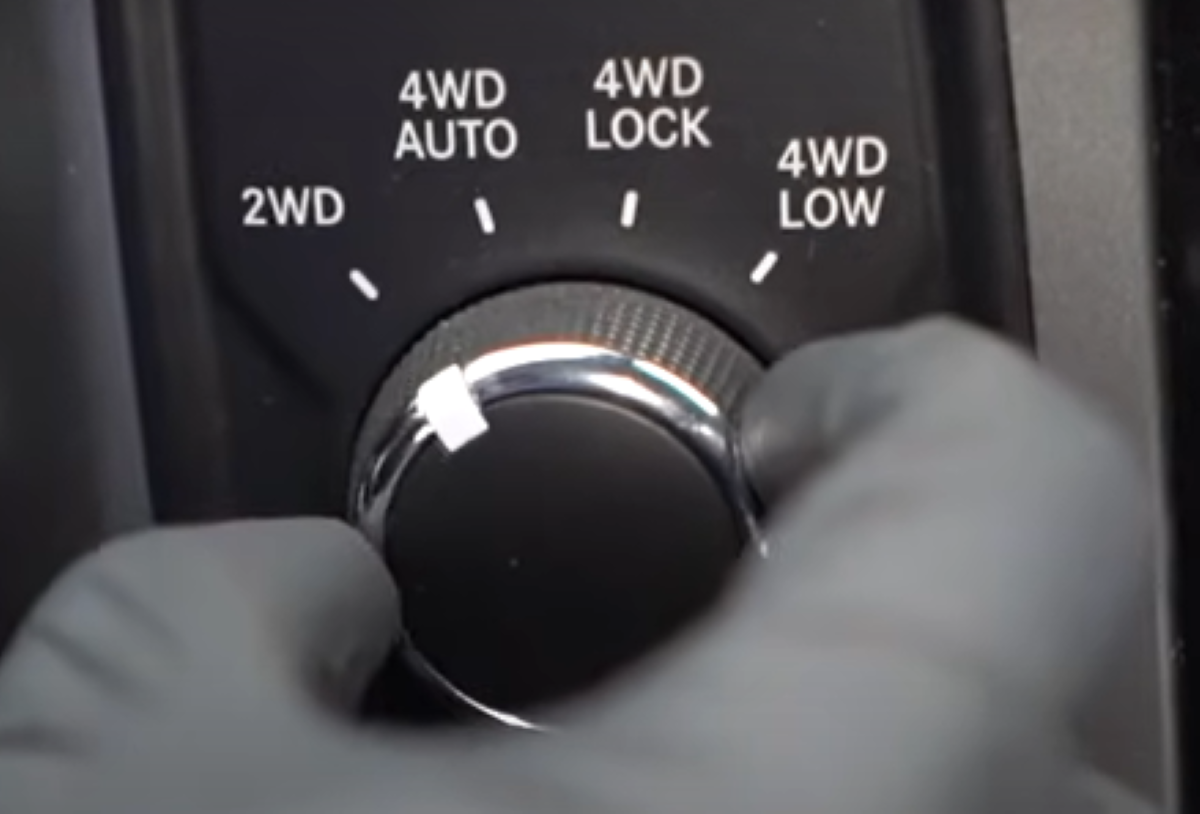
How It Works: The Switching Process
Switching between 2WD and 4WD involves engaging or disengaging the front axle and the transfer case. Here's a general overview of the process:
- 2WD to 4HI (4-Wheel Drive High): Typically, you can shift into 4HI while driving at speeds below a certain limit (usually around 55 mph, but check your owner's manual). The transfer case engages, splitting power between the front and rear axles. The front hubs also engage, connecting the front wheels to the axleshafts.
- 4HI to 2WD: Simply shift the lever or press the button back to 2WD. The transfer case disengages, sending power only to the rear axle. The front hubs may disengage immediately, or it may take a few moments for them to fully disengage.
- 4HI to 4LO (4-Wheel Drive Low): This requires stopping the vehicle and shifting the transmission into neutral (or park for some vehicles). Then, shift the transfer case lever or press the button to 4LO. 4LO provides a much lower gear ratio, increasing torque for crawling over obstacles or navigating steep inclines.
- 4LO to 4HI: Again, stop the vehicle and shift the transmission into neutral (or park). Then, shift the transfer case lever or press the button to 4HI.
Important note: Always refer to your vehicle's owner's manual for specific instructions on how to engage and disengage your 4WD system. Different vehicles may have different procedures and speed limitations.
Real-World Use: Troubleshooting Tips
Here are some common issues you might encounter when using your 4WD system and some basic troubleshooting tips:
- 4WD won't engage:
- Check the shift linkage or electrical connections to the transfer case.
- Inspect the vacuum lines or electrical connections to the front axle actuator.
- Verify that the front hubs are engaging properly.
- 4WD won't disengage:
- Try driving in reverse for a short distance. This can sometimes help disengage the front hubs.
- Check the vacuum lines or electrical connections to the front axle actuator.
- Inspect the transfer case shift linkage for binding.
- Grinding or clunking noises:
- This could indicate worn gears or bearings in the transfer case or differentials.
- Check the fluid level in the transfer case and differentials.
- Inspect the u-joints in the driveshafts for wear or damage.
- Dashboard 4WD light is flashing:
- This usually indicates a problem with the 4WD system. Consult your vehicle's service manual or a qualified mechanic for diagnosis.
If you're comfortable using a multimeter and have access to a scan tool, you can further diagnose electrical problems within the 4WD system. Consult the diagnostic diagram for specific test points and procedures.
Safety: Risky Components and Best Practices
Working on 4WD systems involves certain risks. Here are some safety precautions to keep in mind:
- Driveshafts: Driveshafts rotate at high speeds and can cause serious injury if they come loose or break. Always inspect driveshafts for wear or damage before working on the 4WD system. Support the vehicle securely on jack stands before working under it.
- Differentials: Differentials contain gears that can be sharp and can pinch fingers. Wear gloves when working with differentials.
- Transfer Case: Transfer cases are heavy and can be difficult to handle. Use proper lifting techniques and equipment when removing or installing a transfer case.
- Electrical System: Disconnect the negative battery cable before working on the electrical system to prevent shorts and shocks.
- Fluid Leaks: Be aware of potential fluid leaks from the transfer case, differentials, or axles. Wear appropriate safety gear to protect your skin and eyes. Clean up any spills immediately to prevent slips and falls.
Important note: If you're not comfortable working on your 4WD system, it's best to take it to a qualified mechanic.
Conclusion
Understanding how to switch to 4-wheel drive effectively and safely is a valuable skill for any vehicle owner, especially those who frequent challenging terrains. By familiarizing yourself with the components, operation, and troubleshooting tips outlined in this article, you'll be better equipped to handle various situations and perform basic maintenance on your 4WD system. Remember to always consult your vehicle's owner's manual for specific instructions and safety precautions. With the knowledge and resources provided here, you can confidently navigate the world of 4WD and enjoy the enhanced traction and control it offers. We have the diagnostic diagram file, and you can download it by clicking here. Good luck and safe driving!