How To Take Off Exhaust Hangers
Alright, let's talk about exhaust hangers. These little guys are often overlooked, but they're absolutely crucial for a safe and quiet ride. Whether you're replacing a rusty exhaust system, installing performance upgrades, or just need to do some maintenance under your car, knowing how to properly remove and reinstall exhaust hangers is essential. This isn't rocket science, but there are some best practices and potential pitfalls you should be aware of. So, let's dive in.
Purpose of Understanding Exhaust Hangers
Understanding how exhaust hangers work and how to deal with them is important for several reasons:
- Repairs: Hangers often rust and break, leading to a rattling exhaust system. Replacing them is a common repair.
- Exhaust System Replacement: If you are installing an entire new system, you'll need to remove the old one, which means dealing with these hangers.
- Performance Upgrades: Installing aftermarket exhausts, headers, or catalytic converters necessitates working with exhaust hangers to properly position and secure the new components.
- Learning and General Maintenance: Knowing how these simple components function contributes to your overall understanding of your vehicle. You might need to remove an exhaust section to access other parts of the car (e.g., transmission access).
Key Specs and Main Parts
Exhaust hangers are deceptively simple, but understanding their components is key to working with them effectively.
Main Parts:
- Hanger Rod/Wire: This is typically a steel rod or wire, often bent into a specific shape, that connects the exhaust system to the vehicle's undercarriage. Think of this as the "spine" of the hanger.
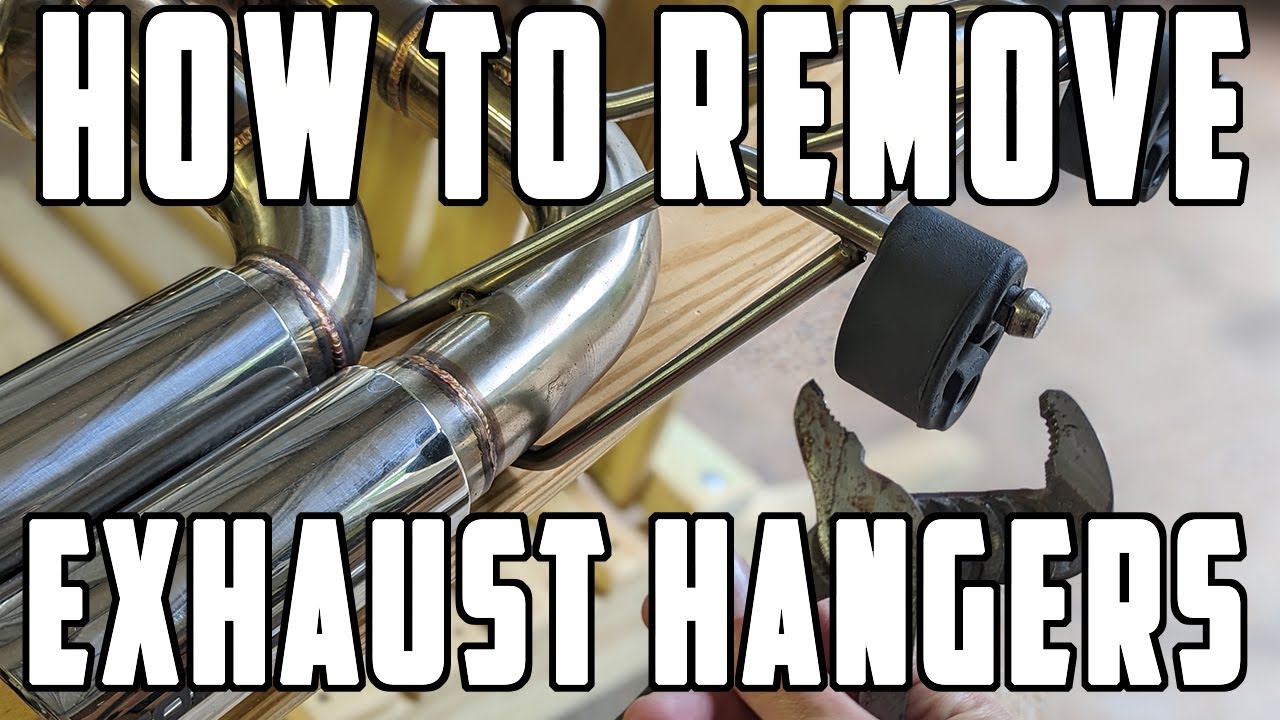
- Rubber Insulator (Bushing): This is the most common type of exhaust hanger and it's the part you'll usually interact with most. These rubber pieces isolate the exhaust system from the vehicle's frame, damping vibrations and preventing rattling. They are prone to wear and tear due to heat, age, and exposure to the elements.
- Bracket (Vehicle-Side): This is a metal bracket welded or bolted to the vehicle's frame or body. It's where the rubber insulator attaches.
- Bracket (Exhaust-Side): This bracket is welded onto the exhaust pipe itself. It mates with the rubber insulator, connecting the exhaust to the vehicle.
- Clamps/Fasteners: Some hangers use clamps or fasteners to secure the rubber insulator to the brackets.
Key Specifications:
- Material: Hanger rods and brackets are typically made of steel, often with a protective coating to resist rust. Rubber insulators are made of a high-temperature-resistant rubber compound.
- Load Rating: While not explicitly stated, hangers are designed to support the weight of the exhaust system. Overloading them (e.g., hanging additional components off the exhaust) can lead to premature failure.
- Dimensions: The length and shape of the hanger rod, as well as the size of the rubber insulator, vary depending on the vehicle make and model.
How It Works
The fundamental principle behind exhaust hangers is to suspend the exhaust system securely while allowing for some degree of movement. The rubber insulators play a crucial role in this. The engine produces significant vibrations, and the exhaust system is directly connected to it. Without the rubber insulators, these vibrations would transmit directly to the vehicle's frame, resulting in noise and discomfort.
Here's a breakdown of the process:
- The exhaust system is connected to the vehicle through the exhaust-side bracket.
- The exhaust-side bracket is attached to the rubber insulator.
- The rubber insulator is connected to the vehicle-side bracket, which is mounted on the chassis.
- As the engine runs and the exhaust system vibrates, the rubber insulator absorbs and dampens these vibrations, preventing them from transmitting to the vehicle.
- The hangers allow the exhaust system to move slightly as the engine revs or the car goes over bumps, preventing stress on the exhaust pipes and joints.
Real-World Use - Basic Troubleshooting
Knowing how to identify and address common issues with exhaust hangers can save you time and money.
- Rattling Noise: This is the most common symptom of a worn or broken exhaust hanger. Inspect the rubber insulators for cracks, tears, or complete separation. Also, check the hanger rods for rust or breaks.
- Exhaust System Sagging: If the exhaust system is sagging noticeably, it's a sign that one or more hangers have failed. This can put stress on other exhaust components and potentially cause leaks.
- Visual Inspection: Regularly inspect the exhaust hangers for signs of wear and tear. Look for rust, cracks, or deterioration of the rubber insulators.
Troubleshooting Tips:
- WD-40 or Penetrating Oil: Use these to lubricate the rubber insulators before attempting to remove them. This can make the process much easier.
- Pry Bar: A small pry bar can be helpful for levering the rubber insulators off the hanger rods.
- Channel-Lock Pliers: These pliers can be used to grip the rubber insulators and twist them off the hanger rods.
- Heat Gun: *Carefully* using a heat gun to warm the rubber insulator can soften it and make it easier to remove. Be cautious not to overheat the rubber.
- Replacement: When replacing rubber insulators, choose high-quality replacements that are designed for the specific vehicle. Generic parts might not fit properly or last as long.
- Prevention: Periodically spray the rubber insulators with a rubber protectant to help prevent them from drying out and cracking.
Safety Considerations
Working on exhaust systems involves some inherent risks. Here's what you need to know to stay safe:
- Hot Exhaust: Never work on an exhaust system immediately after the engine has been running. Allow the exhaust to cool down completely to avoid burns.
- Jack Stands: Always use jack stands to support the vehicle before working underneath it. Never rely solely on a jack.
- Eye Protection: Wear safety glasses to protect your eyes from rust, debris, and other particles.
- Gloves: Wear gloves to protect your hands from sharp edges, hot surfaces, and chemicals.
- Rust and Corrosion: Exhaust systems are prone to rust and corrosion, which can weaken the metal and make it more likely to break. Be careful when working with rusty components, and use appropriate tools to avoid injury.
- Penetrating Oil: Be careful when using penetrating oil, as it can be flammable. Avoid spraying it on hot surfaces.
- Exhaust Fumes: Work in a well-ventilated area to avoid inhaling exhaust fumes.
Risky Components:
- Catalytic Converter: While you aren't directly dealing with it when just removing hangers, be aware that the catalytic converter can remain very hot for a considerable time after the engine is turned off.
- Sharp Edges: Rusty exhaust pipes can have sharp edges that can easily cut your skin. Wear gloves and use caution.
With this article in hand, you should be well-equipped to tackle those exhaust hanger projects with confidence and safety. Remember to take your time, use the right tools, and prioritize safety above all else.