How To Tell Bad Spark Plug
Alright, let's dive into the world of spark plugs and learn how to diagnose a bad one. This guide is for you seasoned DIYers, modders, and intermediate car owners who aren't afraid to get your hands dirty. Knowing how to read spark plugs is a crucial skill. It's like having a window into your engine's combustion chamber, allowing you to diagnose problems with fuel mixture, ignition timing, oil consumption, and more. We'll cover the key indicators of a healthy or unhealthy spark plug, helping you pinpoint issues and save money on unnecessary repairs. We'll walk through the technical aspects, but in a way that makes sense, like I'm explaining it to you over a cold beverage in the garage.
Why Understanding Spark Plug Condition Matters
Understanding the health of your spark plugs is essential for several reasons:
- Engine Performance: Spark plugs are responsible for igniting the air-fuel mixture in the combustion chamber. A faulty spark plug can lead to misfires, reduced power, poor fuel economy, and rough idling.
- Troubleshooting: Spark plug condition often provides clues about underlying engine problems. Examining the plugs can help you diagnose issues like rich or lean fuel mixtures, oil leaks, overheating, or even coolant leaks.
- Preventative Maintenance: Regular spark plug inspection allows you to catch problems early before they escalate into more significant and costly repairs. Replacing worn or damaged plugs can prevent damage to the ignition coils and catalytic converter.
- Performance Tuning: For those who modify their engines, understanding spark plug readings is vital for optimizing performance. It allows you to fine-tune the air-fuel ratio and timing to achieve maximum power and efficiency.
Key Specs and Main Parts of a Spark Plug
Before we get into diagnosing problems, let's quickly review the key parts of a spark plug:
- Terminal: The top of the plug that connects to the spark plug wire or coil-on-plug unit.
- Insulator: Usually made of ceramic, this component insulates the center electrode from the metal shell, preventing the high-voltage current from grounding out. The insulator must be free of cracks.
- Ribs (or Corrugations): Grooves on the outside of the insulator that increase the surface area and prevent voltage from tracking along the insulator to the engine block.
- Metal Shell: The threaded metal part that screws into the cylinder head. It provides a ground path for the spark.
- Center Electrode: The electrode in the center of the plug that carries the high-voltage current.
- Ground Electrode (Side Electrode): The L-shaped electrode that is grounded to the metal shell. The spark jumps across the gap between the center and ground electrodes.
- Gap: The distance between the center and ground electrodes. This gap is critical for proper ignition.
- Heat Range: A measure of the spark plug's ability to dissipate heat. A "hotter" plug retains more heat, while a "colder" plug dissipates heat more quickly. The correct heat range is crucial for optimal performance and preventing engine damage.
Reading Spark Plugs: What to Look For
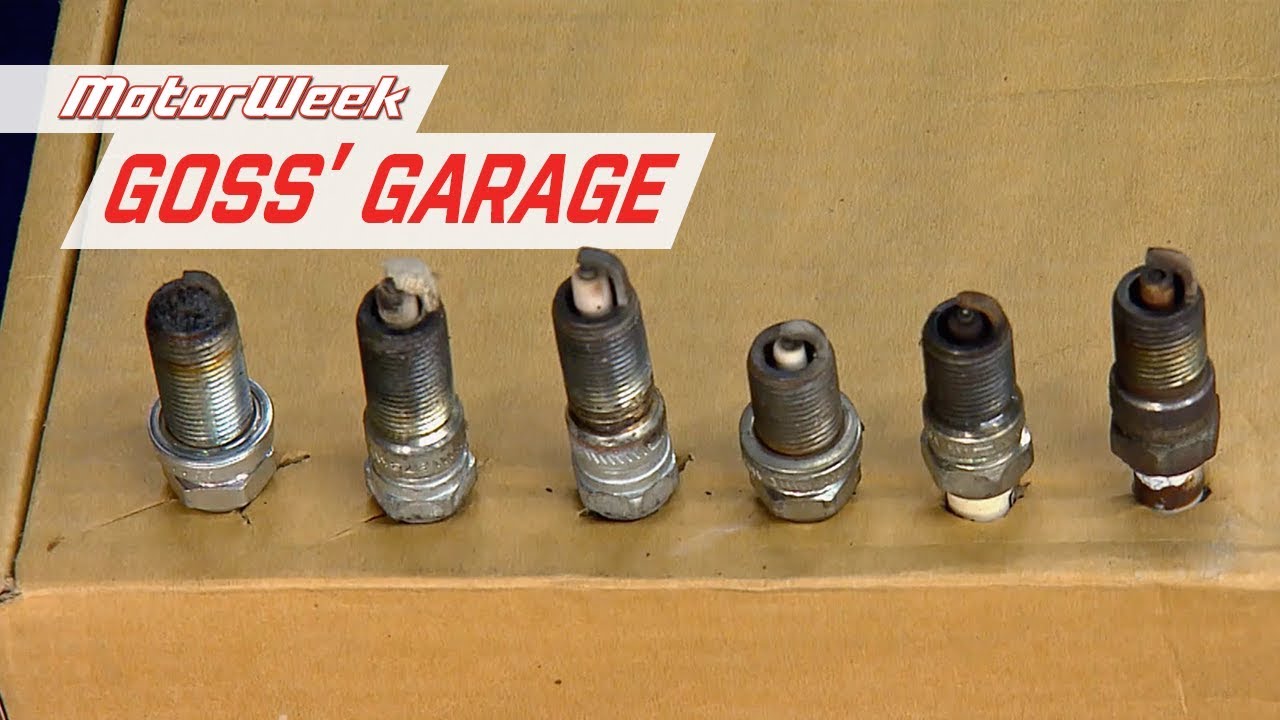
Now, let's get to the heart of the matter: deciphering the stories your spark plugs are telling. Remember to examine all the spark plugs to compare conditions between cylinders.
Normal Condition
A healthy spark plug will typically have a light tan or grayish-brown deposit on the insulator tip. This indicates proper air-fuel mixture and efficient combustion. The electrodes will be relatively clean and show minimal wear.
Common Problem Indicators
Here's a breakdown of common issues and what they mean:
- Fouled/Wet Spark Plug:
- Appearance: Wet with fuel or oil.
- Cause: Excessive fuel, oil leaks into the combustion chamber (worn piston rings, valve seals), or a very rich fuel mixture.
- Impact: Misfires, poor starting, and potentially damage to the catalytic converter.
- Fix: Address the underlying cause of the fuel or oil leak, adjust the fuel mixture, or replace worn components.
- Carbon Fouling:
- Appearance: Dry, black, sooty deposits.
- Cause: Rich fuel mixture, excessive idling, restricted air intake, weak ignition system.
- Impact: Misfires, poor performance, reduced fuel economy.
- Fix: Adjust the fuel mixture, check the air filter and intake system, inspect the ignition system (coil, wires).
- Oil Fouling:
- Appearance: Oily, wet deposits.
- Cause: Worn piston rings, valve stem seals, or a malfunctioning PCV valve.
- Impact: Blue smoke from the exhaust, misfires, oil consumption.
- Fix: Repair or replace worn engine components (piston rings, valve seals), or fix the PCV system.
- Overheating:
- Appearance: White or light gray insulator, possibly with blistered or melted electrodes.
- Cause: Lean fuel mixture, incorrect spark plug heat range (too hot), advanced ignition timing, engine overheating.
- Impact: Pre-ignition, detonation (knocking), potential engine damage.
- Fix: Adjust the fuel mixture, use the correct spark plug heat range, retard ignition timing, address engine overheating issues.
- Detonation/Pre-ignition:
- Appearance: Damaged or broken insulator, melted or eroded electrodes.
- Cause: Low octane fuel, excessive cylinder pressure, lean fuel mixture, advanced ignition timing, hot spots in the combustion chamber.
- Impact: Severe engine damage, including piston damage, head gasket failure, and bearing failure.
- Fix: Use the correct octane fuel, address lean fuel mixture, retard ignition timing, eliminate hot spots in the combustion chamber.
- Gap Bridging:
- Appearance: Deposits bridging the gap between the electrodes.
- Cause: Excessive oil or fuel additives, worn engine components, or incorrect spark plug heat range.
- Impact: Misfires, poor performance.
- Fix: Clean or replace the spark plug, address the underlying cause of the deposits.
Real-World Use: Basic Troubleshooting Tips
Okay, you've pulled your plugs. Now what? Here's a basic troubleshooting guide:
- Document: Take pictures of each spark plug before cleaning or replacing them. This will help you remember which plug came from which cylinder.
- Compare: Compare the appearance of the plugs to the descriptions above. Are they all similar, or is one or two significantly different? This can help you isolate problems to specific cylinders.
- Check the Gap: Use a spark plug gapping tool to ensure the gap is within the manufacturer's specifications. Adjust the gap as needed. Too large of a gap requires high voltage, and too small of a gap can result in a weak spark.
- Inspect for Damage: Look for cracks in the insulator, damaged electrodes, or other signs of physical damage. If you find any damage, replace the spark plug immediately.
- Clean (Carefully): If the plugs are fouled with carbon or oil, you can try cleaning them with a spark plug cleaner or a wire brush. Be careful not to damage the electrodes or the insulator. I generally recommend replacing rather than cleaning unless you are in a bind.
- Replace if Necessary: If the plugs are heavily worn, damaged, or fouled, it's best to replace them. Spark plugs are relatively inexpensive, and replacing them can often resolve many engine problems.
- Investigate: If you find any signs of engine problems (oil fouling, overheating, etc.), investigate the underlying cause and address it before installing new spark plugs.
Safety First!
Working on your car involves inherent risks. Always disconnect the negative battery cable before working on the ignition system to prevent electrical shock. When removing spark plugs, be careful not to drop them or allow dirt or debris to enter the cylinder. Wear safety glasses to protect your eyes from debris. The ignition system carries high voltage and can be dangerous if not handled properly.
If you're unsure about any aspect of spark plug diagnosis or replacement, it's best to consult a qualified mechanic. Don't risk damaging your engine or injuring yourself!
Remember, reading spark plugs is a skill that improves with practice. The more you work on your car and examine the spark plugs, the better you'll become at diagnosing engine problems.
We have a helpful diagram that visually summarizes all of this information, including a color-coded chart that visually compares spark plug conditions. You can download it to keep it handy in your garage!