How To Tell Brake Pads Are Bad
Alright, let's talk brake pads. You might think you know when they're bad – squealing like a banshee, right? But there's a lot more to it than that. We're going to dive deep into the mechanics of brake pad wear, how to diagnose it properly, and what to look for before those tell-tale signs even appear. This knowledge will help you keep your car safe and avoid costly repairs down the road. Consider this your advanced course in brake pad diagnostics.
Purpose: Why Bother Learning This?
Understanding brake pad wear goes way beyond just avoiding annoying squeals. It's about preventative maintenance, saving money, and most importantly, safety. If you can accurately assess the condition of your brake pads, you can plan your maintenance schedule effectively, minimizing unexpected failures. Plus, you'll be able to spot problems early, potentially avoiding damage to your rotors (also known as brake discs), calipers, and other components in the braking system. This saves you money in the long run because replacing pads is significantly cheaper than replacing rotors and calipers, too!
Key Specs and Main Parts of a Disc Brake System
Before we get into specific wear patterns, let's review the key players in a disc brake system:
- Brake Pads: These are the friction materials that press against the rotor to slow the car down. They consist of a backing plate (usually steel) and the friction material itself. This material can be organic, semi-metallic, or ceramic, each with its own properties regarding stopping power, noise, and wear characteristics.
- Rotors (Brake Discs): These are the rotating discs that the brake pads clamp onto. They're typically made of cast iron but can also be made of carbon ceramic or other advanced materials, especially in high-performance applications.
- Calipers: These house the brake pistons and hold the brake pads in place. They use hydraulic pressure from the brake master cylinder to force the pads against the rotor. Calipers can be fixed (pistons on both sides) or floating (piston only on one side).
- Brake Lines: These carry the brake fluid from the master cylinder to the calipers.
- Brake Master Cylinder: This is the source of hydraulic pressure that actuates the entire braking system. When you depress the brake pedal, you are applying pressure to the master cylinder.
Key specs to keep in mind include the minimum allowable brake pad thickness (usually measured in millimeters or inches) and the maximum allowable rotor runout (warping), also usually measured in millimeters or inches. Consult your vehicle's service manual for specific values.
Understanding Brake Pad Wear
Now let's get into what signifies a worn brake pad. Here are the main indicators, in order of severity:
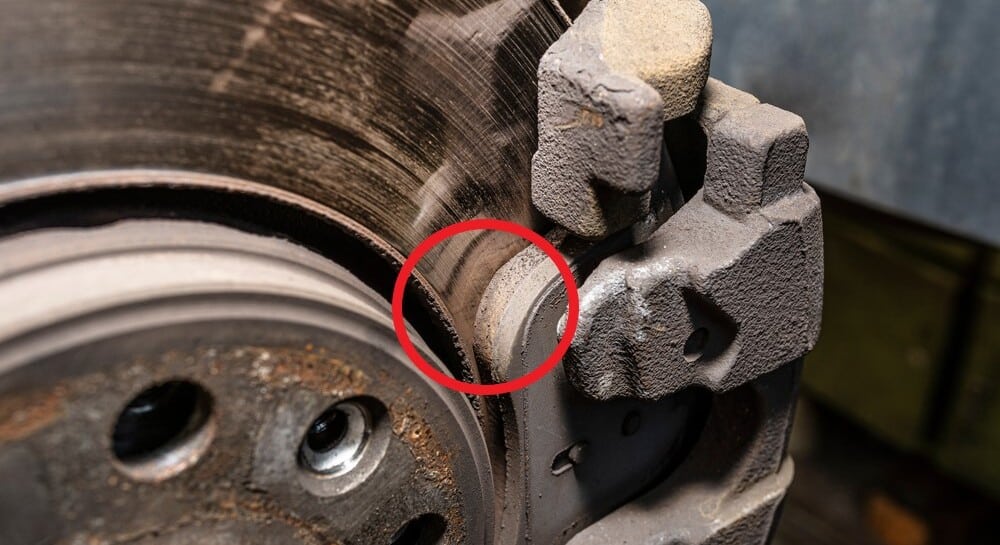
- Visual Inspection: This is your first line of defense. You're looking for the thickness of the friction material. A general rule of thumb is that if the friction material is less than 3mm (or 1/8 inch) thick, it's time to replace the pads. This measurement should be taken at the thinnest point of the pad. Don't just eyeball it; use a ruler or a specialized brake pad thickness gauge.
- Wear Indicators: Many brake pads have built-in wear indicators. These can be mechanical (a small metal tab that rubs against the rotor when the pad is worn, creating a squealing noise) or electronic (a sensor that triggers a warning light on your dashboard). The squealing sound is an early warning. Don't ignore it!
- Braking Performance: A noticeable decrease in braking performance is a clear sign of worn brake pads (or other braking system issues). This might manifest as longer stopping distances, a "spongy" brake pedal feel, or the need to apply significantly more force to the pedal to achieve the same braking effect.
- Noise: Squealing is the most common symptom, but grinding, scraping, or pulsating noises can also indicate serious problems. Grinding or scraping usually means the friction material is completely gone, and the backing plate is rubbing against the rotor, causing potentially extensive damage. Pulsating can be a sign of warped rotors.
- Vibration: Excessive vibration or pulsing felt through the brake pedal or steering wheel during braking often indicates warped rotors. However, it can also be caused by uneven brake pad wear or loose suspension components.
- Uneven Wear: Uneven wear patterns across the brake pad surface or between pads on the same axle can indicate issues with the caliper, brake lines, or other components.
How It Works: The Mechanics of Wear
Brake pads wear down due to the friction generated when they are pressed against the rotor. The harder you brake, and the more frequently you brake, the faster your pads will wear. Heat is a major factor. High temperatures can accelerate pad wear and even lead to brake fade (a temporary loss of braking power). Driving habits, road conditions, and the type of brake pad material all influence the wear rate.
Uneven wear is often caused by a sticking caliper piston. If the piston doesn't retract properly, the pad will remain in contact with the rotor, even when the brake pedal isn't depressed. This constant friction generates excessive heat and causes the pad to wear down more quickly on that side. A collapsed brake line can also cause uneven wear by restricting brake fluid flow.
Real-World Use: Troubleshooting Tips
Here are some practical troubleshooting tips for diagnosing brake pad issues:
- Perform a thorough visual inspection. Remove the wheels and visually inspect the pads and rotors. Look for excessive wear, cracks, scoring, and uneven wear patterns.
- Measure brake pad thickness. Use a ruler or brake pad thickness gauge to accurately measure the remaining friction material.
- Check for caliper movement. With the wheel removed, have someone lightly press the brake pedal while you observe the caliper. Make sure the caliper piston moves smoothly and evenly. If it sticks or binds, the caliper may need to be rebuilt or replaced.
- Inspect brake lines. Look for leaks, cracks, or bulges in the brake lines. Replace any damaged lines immediately.
- Test drive the vehicle. Pay attention to braking performance, noise, and vibration.
Example Scenario: You notice a squealing noise when braking. After removing the wheel, you see that one of the brake pads has significantly less friction material than the other. This suggests that the caliper piston on that side may be sticking. The solution would involve rebuilding the caliper and replacing both brake pads on that axle.
Safety: Highlighting Risky Components
The braking system is critical to vehicle safety. Working on it requires care and attention to detail. Here are some potential hazards to be aware of:
- Brake Fluid: Brake fluid is corrosive and can damage paint and skin. Wear gloves and eye protection when handling brake fluid. Dispose of used brake fluid properly.
- Asbestos: Older brake pads may contain asbestos, a known carcinogen. Avoid breathing dust from old brake pads. Wear a respirator and dispose of old pads properly. Modern brake pads generally don't contain asbestos, but it's best to err on the side of caution.
- Compressed Springs: Some brake calipers use compressed springs that can be dangerous if not handled properly. Use the correct tools and procedures when disassembling calipers.
Crucially, always use jack stands when working under a vehicle. Never rely solely on a jack. Also, after replacing brake pads, always bed them in properly by performing a series of controlled stops to heat-cycle the pads and rotors. This will ensure optimal braking performance and extend the life of your brake components.
By following these guidelines, you can confidently diagnose brake pad issues and maintain a safe and reliable braking system.