How To Tell If A Strut Is Bad
So, you suspect your struts are on their way out? You've come to the right place. Figuring out if a strut is bad isn't always straightforward, but with a little know-how, you can diagnose the problem yourself and save some serious cash on unnecessary repairs. This guide will walk you through the telltale signs of a failing strut, explain the underlying mechanics, and offer practical troubleshooting tips.
Purpose of Understanding Strut Diagnostics
Why bother learning this? Simple: accurate diagnosis saves you time, money, and frustration. Instead of blindly replacing parts (a common mistake!), you can pinpoint the problem and address it directly. This knowledge is invaluable for general car maintenance, prepping your vehicle for performance modifications, or even just understanding how your car handles. Plus, knowing your suspension system inside and out boosts your confidence as a DIY mechanic. We have a diagnostic diagram available for download that you can use in conjunction with this article; it offers a visual aid to help you with the process.
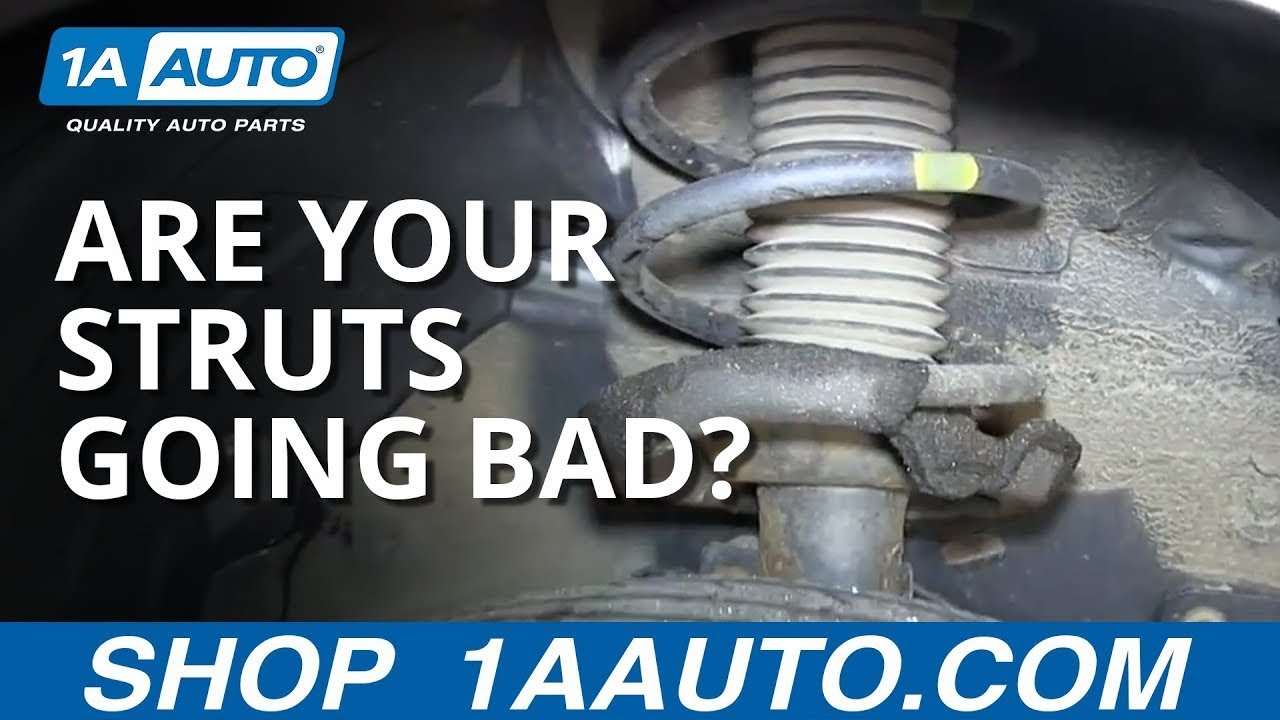
Key Specs and Main Parts of a Strut Assembly
A strut isn't just a shock absorber; it's a crucial structural component of your suspension. It's more complex than it looks, so let's break down the essential parts:
- Strut Body: The main housing, usually filled with hydraulic fluid or gas.
- Piston Rod: A polished rod that moves in and out of the strut body, controlling damping.
- Spring Seat: Where the coil spring rests on the strut.
- Coil Spring: Supports the vehicle's weight and absorbs initial impacts.
- Bump Stop: Prevents the suspension from bottoming out during extreme compression.
- Strut Mount: Connects the strut assembly to the vehicle's chassis. This often includes a bearing or bushing for smooth steering.
Key specs to consider (though you usually won't be measuring these directly during a simple diagnosis) include the strut's damping rate (how quickly it controls suspension movement) and its stroke length (the distance the piston rod can travel).
Understanding the Diagnostic Diagram (Available for Download)
The diagnostic diagram we offer visually represents common strut failures and their associated symptoms. Here's a breakdown of what you'll typically find:
- Lines and Arrows: These often indicate the direction of force or movement. For example, an arrow might point to a specific part of the strut where wear is likely to occur.
- Colors: Colors are typically used to highlight different components or stages of failure. Red might indicate severe damage, yellow might indicate a warning sign, and green might indicate a normal operating condition.
- Icons: Icons are shorthand for common problems, such as a leaking seal (often represented by a droplet symbol) or a broken spring (represented by a fractured line).
- Text Annotations: These explain what each part of the diagram represents and offer additional diagnostic tips.
By studying the diagram alongside this article, you'll gain a comprehensive understanding of strut diagnostics.
How Struts Work: A Quick Refresher
Think of a strut as a gatekeeper of suspension movement. As the wheel encounters a bump, the coil spring compresses. Without a strut, the spring would oscillate uncontrollably, resulting in a bouncy, uncomfortable ride. The strut's internal damping mechanism, controlled by the piston moving through hydraulic fluid or gas, resists this oscillation, smoothing out the ride and maintaining tire contact with the road.
When the piston moves inside the strut body, it forces fluid through small orifices. The size and configuration of these orifices determine the damping rate. A stiffer damping rate results in a firmer ride and better handling, while a softer damping rate provides a more comfortable ride.
Real-World Use: Troubleshooting Bad Struts
Okay, time to get your hands dirty! Here's how to diagnose a bad strut:
Visual Inspection:
Look for leaks: This is the most obvious sign. Oil or fluid on the strut body is a dead giveaway. A small amount of grime is normal, but a wet, oily surface indicates a leaking seal.
Inspect the spring: Check for cracks, rust, or broken sections. A broken spring is an immediate safety hazard and will drastically affect handling.
Examine the strut mount: Look for cracks, tears, or excessive play in the rubber bushing. A worn strut mount can cause clunking noises and poor steering response.
Check the bump stop: If it's deteriorated or missing, the strut is more likely to bottom out, potentially damaging the strut itself and other suspension components.
Bounce Test:
Push down firmly on each corner of your vehicle (the fender above the wheel) and release. Observe how many times the vehicle bounces. A healthy strut should allow the vehicle to return to its original position with minimal oscillation (one or two bounces maximum). Excessive bouncing indicates a worn-out strut.
Driving Test:
Listen for noises: Clunking, knocking, or rattling sounds, especially when going over bumps, are common signs of worn struts or strut mounts.
Feel for handling issues: Excessive body roll (leaning in turns), nose diving during braking, or rear-end squat during acceleration can all indicate worn struts. Poor steering response and uneven tire wear are other potential symptoms.
Specific Symptoms and Their Causes:
- Clunking Noise: Worn strut mount, loose strut components, or damaged internal strut components.
- Bouncing Ride: Worn struts with reduced damping capacity.
- Excessive Body Roll: Worn struts unable to control body movement during cornering.
- Uneven Tire Wear: Worn struts can cause improper wheel alignment, leading to uneven tire wear.
- Nose Dive During Braking: Worn front struts unable to adequately support the front of the vehicle during braking.
- Leaking Strut: Damaged strut seal, resulting in loss of hydraulic fluid and reduced damping performance.
Safety First! Risky Components and Precautions
Working on struts involves compressed springs, which can be extremely dangerous if handled improperly. Never attempt to disassemble a strut assembly without the proper spring compressor tool. Compressed springs store immense energy, and if released unexpectedly, they can cause serious injury or even death.
Furthermore, be mindful of the brake lines and ABS sensors when working around the suspension. Accidental damage to these components can lead to brake failure or other serious problems. Always disconnect the battery before working on any electrical components.
Always wear safety glasses and gloves when working on your suspension. And remember, if you're uncomfortable with any aspect of the repair, it's always best to consult a professional mechanic.
Download the Diagnostic Diagram
We have a detailed diagnostic diagram available for you to download. This diagram provides a visual reference for identifying common strut failures and their associated symptoms. Use it alongside this article to enhance your understanding and improve your diagnostic accuracy. With this knowledge and the right tools, you can confidently diagnose and address strut problems, saving yourself time and money.