How To Tell If My Shocks Are Bad
As an experienced DIYer or modifier, you know that your car's suspension system is more than just springs and tires. Your shocks, or more accurately, dampers, play a crucial role in ride quality, handling, and even braking performance. Identifying worn or damaged shocks is essential for maintaining safety and preventing further damage to your vehicle. This article will provide you with the knowledge and skills to diagnose potentially bad shocks. We'll cover visual inspections, performance tests, and key indicators of shock failure.
Understanding Shocks and Their Importance
Before diving into diagnostics, let's quickly recap the purpose of shocks. Their primary function is to control spring oscillation. When your car encounters a bump, the springs compress and rebound. Without shocks, this rebounding motion would continue endlessly, resulting in a bouncy and unstable ride. Shocks dampen this motion, allowing the tires to maintain contact with the road surface for better grip and control.
Key Specs and Main Parts
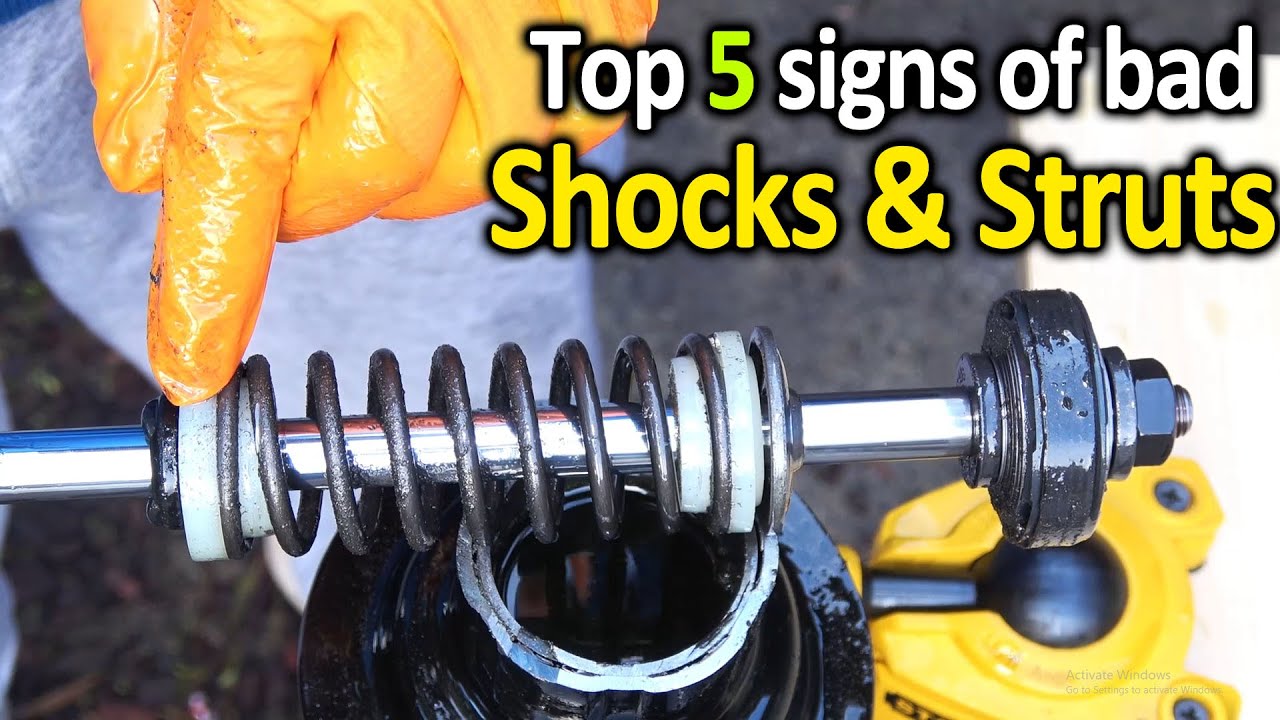
Most automotive shocks are hydraulic or gas-charged. Here's a breakdown of the key components:
- Piston Rod: A polished steel rod that moves in and out of the shock body. It's connected to the vehicle's suspension.
- Piston: Attached to the end of the piston rod, the piston moves through the hydraulic fluid inside the shock. It contains valves that control the flow of fluid.
- Cylinder/Shock Body: The main housing of the shock absorber, filled with hydraulic fluid or gas.
- Hydraulic Fluid: The damping medium. Its viscosity affects the shock's performance.
- Valves (Compression & Rebound): These valves control the flow of hydraulic fluid during compression (when the suspension is compressed) and rebound (when the suspension extends).
- Mounting Points (Bushings or Eyes): These connect the shock absorber to the vehicle's frame and suspension components.
Key specifications to consider when replacing shocks include:
- Length (Extended & Compressed): The length of the shock at its maximum and minimum extension.
- Damping Force (Compression & Rebound): Measured in Newtons (N) or pounds-force (lbf), this indicates the resistance to movement. Higher numbers mean stiffer damping.
- Mounting Type: Refers to the style of the mounting points (e.g., eye-to-eye, stem-to-eye).
Visual Inspection: A Critical First Step
A thorough visual inspection is often the easiest way to spot obvious shock issues. Look for the following:
- Leaks: This is the most common sign of a failing shock. A light film of oil is normal, but excessive leakage indicates a problem. Look for oil running down the shock body.
- Damage to the Shock Body: Dents, bends, or cracks can compromise the shock's integrity.
- Damaged Mounting Points: Check the bushings (usually rubber or polyurethane) for cracks, tears, or excessive wear. Worn bushings can cause clunking noises and reduced damping effectiveness. Inspect the mounting eyes for deformation or damage.
- Rust and Corrosion: Severe rust can weaken the shock's structure and lead to failure.
- Debris: Excessive accumulation of dirt or debris around the seals can contribute to premature wear.
Pro Tip: Clean the shocks before inspecting them. This will make it easier to spot leaks and other damage.
Performance Tests: Feeling the Problem
If the visual inspection is inconclusive, try these performance tests:
- Bounce Test: This is a simple but often unreliable test. Push down firmly on each corner of the vehicle and release. The vehicle should rebound once and settle quickly. Excessive bouncing (more than two or three oscillations) suggests weak shocks. However, this test is less effective on vehicles with very stiff springs or anti-roll bars.
- Ride Test: Pay attention to how the vehicle handles during normal driving. Do you notice excessive body roll during turns? Does the vehicle feel unstable or bouncy over bumps? Are there unusual noises coming from the suspension?
- Braking Test: Worn shocks can increase braking distance. Under heavy braking, the front of the vehicle may dip excessively, and the rear may feel unstable. Perform this test in a safe, controlled environment and be aware of your surroundings.
Interpreting the Signs: Common Symptoms of Bad Shocks
Here's a summary of common symptoms that indicate failing shocks:
- Excessive Bouncing: The vehicle continues to bounce after hitting a bump.
- Poor Handling: Increased body roll during turns, difficulty maintaining control in windy conditions, or a general feeling of instability.
- Increased Braking Distance: The vehicle takes longer to stop, especially during emergency braking.
- Uneven Tire Wear: Cupping or scalloping on the tires can be a sign of worn shocks.
- Nose Dive During Braking: The front of the vehicle dips excessively when braking.
- Clunking Noises: Worn bushings or internal shock damage can cause clunking or rattling noises, especially when driving over bumps.
- Fluid Leaks: Visible oil leaks on the shock body.
Real-World Use – Basic Troubleshooting Tips
When troubleshooting shock problems, consider the following:
- Replace Shocks in Pairs: Always replace shocks on the same axle in pairs to maintain balanced handling. Replacing only one shock can lead to uneven damping and unpredictable handling characteristics.
- Consider Your Driving Style and Vehicle Use: If you frequently tow or carry heavy loads, you may need heavy-duty shocks. For performance driving, consider adjustable shocks that allow you to fine-tune the damping characteristics.
- Check Other Suspension Components: Before replacing shocks, inspect other suspension components such as ball joints, tie rod ends, and control arm bushings. Worn components can mimic the symptoms of bad shocks.
- Don't Ignore Unusual Noises: Pay attention to any clunking, rattling, or squeaking noises coming from the suspension. These noises can indicate a variety of problems, including worn shocks, damaged bushings, or loose components.
Safety – Highlight Risky Components
Working on suspension components can be dangerous. Here are some safety precautions to keep in mind:
- Use Jack Stands: Never work under a vehicle supported only by a jack. Always use properly rated jack stands to support the vehicle securely.
- Spring Compressors: If you're working with coil-over shocks, you'll need to use a spring compressor to safely remove the spring. Springs store a tremendous amount of energy and can cause serious injury if released improperly. If you're not comfortable using a spring compressor, take the shocks to a professional for disassembly and reassembly.
- Wear Safety Glasses: Protect your eyes from flying debris.
- Disconnect the Battery: Disconnect the negative battery cable to prevent accidental electrical shorts.
- Consult a Repair Manual: Refer to a repair manual for specific instructions and torque specifications for your vehicle.
Conclusion
By following the steps outlined in this article, you can confidently diagnose potential shock problems and take appropriate action. Remember that a properly functioning suspension system is critical for safety and performance. If you're unsure about any aspect of shock diagnosis or replacement, consult a qualified mechanic.
We have a detailed diagram of a typical shock absorber assembly available for download. This diagram illustrates the various components and their functions. This detailed visual guide is an invaluable resource for understanding shock construction and operation. Feel free to request the file, and we'll provide you with a link.