How To Tell If Spark Plug Bad
So, you suspect you have a bad spark plug? That's a classic issue, and knowing how to diagnose it yourself can save you a lot of time and money at the shop. This article will walk you through the process of visually inspecting a spark plug to determine its condition, interpreting what you see, and understanding the underlying causes of common spark plug problems. We'll cover everything from normal wear to serious engine issues that manifest in the spark plug's appearance.
Purpose: Why Spark Plug Diagnosis Matters
Why bother digging into this? Well, accurate spark plug diagnosis provides several key benefits:
- Early Problem Detection: Identifying spark plug issues early can prevent more significant engine damage, such as cylinder misfires leading to catalytic converter failure.
- Performance Optimization: Correctly functioning spark plugs are crucial for efficient combustion and optimal engine performance. Identifying and replacing worn or fouled plugs restores lost power and fuel economy.
- Informed Repairs: Visual inspection provides valuable clues about the overall health of your engine. Spark plug condition can point towards issues like oil leaks, rich or lean fuel mixtures, or cooling system problems.
- Cost Savings: DIY diagnosis allows you to determine if a simple spark plug replacement is all that's needed, avoiding potentially unnecessary (and expensive) mechanic bills.
- Learning Opportunity: Understanding spark plug condition allows you to better understand the workings of your engine and diagnose future problems.
Key Specs and Main Parts
Before we dive into diagnostics, let's review the key components of a spark plug and their roles:
- Terminal: The top of the spark plug that connects to the spark plug wire (or coil-on-plug connector).
- Insulator: Made of ceramic, it prevents the high-voltage electricity from grounding out before reaching the electrode. Look for cracks or damage.
- Metal Shell: The threaded part that screws into the cylinder head. It provides grounding and heat dissipation.
- Center Electrode: The electrode in the center of the spark plug where the high-voltage electricity jumps from.
- Ground Electrode (Side Electrode): The electrode that's bent over the center electrode. The spark jumps across the gap between these two electrodes.
- Spark Plug Gap: The distance between the center and ground electrodes. This gap is critical for proper ignition.
- Heat Range: A spark plug's ability to dissipate heat. A hotter plug retains more heat, while a colder plug dissipates heat faster. Choosing the correct heat range is crucial for engine performance and longevity.
Key Specs:
- Spark Plug Gap: Measured in thousandths of an inch (e.g., 0.044"). Varies depending on the engine and application. Refer to your vehicle's service manual for the correct specification.
- Heat Range: Indicated by a number on the spark plug. Higher numbers usually denote colder plugs, and lower numbers denote hotter plugs (although this can vary by manufacturer).
How It Works
The spark plug's primary job is to ignite the air-fuel mixture in the combustion chamber. Here's a breakdown of the process:
- The ignition coil sends a high-voltage pulse to the spark plug.
- This voltage travels through the spark plug to the center electrode.
- The voltage jumps across the spark plug gap to the ground electrode, creating a spark.
- The spark ignites the compressed air-fuel mixture in the cylinder, initiating combustion.
A properly functioning spark plug produces a consistent and powerful spark, ensuring complete combustion. When a spark plug is faulty, it can lead to misfires, reduced power, poor fuel economy, and other engine problems.
Real-World Use: Basic Troubleshooting Tips and Visual Inspection
Now, let's get to the practical part: how to tell if a spark plug is bad based on its appearance.
Tools You'll Need:
- Spark plug socket (specific to your spark plug size)
- Ratchet
- Torque wrench
- Spark plug gap tool
- Clean rag or paper towel
- Safety glasses
- Gloves
Procedure:
- Safety First: Disconnect the negative battery cable before working on the ignition system. Allow the engine to cool completely before removing spark plugs.
- Remove the Spark Plugs: Carefully disconnect the spark plug wires or coil-on-plug connectors. Use the spark plug socket and ratchet to remove the spark plugs. Keep track of which spark plug came from which cylinder; this is crucial for diagnosis.
- Visual Inspection: Examine each spark plug carefully, comparing it to the descriptions below.
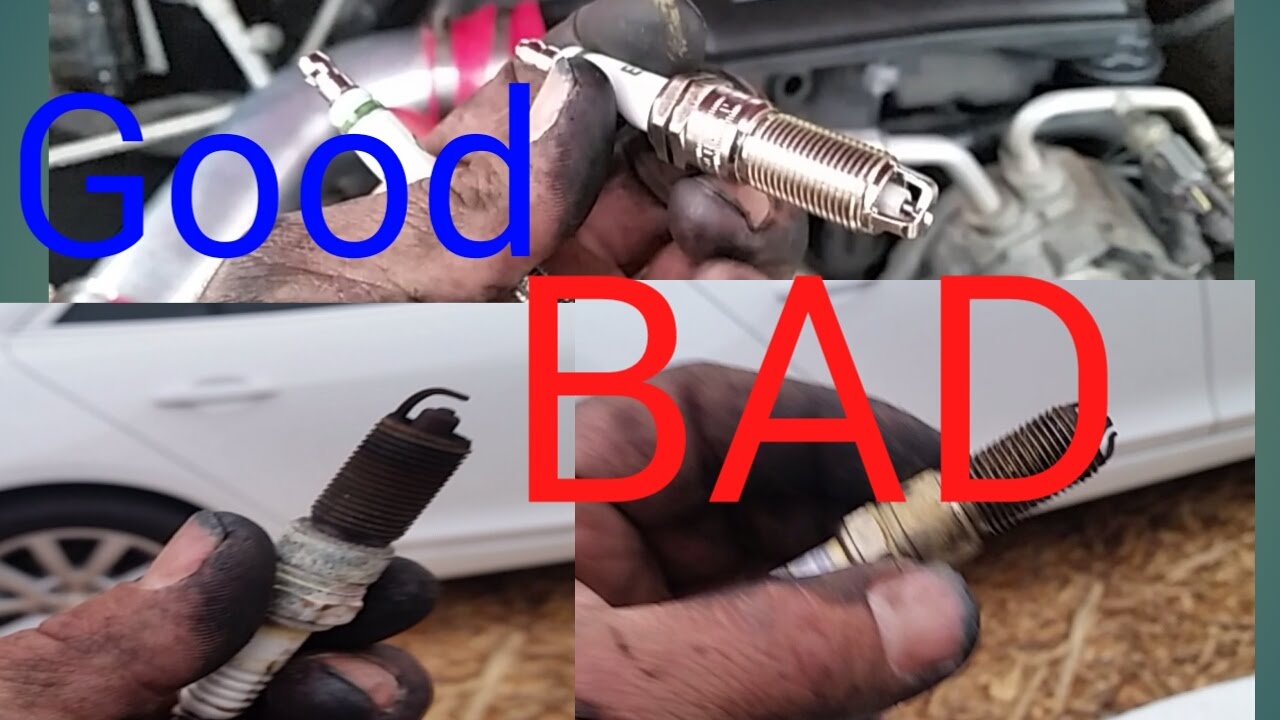
Interpreting Spark Plug Condition
- Normal: Light tan or gray deposits on the insulator tip. This indicates proper combustion and a healthy engine. Nothing to worry about.
- Worn: Rounded electrodes with an increased gap. Indicates normal wear and tear. Replace the spark plugs.
- Oil Fouling: Wet, oily deposits on the insulator and electrodes. This indicates oil is entering the combustion chamber, often due to worn piston rings, valve stem seals, or a leaking head gasket. Replacing the spark plugs alone will not fix the problem; you need to address the oil leak.
- Fuel Fouling: Black, sooty deposits on the insulator and electrodes. This indicates a rich fuel mixture (too much fuel, not enough air). Possible causes include a faulty oxygen sensor, a stuck-open fuel injector, or a clogged air filter.
- Overheating: White or blistered insulator tip. This indicates the spark plug is running too hot. Possible causes include a lean fuel mixture, incorrect spark plug heat range, or a cooling system problem.
- Detonation/Pre-Ignition: Damaged or melted electrodes. Indicates severe engine problems, such as detonation or pre-ignition. This can be caused by a lean fuel mixture, excessive engine load, or incorrect ignition timing. Requires immediate attention to prevent further engine damage.
- Deposits: Various colored deposits (e.g., reddish-brown, green) can indicate coolant leaks, fuel additives, or other contaminants entering the combustion chamber.
- Cracked or Broken Insulator: Usually caused by improper installation or over-tightening. Replace the spark plug.
After Inspection:
- Gap the New Spark Plugs: If replacing the spark plugs, gap them to the manufacturer's specification using a spark plug gap tool.
- Install the Spark Plugs: Carefully install the new spark plugs by hand to avoid cross-threading. Tighten them to the torque specification listed in your vehicle's service manual using a torque wrench.
- Reconnect Everything: Reconnect the spark plug wires or coil-on-plug connectors. Reconnect the negative battery cable.
Basic Troubleshooting Tips
- Misfire: If you're experiencing a misfire, start by checking the spark plugs. A fouled or worn spark plug is a common cause.
- Poor Fuel Economy: Worn or fouled spark plugs can reduce fuel economy.
- Rough Idle: A faulty spark plug can cause a rough or uneven idle.
- Check Engine Light: A misfire code (e.g., P0300, P0301) on the check engine light often indicates a spark plug problem.
Safety - Highlight Risky Components
Working with the ignition system involves high voltage and potentially flammable materials. Here are some key safety precautions:
- Disconnect the Battery: Always disconnect the negative battery cable before working on the ignition system to prevent electrical shock.
- Work on a Cool Engine: Never remove spark plugs from a hot engine. Allow the engine to cool completely to prevent burns.
- Use Proper Tools: Use the correct spark plug socket and torque wrench to avoid damaging the spark plugs or cylinder head.
- Avoid Flammable Materials: Keep flammable materials away from the engine compartment while working on the ignition system.
- Wear Safety Glasses and Gloves: Protect your eyes and hands from debris and chemicals.
- Be Careful with Fuel: Be careful of gasoline vapors. Do not smoke or work near open flames.
- Coil-on-Plug Systems: Be very careful when dealing with coil-on-plug systems as they can still deliver a powerful shock even with the engine off if not properly disconnected.
The ignition coil can store a significant charge, even after the engine is turned off. Exercise extreme caution when working near the coil or spark plug wires.
Diagnosing spark plug condition is a valuable skill for any DIY mechanic. By understanding the different types of spark plug fouling and their causes, you can identify potential engine problems early and save yourself time and money. Remember to always prioritize safety and consult your vehicle's service manual for specific instructions and torque specifications.
We have a detailed spark plug diagnostic diagram available for download. It includes high-resolution images of various spark plug conditions and their corresponding diagnoses. This diagram will be a valuable reference tool for your future troubleshooting endeavors. Contact us to get your copy!