How To Tell If Your Rim Is Bent
Determining whether a rim is bent can be crucial for maintaining vehicle safety, performance, and ride comfort. A bent rim not only leads to annoying vibrations but can also accelerate tire wear, compromise handling, and potentially cause tire blowouts. This article provides a detailed guide for intermediate car owners, modders, and DIY mechanics on how to identify a bent rim, understand its causes, and assess the severity of the damage. We will cover visual inspections, using specialized tools, and understanding the key specifications of a wheel.
Purpose of Rim Inspection
The primary reason for inspecting your rims is to ensure your vehicle's safety and optimal performance. A bent rim can significantly impact handling and stability, especially at higher speeds. Regular inspections can help you identify potential problems early on, allowing you to address them before they escalate into more serious and costly repairs. This is critical for:
- Safety: A severely bent rim can cause tire blowouts or complete wheel failure, both of which can lead to accidents.
- Performance: A bent rim can cause vibrations, uneven tire wear, and reduced fuel efficiency.
- Cost Savings: Early detection of rim damage can prevent more extensive and expensive repairs down the line.
- Learning: Understanding wheel structure and potential damage types will help you make informed decisions regarding repair or replacement.
Key Specs and Main Parts
To effectively diagnose a bent rim, it’s essential to understand the fundamental components and specifications of a wheel. Key areas to examine include:
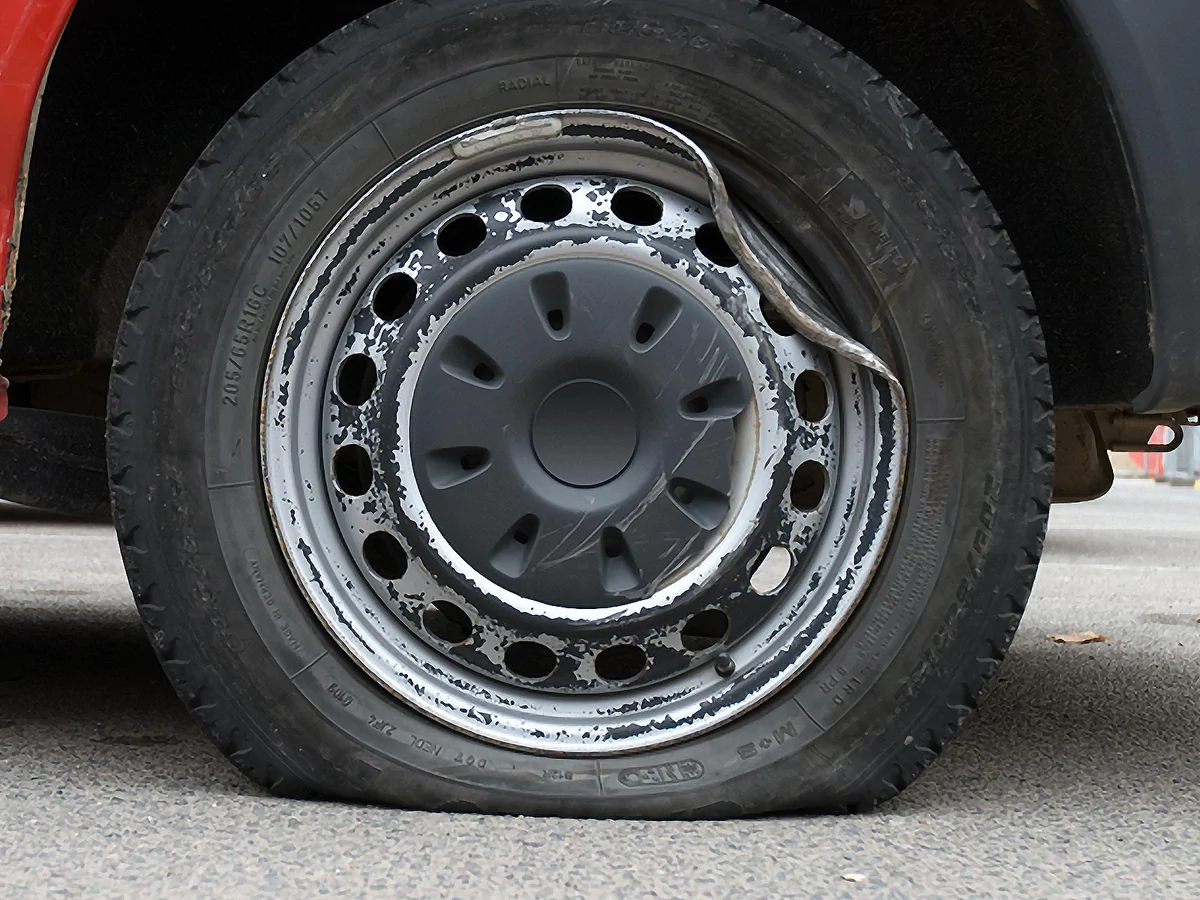
- Rim Flange: The outermost edge of the rim that holds the tire bead in place. Damage here is common from curb strikes.
- Wheel Face: The visible front portion of the wheel. Scratches are cosmetic, but significant dents can indicate structural damage.
- Barrel: The cylindrical inner part of the rim where the tire sits. This is often overlooked, but damage to the barrel can cause air leaks.
- Wheel Hub: The center of the wheel that mounts onto the vehicle's axle. Damage here is less common but extremely serious.
- Bolt Holes/Stud Holes: The holes through which the wheel is bolted or studded to the hub. Cracks or deformation around these holes are dangerous.
- Wheel Offset: The distance between the wheel's mounting surface and its centerline. Incorrect offset can lead to rubbing or suspension problems. Understanding your vehicle's correct offset is critical when choosing replacement wheels.
- Wheel Diameter and Width: These measurements, usually in inches, dictate the size of the tire that can be mounted.
- Bolt Pattern: The number and spacing of the bolt holes. This must match your vehicle's hub.
The rim flange is particularly vulnerable to damage from impacts, such as hitting potholes or curbs. The wheel face, while primarily aesthetic, can also be an indicator of more severe underlying problems. The barrel, though hidden, is critical for maintaining a proper seal with the tire. Dents in the barrel can prevent the tire from seating correctly, leading to air leaks.
Visual Inspection
The first step in identifying a bent rim is a thorough visual inspection. This can be done with the wheel mounted on the vehicle or, preferably, with it removed. Follow these steps:
- Clean the Wheel: Remove any dirt, grime, or brake dust. This will allow you to see any damage more clearly.
- Inspect the Rim Flange: Look for dents, bends, or cracks along the outer edge of the rim. Pay close attention to any areas that appear to have been scraped or impacted.
- Check the Wheel Face: Examine the face of the wheel for any visible dents, bends, or cracks. Even minor dents can indicate structural damage.
- Inspect the Barrel: If possible, inspect the inner barrel of the wheel for any dents or bends. This may require removing the wheel from the vehicle.
- Look for Runout: With the wheel on the vehicle, slowly rotate it and observe the rim flange. Look for any wobbling or unevenness. This is called runout and indicates a bend. You can also do this with the wheel on a balancer.
Using Specialized Tools
For a more accurate assessment, you can use specialized tools to measure runout and identify bends. Here are a few commonly used tools:
- Dial Indicator: A dial indicator is a precision measuring tool used to measure runout. Attach the dial indicator to a stable base and position the tip against the rim flange. As you rotate the wheel, the dial indicator will measure any variations in the rim's surface. Excessive runout indicates a bent rim.
- Rim Straightening Tools: While not diagnostic tools, these are used to *repair* minor bends. Use with caution, as improper use can worsen the damage. Professional rim straightening machines are preferred for serious bends.
How It Works (Runout Measurement with a Dial Indicator)
The dial indicator measures the radial runout, which is the amount the rim deviates from a perfectly circular shape. To use a dial indicator:
- Mount the wheel on a balancer or hub. Ensure it is securely mounted and free to rotate.
- Position the dial indicator so that the tip is touching the rim flange.
- Set the dial to zero.
- Slowly rotate the wheel one full revolution.
- Observe the maximum and minimum readings on the dial indicator. The difference between these readings is the total runout.
Acceptable runout values vary depending on the wheel manufacturer, but generally, any runout exceeding 0.030 inches (0.76 mm) is considered excessive and indicates a bent rim.
Real-World Use – Basic Troubleshooting Tips
Here are some troubleshooting tips to help you diagnose and address bent rim issues:
- Vibration at High Speeds: If you experience vibrations, especially at higher speeds, it could be a sign of a bent rim. Start by checking the rims for visible damage.
- Uneven Tire Wear: A bent rim can cause uneven tire wear, such as feathering or cupping. Inspect your tires for any unusual wear patterns.
- Air Leaks: If you notice that your tire is losing air pressure, especially around the rim, it could be due to a bent rim preventing a proper seal.
- Balance Issues: If your wheels are difficult to balance, or require excessive weights to balance, it's a strong indication of a bent rim.
Safety – Highlight Risky Components
Working with wheels and tires involves certain risks, especially when dealing with potentially damaged components. Here are some safety precautions to keep in mind:
- Tire Pressure: Always deflate the tire completely before attempting to remove it from the rim. A pressurized tire can explode if the bead is suddenly released.
- Wheel Removal: Use proper lifting equipment and wheel chocks to prevent the vehicle from rolling.
- Inspection: Never attempt to repair a severely damaged rim yourself. It's best to consult with a professional wheel repair specialist. Cracks in the rim are *extremely* dangerous and should not be repaired; the wheel should be replaced.
- Torque Specifications: When reinstalling the wheel, always use a torque wrench to tighten the lug nuts to the manufacturer's specified torque. Over-tightening can damage the wheel studs or warp the hub.
- Safety Glasses: Wear safety glasses when inspecting or working on wheels to protect your eyes from debris.
- Gloves: Wear gloves to protect your hands from sharp edges and grime.
A cracked rim is a major safety hazard and should not be driven on under any circumstances. The structural integrity of the wheel is compromised, and it could fail catastrophically, leading to an accident.
Diagnosing a bent rim requires a combination of visual inspection, using specialized tools, and understanding the key specifications of a wheel. By following the steps outlined in this guide, you can effectively identify potential problems early on and ensure your vehicle's safety and optimal performance. Remember to prioritize safety and consult with a professional when in doubt.
We have a detailed diagram illustrating the various parts of a wheel and common types of damage. You can download the diagram for further reference. Understanding these details will improve your ability to diagnose issues and determine the appropriate course of action. Early detection and proper maintenance are the best ways to prevent more serious problems and ensure your vehicle's safety.