How To Test A Knock Sensor With A Multimeter
Imagine you're driving your car, and suddenly, you notice a slight hesitation, a lack of power, or even a persistent "check engine" light. One potential culprit lurking beneath the surface could be a malfunctioning knock sensor. This seemingly small component plays a crucial role in protecting your engine from potentially catastrophic damage. But how do you know if it's the knock sensor causing the problem? While a diagnostic scan tool can point you in the general direction, sometimes you need to get your hands dirty and perform a more direct test. This is where the trusty multimeter comes in.
Think of your engine as a finely tuned orchestra. Each cylinder fires in perfect harmony, creating a smooth and powerful performance. But what happens if one instrument starts playing out of tune? That's essentially what engine knock, or detonation, is. It's an uncontrolled explosion in the combustion chamber, creating pressure waves that can damage pistons, connecting rods, and even the cylinder head. The knock sensor acts as the orchestra's sound engineer, listening for these dissonant sounds and alerting the engine control unit (ECU) to adjust the timing and fuel mixture to prevent damage.
Understanding Knock Sensor Operation
To properly test a knock sensor, it's essential to understand how it works. Most modern knock sensors are piezoelectric devices. Let's break that down:
Piezoelectricity is a phenomenon where certain materials generate an electrical charge when subjected to mechanical stress. In the case of a knock sensor, a piezoelectric crystal is housed within a metal casing, typically bolted directly to the engine block. When engine knock occurs, the vibrations travel through the engine block and into the sensor. These vibrations create stress on the piezoelectric crystal, generating a small AC voltage signal.
The ECU interprets the voltage signal from the knock sensor. A higher voltage generally indicates more severe knocking. Based on this information, the ECU can retard (delay) the ignition timing. Retarding the timing reduces cylinder pressure and combustion temperature, effectively suppressing the knock. The ECU might also adjust the air-fuel ratio, enriching the mixture to further cool down the combustion process.
Mechanical Details
Typically, the knock sensor consists of the following:
- Housing: A robust metal casing that protects the piezoelectric element and provides a mounting point for the engine block.
- Piezoelectric Element: The heart of the sensor, responsible for generating the voltage signal. Common materials include quartz or certain ceramic compounds.
- Internal Mass: Some sensors incorporate an internal mass that amplifies the vibrations and enhances the signal strength.
- Connector: A connector that allows the sensor to be wired to the engine control unit (ECU).
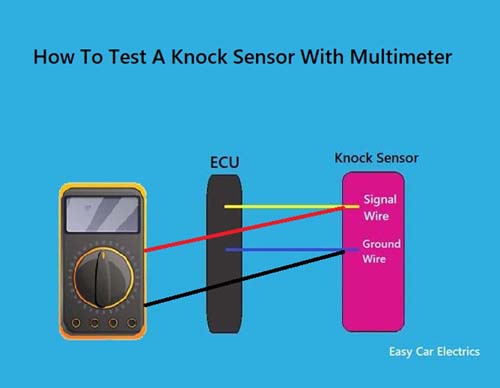
Testing a Knock Sensor with a Multimeter
Now that we have a grasp of the theoretical operation, let's dive into the practical steps of testing a knock sensor using a multimeter.
Tools Required:
- Multimeter (capable of measuring AC voltage and resistance)
- Socket wrench (to remove and reinstall the sensor, if necessary)
- Service manual for your specific vehicle (for torque specifications)
- Safety glasses
- Gloves
Safety First! Before starting any automotive repair, ensure the engine is cool, the vehicle is parked on a level surface, and the parking brake is engaged. Disconnect the negative battery cable to prevent accidental shorts.
Step 1: Visual Inspection: Carefully inspect the knock sensor for any visible signs of damage, such as cracks, corrosion, or loose wiring. Check the connector for damage or corrosion as well.
Step 2: Resistance Test: This test checks the internal integrity of the sensor. Disconnect the knock sensor connector. Set your multimeter to measure resistance (Ohms). Touch one probe to one terminal of the sensor connector and the other probe to the other terminal. Consult your vehicle's service manual for the expected resistance range. An open circuit (infinite resistance) or a short circuit (zero resistance) indicates a faulty sensor.
Note: Some knock sensors may have a very high resistance, even when functioning correctly. Always refer to the manufacturer's specifications.
Step 3: Voltage Test (Dynamic Test): This test checks the sensor's ability to generate a voltage signal when subjected to vibration. This test is more challenging and requires some creativity.
- Reconnect the knock sensor connector to the vehicle's wiring harness.
- Set your multimeter to measure AC voltage.
- Backprobe the connector (carefully insert the multimeter probes into the back of the connector without damaging the wires) to access the signal wire from the knock sensor.
- Start the engine.
- Gently tap on the engine block near the knock sensor with a wrench or screwdriver handle. This simulates engine knock.
- Observe the multimeter reading. A functioning knock sensor should produce a small AC voltage signal (usually a few millivolts). The voltage should fluctuate as you tap on the engine block.
Important: Do not strike the engine block forcefully. You are only trying to simulate a mild vibration.
Step 4: Compare to Good Sensor (Optional): If you have access to a known good knock sensor, you can perform the same tests on it and compare the results. This can help you confirm whether the original sensor is faulty.
Pros and Cons of Multimeter Testing
Pros:
- Affordable: Multimeters are relatively inexpensive and readily available.
- Direct Measurement: Provides a direct measurement of the sensor's electrical properties.
- Can Identify Basic Faults: Can identify open circuits, short circuits, and a complete lack of voltage output.
Cons:
- Limited Diagnostic Capability: May not detect subtle performance issues.
- Requires Some Mechanical Skill: May require removing or accessing the sensor.
- Interpretation Can Be Tricky: Requires knowledge of expected values and sensor operation.
- Dynamic test can be subjective: Reliant on the user's ability to stimulate the sensor.
Use Cases and Manufacturer Examples
Knock sensors are used in virtually all modern gasoline engines. Here are a few examples:
- General Motors (GM): GM vehicles often use single-wire knock sensors.
- Ford: Ford vehicles commonly use two-wire knock sensors.
- Toyota: Toyota vehicles also employ a variety of knock sensor designs, depending on the engine and model year.
- Bosch: Bosch is a major manufacturer of knock sensors, supplying them to various automakers.
Common scenarios where multimeter testing is useful:
- Check Engine Light: When the check engine light is on, and the diagnostic code indicates a knock sensor issue.
- Poor Engine Performance: If the engine is experiencing a lack of power or hesitation.
- Fuel Efficiency Issues: A faulty knock sensor can cause the ECU to retard the timing excessively, leading to reduced fuel economy.
- After Engine Work: To verify the functionality of the knock sensor after engine repairs or modifications.
Real-World Insights and Recommendations
While multimeter testing can be a valuable tool, it's important to remember its limitations. A multimeter can only tell you if the sensor is fundamentally broken. It cannot assess its sensitivity or accuracy under all operating conditions.
Recommendations:
- Always Consult the Service Manual: Refer to your vehicle's service manual for the correct testing procedures and expected values.
- Use a Scan Tool: Combine multimeter testing with a diagnostic scan tool for a more comprehensive diagnosis. The scan tool can provide valuable information about the knock sensor's signal and the ECU's response.
- Consider Sensor Location: When performing the dynamic voltage test, try to tap the engine block as close as possible to the knock sensor. This will ensure that the sensor receives the maximum vibration.
- Replace with OEM or Reputable Brands: If you determine that the knock sensor is faulty, replace it with a high-quality replacement sensor from a reputable brand (e.g., Bosch, Denso, or the original equipment manufacturer). Cheap aftermarket sensors may not perform reliably.
- Torque to Specification: When reinstalling the knock sensor, torque it to the manufacturer's specifications. Over-tightening or under-tightening can affect the sensor's performance.
- Test After Replacement: After replacing the knock sensor, clear the diagnostic codes and monitor the engine's performance to ensure that the problem has been resolved.
In conclusion, testing a knock sensor with a multimeter can be a useful troubleshooting technique for the DIY enthusiast. While it may not provide a definitive diagnosis in all cases, it can help you identify basic faults and potentially save you a trip to the mechanic. However, it's crucial to understand the sensor's operation, follow the correct testing procedures, and interpret the results carefully. Combining multimeter testing with other diagnostic tools and resources will provide the most accurate and reliable assessment of your knock sensor's health.