How To Test A Knock Sensor With Multimeter
A knock sensor is a vital component in your vehicle's engine management system. Its primary job is to detect engine knocking or pinging, a damaging condition caused by abnormal combustion. When the sensor detects knocking, it signals the engine control unit (ECU), which then retards the ignition timing to protect the engine. A faulty knock sensor can lead to reduced engine performance, poor fuel economy, and even engine damage. Testing your knock sensor with a multimeter is a relatively straightforward process that can help you diagnose potential issues. This article will guide you through the steps and provide valuable insights into knock sensor testing.
Why Testing Your Knock Sensor Matters
Understanding the importance of a functioning knock sensor is crucial. Here's why regular testing, or at least testing when you suspect a problem, is essential:
- Prevents Engine Damage: Knocking, also known as pinging or detonation, is uncontrolled combustion that creates intense pressure spikes within the cylinders. This can damage pistons, connecting rods, and other engine components. A functioning knock sensor allows the ECU to correct the timing and prevent this damage.
- Maintains Engine Performance: When the ECU receives a false signal from a faulty knock sensor, it might unnecessarily retard the timing, leading to a noticeable decrease in power and acceleration.
- Optimizes Fuel Efficiency: By ensuring proper timing, the knock sensor contributes to optimal combustion, which translates to better fuel economy. A faulty sensor can cause the engine to run less efficiently, wasting fuel.
- Reduces Emissions: Proper combustion also minimizes harmful emissions. A malfunctioning knock sensor can lead to incomplete combustion and increased pollution.
- Avoids Costly Repairs: Diagnosing and addressing a faulty knock sensor early can prevent more severe and expensive engine repairs down the line. Replacing a knock sensor is typically much cheaper than rebuilding an engine damaged by knocking.
Ignoring a suspected knock sensor issue can lead to significant problems. Regular testing helps ensure your engine is running optimally and protected from potential damage.
How to Choose the Right Multimeter for Testing
Using the correct multimeter is essential for accurate and safe testing. Here's what to look for:
- Digital Multimeter (DMM): A digital multimeter is highly recommended over an analog multimeter. DMMs provide more precise readings and are easier to read.
- Auto-Ranging: An auto-ranging multimeter automatically selects the appropriate measurement range, simplifying the testing process.
- Voltage (DC and AC): The multimeter should be able to measure both direct current (DC) voltage, which is typically used for power supply testing, and alternating current (AC) voltage, which is used for signal output testing in some knock sensor types.
- Resistance (Ohms): The ability to measure resistance is crucial for testing the sensor's internal resistance and continuity.
- Continuity Test: A continuity test is helpful for checking for broken wires or poor connections in the sensor circuit.
- Input Impedance: A higher input impedance (typically in the megaohm range) is preferable. This minimizes the multimeter's impact on the circuit being tested, ensuring more accurate readings.
- Safety Features: Ensure the multimeter has appropriate safety ratings (CAT ratings) for automotive use, protecting you from electrical hazards.
For basic knock sensor testing, a standard digital multimeter with voltage, resistance, and continuity functions will suffice. However, investing in a higher-quality meter with more advanced features can be beneficial for more in-depth diagnostics.
Testing a Knock Sensor with a Multimeter: Step-by-Step Guide
Here's a comprehensive guide on how to test your knock sensor using a multimeter:
Step 1: Safety First
Before you begin, always disconnect the negative terminal of your car battery. This prevents any accidental electrical shocks or damage to the vehicle's electrical system.
Step 2: Locate the Knock Sensor
The knock sensor is typically located on the engine block, often near the intake manifold or cylinder head. Consult your vehicle's repair manual to find the exact location of the knock sensor for your specific make and model. They often look like small, cylindrical or disc-shaped devices with a single wire or connector attached.
Step 3: Visual Inspection
Carefully inspect the knock sensor and its wiring for any signs of damage, such as cracks, corrosion, or frayed wires. If you find any visible damage, replace the sensor and/or wiring harness before proceeding with further testing.
Step 4: Resistance Test
This test measures the internal resistance of the knock sensor. Here's how to perform it:
- Disconnect the knock sensor connector.
- Set your multimeter to the resistance (Ohms) setting. Select the appropriate range if your multimeter is not auto-ranging.
- Place one multimeter probe on one terminal of the knock sensor and the other probe on the other terminal.
- Compare the reading on the multimeter to the specifications in your vehicle's repair manual. Most knock sensors have a resistance value between 100 and 500 kOhms. A reading that is significantly higher or lower than the specified range indicates a faulty sensor. An open circuit (infinite resistance) or a short circuit (very low resistance) also indicates a problem.
Step 5: Voltage Test (Signal Output Test)
This test checks if the knock sensor is producing a signal when subjected to vibration. This test requires more care and potentially a helper.
- Reconnect the knock sensor connector.
- Set your multimeter to AC voltage (ACV) and set the range to a low voltage.
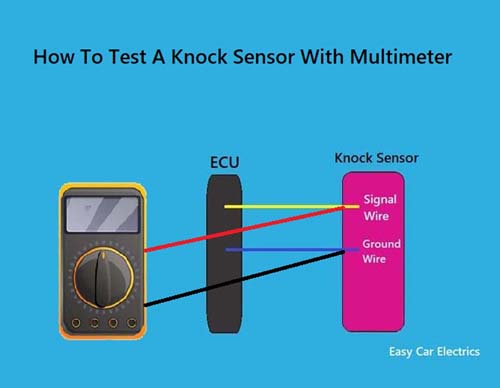
- Backprobe the signal wire of the connector. (This means inserting the probe into the back of the connector without disconnecting it, so the wire is still connected to the ECU. Be careful not to damage the wire insulation.) The other probe connects to ground.
- With the engine running, lightly tap on the engine block near the knock sensor with a wrench or hammer. Do not hit the sensor directly.
- Observe the voltage reading on the multimeter. You should see a fluctuating AC voltage reading when you tap on the engine block. The voltage will vary based on the intensity of the vibration. A reading of 0 volts or a consistently low reading, even when tapping the engine block, suggests a faulty sensor.
Step 6: Continuity Test (Wiring Harness)
This test checks the continuity of the wiring between the knock sensor and the ECU. A break in the wiring can prevent the sensor from functioning correctly.
- Disconnect the knock sensor connector and the ECU connector.
- Set your multimeter to the continuity setting.
- Place one probe on the knock sensor connector terminal and the other probe on the corresponding terminal at the ECU connector.
- The multimeter should beep or display a low resistance reading, indicating continuity. If there is no beep or a very high resistance reading, there is a break in the wiring, and you will need to trace and repair the wiring harness.
- Also, test for shorts to ground. With the knock sensor connector and the ECU connector disconnected, place one probe on the knock sensor connector terminal and the other probe on a known good ground point on the vehicle's chassis. The multimeter should *not* beep and there should be high resistance. If it beeps or shows very low resistance, there's a short to ground which needs tracing.
Step 7: Interpretation of Results
After performing these tests, compare your findings to the specifications in your vehicle's repair manual. If the readings are outside the specified range or if you find any issues with the wiring, the knock sensor or wiring may need to be replaced.
Real-World Owner Experiences
Many car owners have shared their experiences with knock sensor issues and testing. Here are a few common themes:
- Reduced Performance and Fuel Economy: Owners often report a noticeable decrease in engine power and fuel economy when the knock sensor is faulty. This is usually accompanied by a check engine light.
- Difficulty Diagnosing: Some owners found it challenging to diagnose the knock sensor issue initially because the symptoms can be similar to other engine problems. Accurate testing with a multimeter is crucial for pinpointing the problem.
- Importance of Quality Replacement Parts: Owners who opted for cheaper aftermarket knock sensors sometimes experienced recurring issues. Investing in a high-quality OEM or reputable aftermarket sensor is recommended.
- DIY vs. Professional Repair: While some owners successfully replaced the knock sensor themselves, others preferred to have a professional mechanic handle the repair, especially if they lacked experience with automotive electrical systems.
These real-world experiences highlight the importance of proper diagnosis, quality parts, and careful installation when dealing with knock sensor issues.
Frequently Asked Questions (FAQs)
Here are some frequently asked questions about knock sensors and testing:
Q: What are the symptoms of a bad knock sensor?
A: Common symptoms include reduced engine performance, poor fuel economy, engine knocking or pinging, and a check engine light.
Q: Can I drive with a bad knock sensor?
A: While you *can* drive with a bad knock sensor, it's not recommended. The engine might be more susceptible to knocking, which can cause serious damage. It's best to address the issue as soon as possible.
Q: How much does it cost to replace a knock sensor?
A: The cost to replace a knock sensor varies depending on the make and model of your vehicle, as well as the labor rates in your area. Expect to pay between $100 and $500, including parts and labor.
Q: Can a bad knock sensor cause a check engine light?
A: Yes, a faulty knock sensor will almost always trigger the check engine light.
Q: Where is the knock sensor located?
A: The knock sensor is typically located on the engine block, near the intake manifold or cylinder head. Consult your vehicle's repair manual for the exact location.
Q: Are there different types of knock sensors?
A: Yes, there are two main types: resonant knock sensors and broadband knock sensors. Resonant sensors are tuned to a specific frequency, while broadband sensors are more sensitive to a wider range of frequencies.
Q: Is it necessary to use a torque wrench when installing a new knock sensor?
A: Yes, using a torque wrench is highly recommended. Over-tightening the sensor can damage it, while under-tightening can prevent it from functioning correctly. Refer to your vehicle's repair manual for the correct torque specification.