How To Test A Radiator Cap
Radiator Cap Testing: A Comprehensive Guide for the DIY Mechanic
The radiator cap. Often overlooked, but absolutely critical to your cooling system's performance. Think of it as more than just a lid – it's a precisely engineered pressure-regulating valve. This article will delve into the intricacies of radiator cap testing, providing you with the knowledge and skills to diagnose problems, maintain your cooling system, and even understand the underlying principles. Whether you're tackling a persistent overheating issue, performing routine maintenance, or simply expanding your automotive knowledge, mastering radiator cap testing is a valuable asset.
Purpose: Why Radiator Cap Testing Matters
Understanding and testing your radiator cap is essential for several reasons:
- Preventing Overheating: A faulty radiator cap can lead to a loss of coolant, resulting in engine overheating, a potentially catastrophic issue.
- Maintaining Cooling System Efficiency: A properly functioning cap maintains the correct pressure within the system, allowing the coolant to reach its optimal boiling point.
- Extending Component Life: Overheating can damage other components such as head gaskets, hoses, and even the engine block itself. Proper radiator cap function helps prevent this.
- Cost Savings: Identifying and replacing a faulty radiator cap is a relatively inexpensive repair compared to the potential damage caused by overheating.
- Improved Diagnostics: Knowing how to test the cap eliminates it as a possible culprit when troubleshooting cooling system issues.
Key Specs and Main Parts
Before we dive into testing, let's familiarize ourselves with the key specifications and parts of a radiator cap:
- Pressure Rating: This is the most crucial specification, typically measured in pounds per square inch (PSI) or kilopascals (kPa). The pressure rating is stamped on the cap itself. Common ratings are 13, 16, or 18 PSI. Using the correct pressure rating for your vehicle is absolutely critical.
- Pressure Relief Valve: This valve opens when the pressure inside the cooling system exceeds the cap's rating, releasing excess pressure into the overflow tank.
- Vacuum Relief Valve: This valve opens when the cooling system cools down, creating a vacuum. It allows coolant to be drawn back from the overflow tank into the radiator, preventing the collapse of hoses.
- Seals: These rubber seals ensure a tight fit between the cap and the radiator neck, preventing leaks.
- Lever/Ears (if applicable): Some caps have a lever or ears for easy removal.
How It Works: Pressure and Vacuum
The radiator cap's primary function is to increase the boiling point of the coolant. By pressurizing the cooling system, the coolant can reach a higher temperature before boiling. This is because the boiling point of a liquid is dependent on the pressure exerted on it. A higher pressure means a higher boiling point.
When the engine heats up, the coolant expands, increasing the pressure inside the system. When the pressure reaches the cap's rated value, the pressure relief valve opens, releasing excess pressure and coolant into the overflow tank. This prevents the system from over-pressurizing and potentially causing damage (burst hoses, leaky radiator).
As the engine cools down, the coolant contracts, creating a vacuum. The vacuum relief valve then opens, allowing coolant from the overflow tank to be drawn back into the radiator. This maintains a constant level of coolant in the radiator and prevents hoses from collapsing due to the vacuum.
Testing the Radiator Cap: A Step-by-Step Guide
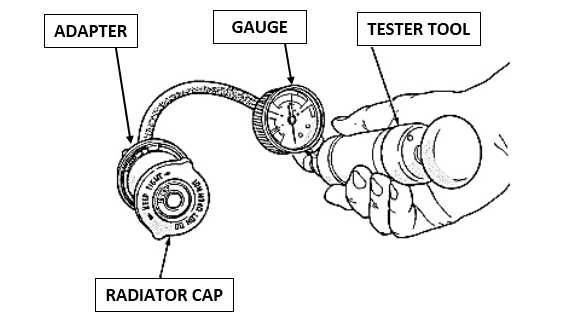
To test a radiator cap properly, you'll need a radiator cap tester. These testers are readily available at auto parts stores. Here's the procedure:
- Inspect the Cap: Visually inspect the cap for any signs of damage, such as cracks, corrosion, or deterioration of the rubber seals. If the cap shows any of these signs, replace it immediately.
- Attach the Tester: Attach the radiator cap to the radiator cap tester, ensuring a tight and secure fit. Most testers come with adapters to fit various cap sizes.
- Pump the Tester: Using the hand pump on the tester, slowly increase the pressure. Watch the gauge on the tester.
- Observe the Pressure: The pressure should hold steady at or very close to the cap's rated pressure. If the pressure drops rapidly, or if the cap leaks, the cap is faulty and needs to be replaced. For example, if you are testing a 16 PSI cap, the pressure should hold steady around 16 PSI. A small, gradual drop is acceptable, but a rapid drop indicates a leak.
- Check the Vacuum Relief Valve (if applicable): Some testers have a feature to test the vacuum relief valve. Consult the tester's instructions for details on how to perform this test. Generally, you'll create a vacuum and observe if the valve opens and relieves the vacuum at the appropriate level.
Real-World Use: Basic Troubleshooting Tips
Here are some common symptoms that may indicate a faulty radiator cap and some troubleshooting tips:
- Overheating: If your engine overheats, especially during normal driving conditions, a faulty radiator cap could be the culprit. Check the cap and cooling system pressure.
- Coolant Loss: If you notice coolant leaking from the radiator cap or overflow tank, the cap may not be sealing properly. Inspect the cap and the radiator neck for damage.
- Overflow Tank Overflowing: If the overflow tank is constantly overflowing, even when the engine is not overheating, the pressure relief valve may be opening prematurely.
- Collapsing Radiator Hoses: Collapsed radiator hoses indicate a problem with the vacuum relief valve. The hoses are collapsing because a vacuum is being created, and the valve isn't allowing air back into the system.
- Low Coolant Light: A constantly lit or intermittent low coolant light can also indicate a cooling system problem. Testing the cap is a good first step in diagnosing the issue.
Troubleshooting Tip: If you suspect a faulty radiator cap, try replacing it with a new one of the correct pressure rating. This is a relatively inexpensive and easy repair that can often resolve cooling system problems. If problems persist, investigate other cooling system components such as the thermostat, water pump, radiator, and hoses.
Safety: Risky Components and Practices
Working with the cooling system can be hazardous. Be extremely careful when dealing with hot coolant or pressurized components.
- Never remove the radiator cap when the engine is hot. The cooling system is under pressure, and removing the cap can cause scalding hot coolant to spray out, resulting in severe burns. Allow the engine to cool down completely before removing the cap.
- Wear safety glasses when working with the cooling system to protect your eyes from coolant splashes.
- Be careful when handling coolant. Coolant is toxic and should be disposed of properly. Do not allow it to spill onto the ground or enter waterways.
- Ensure the testing area is well-ventilated when testing with a pressure tester, especially if using air pressure to operate the tester.
Properly functioning cooling system is critical for maintaining engine efficiency. When dealing with a cooling system problem, taking all of the necessary steps will ensure you are not replacing the wrong parts, or potentially damaging other parts in the system. If you are ever unsure of something, always seek the assistance of a qualified professional.
Remember this article is just a general guide. Always refer to your vehicle's service manual for specific instructions and recommendations.
We hope this guide has provided you with a solid understanding of radiator cap testing. For a detailed diagram of a radiator cap and its operation, as well as the cooling system in general, we have the file available for you to download. It includes a visual representation of the pressure and vacuum relief valves, seal locations, and the direction of coolant flow. This diagram will further enhance your understanding of the radiator cap's function and its role within the cooling system. Contact us for download instructions.