How To Test Knock Sensor With Multimeter
Is your car's engine performance feeling sluggish? Are you noticing a decrease in fuel economy or even hearing unusual engine knocking? A faulty knock sensor might be the culprit. Diagnosing a knock sensor issue can seem daunting, but with a multimeter and some basic knowledge, you can test it yourself and potentially save time and money. This article will guide you through the process of testing your knock sensor using a multimeter, helping you determine if it's functioning correctly and what steps to take next.
Why Test Your Knock Sensor?
Testing your knock sensor is crucial for maintaining your vehicle's performance and preventing potentially serious engine damage. The knock sensor's primary job is to detect abnormal engine vibrations, often referred to as "knocking" or "pinging." This knocking occurs when the air-fuel mixture in the cylinders ignites prematurely or unevenly. By identifying these abnormal vibrations, the knock sensor signals the engine control unit (ECU), which then retards the ignition timing to protect the engine. A malfunctioning knock sensor can lead to poor engine performance, reduced fuel efficiency, and, in the long run, significant engine damage. Identifying and addressing a faulty knock sensor early can save you from costly repairs.
Symptoms of a Faulty Knock Sensor
Recognizing the symptoms of a failing knock sensor is the first step toward proper diagnosis. Here are some common signs that your knock sensor might be on the fritz:
- Reduced Engine Power: One of the most noticeable symptoms is a decrease in overall engine power and performance. Your car might feel sluggish, especially when accelerating or climbing hills.
- Poor Fuel Economy: A failing knock sensor can cause the ECU to constantly retard the ignition timing, leading to inefficient combustion and a drop in fuel economy.
- Engine Knocking or Pinging: You might hear a distinct knocking or pinging sound coming from the engine, particularly under load. This is the sound the knock sensor is designed to prevent.
- Check Engine Light (CEL): A faulty knock sensor will often trigger the check engine light. The diagnostic trouble code (DTC) associated with a knock sensor issue is typically P0325 (Knock Sensor 1 Circuit Malfunction) or similar. You'll need an OBD-II scanner to read the code.
- Rough Idling: In some cases, a bad knock sensor can contribute to a rough or unstable idle.
- Difficulty Starting: Though less common, a malfunctioning knock sensor can sometimes cause difficulty starting the engine.
The Root Cause: How Knock Sensors Work
Knock sensors are essentially piezoelectric devices. Piezoelectricity is the ability of certain materials to generate an electrical charge in response to mechanical stress or vibration. The knock sensor is mounted on the engine block and contains a piezoelectric crystal. When the engine vibrates due to knocking, the crystal vibrates as well, producing a small voltage signal. This voltage is then sent to the ECU. The ECU is programmed to recognize specific voltage patterns that indicate knocking. Several factors can cause a knock sensor to fail:
- Physical Damage: The sensor can be damaged by impacts, corrosion, or extreme temperatures.
- Wiring Issues: The wiring connecting the sensor to the ECU can become corroded, frayed, or disconnected. This can disrupt the signal and cause a false reading.
- Internal Failure: The piezoelectric crystal itself can degrade over time, reducing its ability to generate an accurate voltage signal.
- Loose Mounting: If the knock sensor is not properly tightened to the engine block, it won't be able to accurately detect vibrations. This is because the sensor needs to be in direct and solid contact with the engine block to properly pick up vibrations.
What Happens if You Ignore a Faulty Knock Sensor?
Ignoring a faulty knock sensor can have serious consequences for your engine. Continuously running an engine with uncontrolled knocking can lead to:
- Piston Damage: Knocking can cause excessive stress on the pistons, potentially leading to cracks or even complete failure.
- Connecting Rod Damage: Similar to pistons, connecting rods can also be damaged by the forces of uncontrolled knocking.
- Cylinder Head Damage: The cylinder head can also suffer from the impact of uncontrolled combustion.
- Engine Overheating: Increased combustion chamber temperatures due to knocking can lead to engine overheating.
- Reduced Engine Lifespan: Ultimately, prolonged knocking will significantly shorten the lifespan of your engine.
Recommended Fixes: Testing and Replacement
Here's how to test your knock sensor with a multimeter:
Testing the Knock Sensor with a Multimeter
- Safety First: Disconnect the negative terminal of your car's battery before starting any electrical work. This will prevent accidental shorts and potential electrical damage.
- Locate the Knock Sensor: Knock sensor location varies by vehicle make and model. Consult your vehicle's repair manual or search online for specific instructions. They're typically found on the engine block, near the intake manifold or exhaust manifold.
- Disconnect the Connector: Carefully disconnect the electrical connector from the knock sensor. Inspect the connector and wiring for any signs of corrosion, damage, or loose connections. Clean the connector with electrical contact cleaner if necessary.
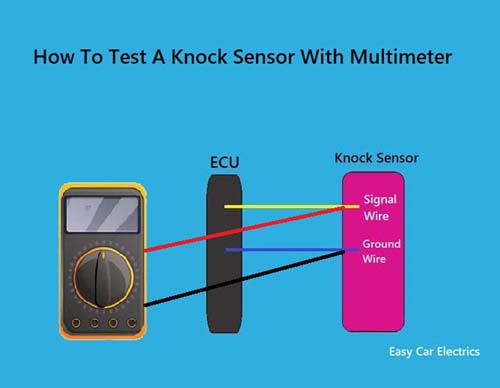
- Resistance Test (Continuity Test): Set your multimeter to measure resistance (Ohms - Ω). Connect the multimeter probes to the two terminals on the knock sensor. The resistance value should fall within the manufacturer's specified range. Refer to your vehicle's repair manual or online resources for the correct resistance value. An open circuit (infinite resistance) or a very low resistance (near zero) indicates a faulty sensor. A common resistance value for many knock sensors is between 100k Ohms and 500k Ohms, but this can vary greatly, so it's essential to find the correct specification for your vehicle.
- Voltage Test (AC Voltage): This test checks the sensor's ability to generate a voltage signal in response to vibration. Set your multimeter to measure AC voltage (VAC). Reconnect the knock sensor's connector. Start the engine and let it idle. Tap lightly on the engine block near the knock sensor with a wrench or screwdriver handle (be careful not to damage anything). The multimeter should display a small AC voltage reading that fluctuates as you tap. The voltage reading will likely be in the millivolt range (mV). If you don't see any voltage reading or the voltage remains constant, the sensor is likely faulty. Be *very* careful when performing this test as the engine is running. Make sure to keep your hands and tools clear of moving parts.
- Check the Wiring: Use your multimeter to check the continuity of the wiring harness between the knock sensor connector and the ECU. Look for any breaks or shorts in the wiring.
Replacing the Knock Sensor
If your testing indicates a faulty knock sensor, replacement is usually the best course of action.
- Disconnect the Battery: As always, disconnect the negative battery terminal.
- Remove the Old Sensor: Use a wrench or socket to remove the old knock sensor from the engine block. Note the orientation of the sensor and any shims or washers that are present.
- Install the New Sensor: Install the new knock sensor, making sure to tighten it to the manufacturer's specified torque. Over-tightening can damage the sensor. Use a torque wrench to ensure proper tightness. Ensure the sensor is properly grounded.
- Reconnect the Connector: Reconnect the electrical connector to the knock sensor.
- Reconnect the Battery: Reconnect the negative battery terminal.
- Clear the Codes: Use an OBD-II scanner to clear any stored diagnostic trouble codes (DTCs).
- Test Drive: Take your car for a test drive to ensure that the issue is resolved and the engine is running smoothly.
Cost Estimates and Shop Advice
The cost of replacing a knock sensor can vary depending on several factors, including the make and model of your vehicle, the cost of the replacement sensor, and labor costs (if you choose to have a mechanic do the work).
- Knock Sensor: The cost of a new knock sensor can range from $30 to $150 or more, depending on the brand and quality.
- Labor: If you choose to have a mechanic replace the knock sensor, labor costs can range from $50 to $200, depending on the location of the sensor and the complexity of the job. Some knock sensors are very easy to access, while others are buried deep within the engine compartment and require significant disassembly to reach.
- Total Cost: The total cost of replacing a knock sensor can range from $80 to $350 or more.
Shop Advice: If you're not comfortable performing the tests or replacement yourself, it's best to take your car to a qualified mechanic. A mechanic can accurately diagnose the problem and ensure that the knock sensor is replaced correctly. Be sure to get an estimate before authorizing any work. When choosing a mechanic, look for one with experience working on your vehicle's make and model.
Technical Service Bulletins (TSBs) and Community Data: It's a good idea to check online forums and resources specific to your vehicle for any common issues related to knock sensors. Also, check if there are any Technical Service Bulletins (TSBs) issued by the manufacturer related to knock sensor problems on your vehicle. TSBs often provide valuable information about common issues, diagnostic procedures, and recommended fixes. Many knock sensors tend to fail around the 100,000 - 150,000 mile mark, but this can vary greatly depending on driving conditions and vehicle maintenance.
By following these steps, you can effectively diagnose and address knock sensor issues, ensuring the longevity and optimal performance of your engine.